
One of the reasons I decided to DIY my own dining room mural was so I could share how to do it with others. Well, I realized about 10 minutes into it that I was totally flying by the seat of my pants and I didn’t know if it would even look good in the end! It’s hard to teach something when I’m just making it up as I go.
This project had been on my mind for a few months, but I kept dragging my feet on actually starting it. As I would begin to formulate a plan and gather colors, memories of a failed attempt at a chinoiserie mural haunted me and intimidated me. Years ago, pre-blog, I decided to paint a white-on-blue chinoiserie-style (sort of an asian toile) mural in our master bedroom. I knew just how I wanted it to look in my head. Jeff was at work, Marshall was napping (he was just a baby) and I pulled out my paint and brushes to make the idea come to life. I got about 2 hours into it and I realized it looked terrible. It looked amateur-ish and not in a charming, folk art sort of way and the scale was completely wrong.
I took out a roller and the wall paint and painted over the mural. When Jeff got home, he never knew I spent the day working on a mural and then painted over it before he could even see it.
So, that memory kept creeping in as I tried to get this started. I had learned my lessons, though, and had a much better grasp of the look I wanted and how to create it. There still wasn’t a detailed plan, but there was enough.
Also, milk paint will wash right off of the walls with a damp cloth, so I could always “erase” and start again if I messed up. (Yes, that does mean this mural will be sealed, so it can’t be wiped off.)

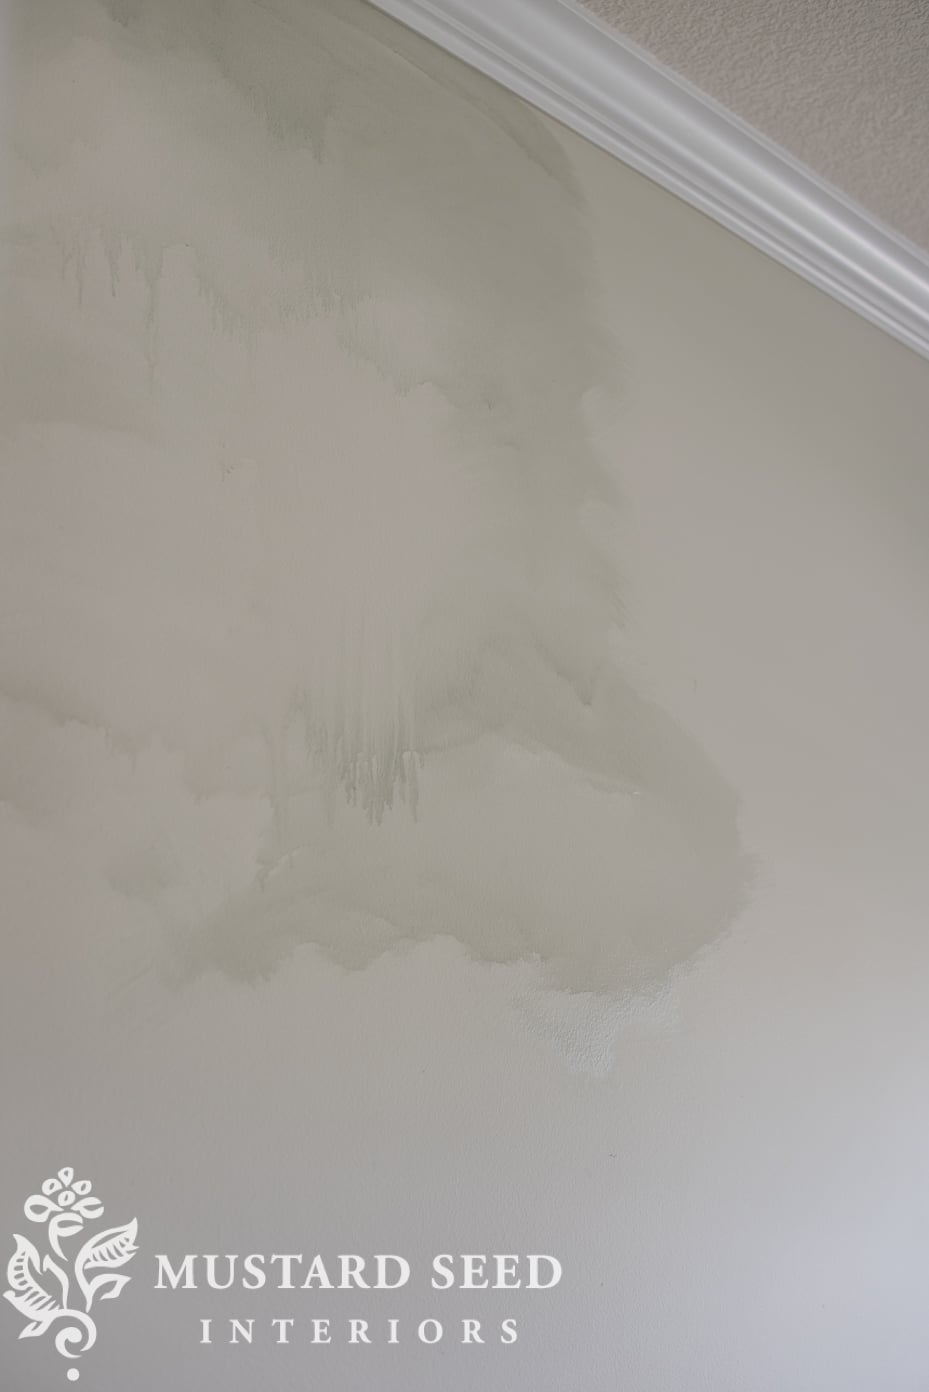
The base wall color is Pearly White by Sherwin Williams in a matte finish. Any nice creamy white will do, though.
As I shared in THIS POST, I started out by brushing on a watery mixture of MMS Milk Paint’s Lucketts Green to create the land. (Click over to that post for more detailed instructions on that part.)

For the sky, I used a watercolor technique to see if it would achieve the soft, barely there color I was hoping for. I brushed water onto small sections of the wall with a 3″ chip brush.

And then dipped the same brush in just a little bit of of a custom color I mixed for the sky (Shutter Gray, Lucketts Green, & Linen) and brushed it onto the wet section of the wall. The pigment flowed and dripped through the water, creating a beautiful effect.

The color starts out a little stronger at the top and gets more translucent as it heads down the wall, giving a sense of depth and clouds.
Similar to the way I painted the grass/land, I painted some distant hills or mountains in a mix of Lucketts Green & Kitchen scale just above the Lucketts Green land.
The look at this stage had me so excited! Even if you just stopped here, it’s a lovely effect that gives a hint of a landscape.

I then added some distant evergreen trees. They were painted in the same color as the mountains and I added a little more kitchen scale for the shadowed side. (In the video below, I show how to paint these trees.)
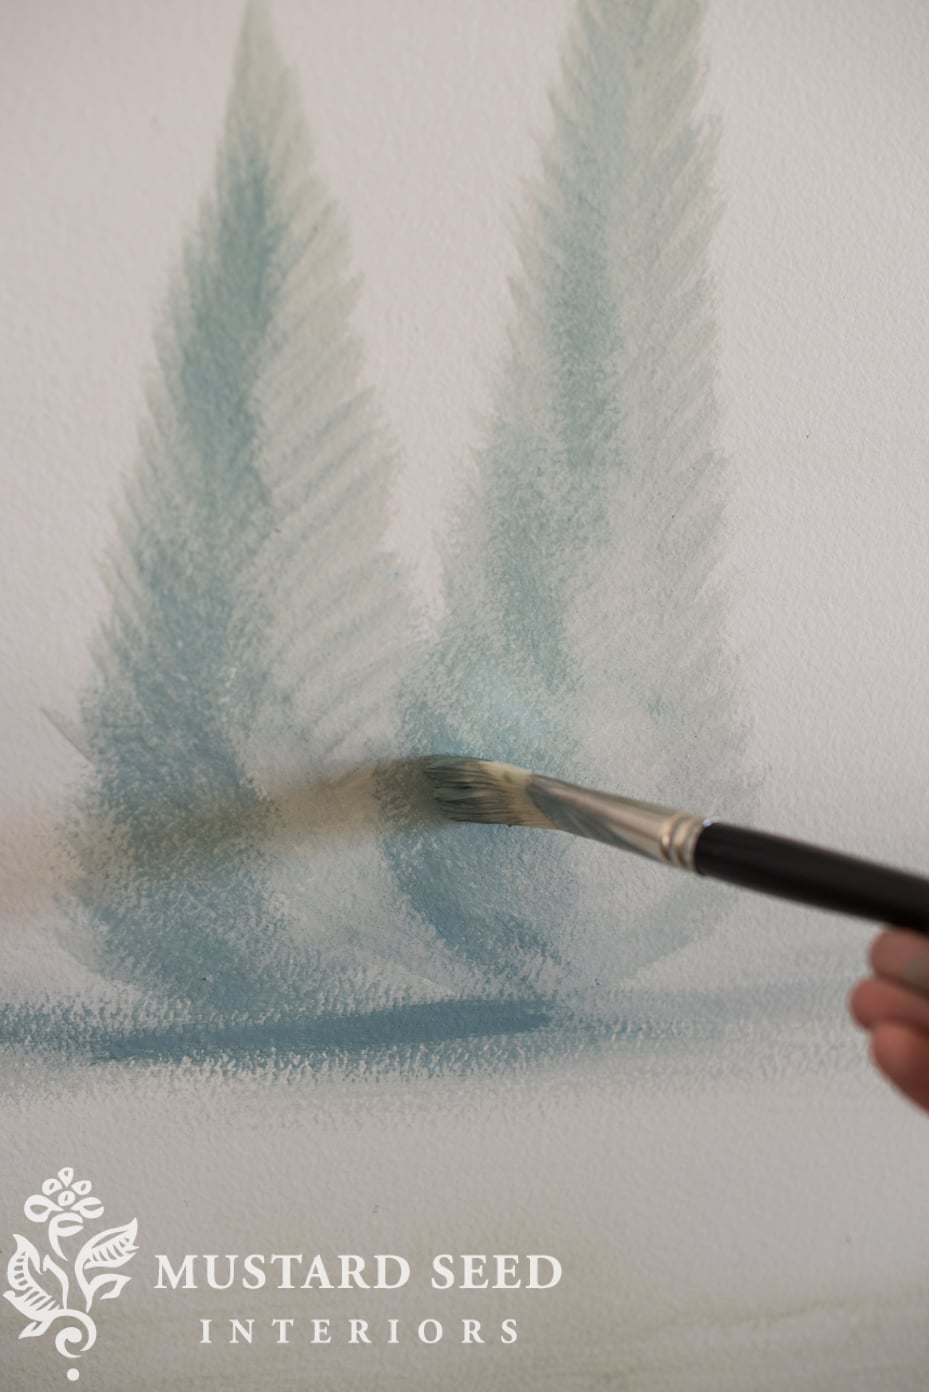
Just to note, the distant trees should sit in front of the mountains/hills, not on top of them. You can also paint some more emphasized land around them, just to give them something to sit on.

For the trees, I started out by drawing the trunk and branches with chalk, just so I made sure I liked the shape and placement before I added paint. Then, with Lucketts Green again, very watered down, I brushed random “clumps” to create the beginning of bunches of leaves. You can already see how a tree is taking shape.

I then added layers of leaves in Boxwood with some Lucketts Green mixed in. I did two layers, mixing the paint a little darker for each layer, so there would be some value variation. This gives the tree a bit more depth, even though it is a very two-dimensional folk art tree. I didn’t want it to look completely flat.

The trunk was painted with Linen and Lucketts Green mixed with a tiny bit of Burnt Umber artist’s acrylic paint. This made a nice, soft brown…
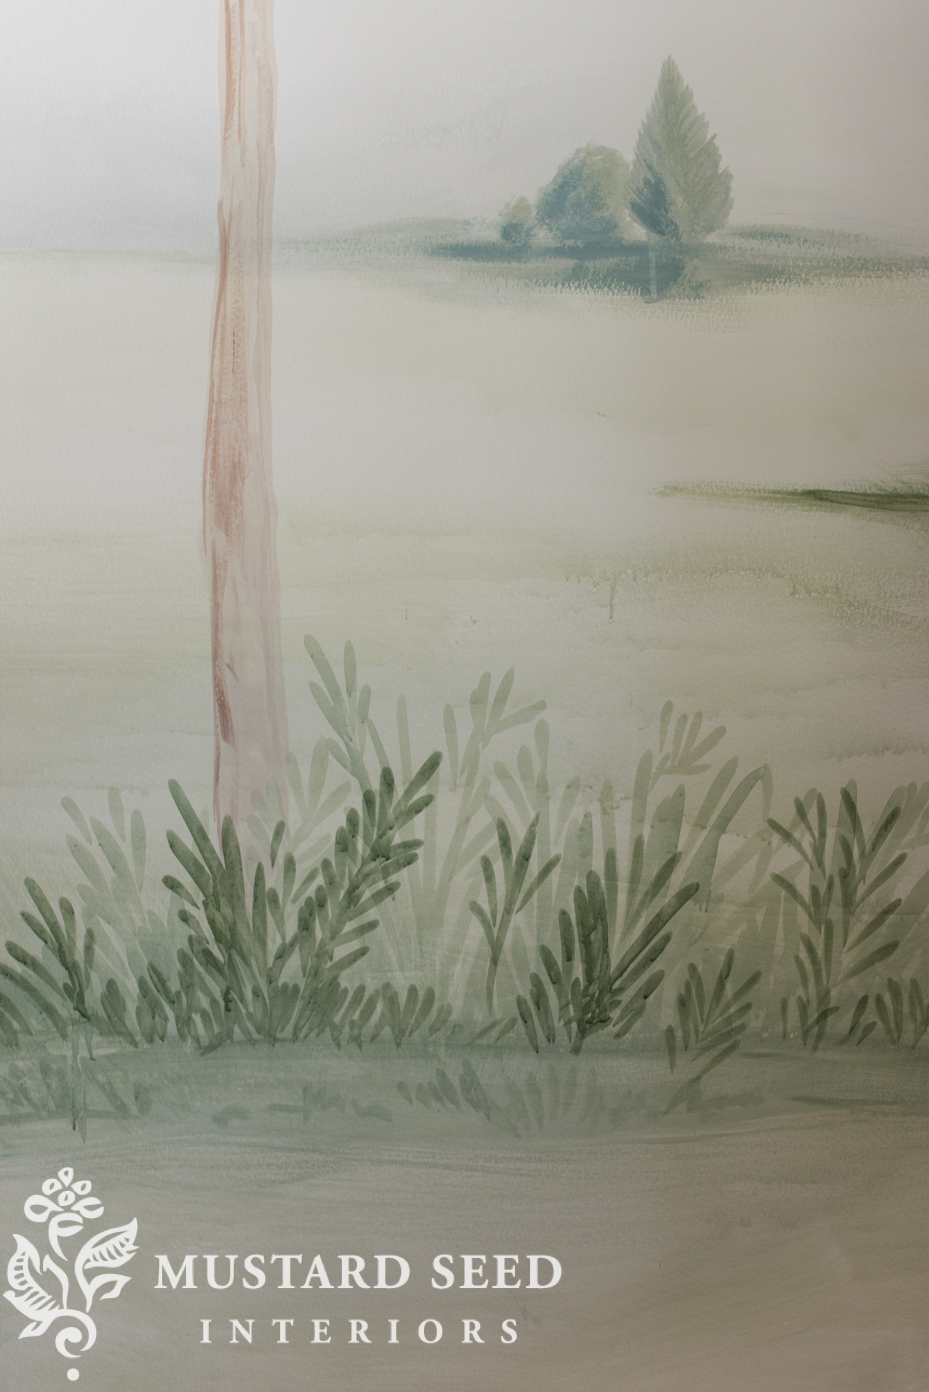
And, lastly, I brushed out some grasses and small brush under the trees and around the mural in Boxwood. As I did with the trees, I added these in layers, with more translucent grasses applied first.
Here is a video showing the strokes I used for the trees and grasses…
I wish I had taken a video of the entire process, because I know this isn’t completely thorough. I hope this will help those who want to do this on their own, though! It’s actually easier than it looks, I think!
And, the best part, this mural required so little paint, you could use sample sizes of MMS Milk Paint and that would be enough! That makes this a huge impact project for very little money.
A few tips for those who are going to give this a shot…
- Relax! It’s just paint and you can always wash it off if you don’t like it. Practice first on a wall you are going to paint anyway, so there is no pressure.
- Make sure your colors are very watery and soft. It’s amazing how much a tiny bit of color can show up when it’s brushed all over the wall. This mural will run away from you and look harsh if your colors are too strong.
- Step back every 10-15 minutes to take in the overall look of the mural. When you look at one of the trees close up, it’s sort of a mess of leaves and drips, but when you step back, it has a great effect!
- Be intentional about it not being perfect. The leaves, grass, everything will look better if they are random and not over-thought. Put on some good music and allow yourself to get into a groove. If you find yourself getting tight, just walk away for a while.
- Remember that your “hand” is different than mine. Trying to copy my mural exactly is like trying to copy my signature or my handwriting. Yours will look different and that’s a good thing! Embrace the uniqueness of your mural created by your hand.
- Don’t judge the mural until it’s done and know that there will always be parts of it that “bother” you. There are a few clumps of grass that I wished I had done a little differently, but done is better than perfect!

I hope some of you will step out and give it a try! Please share pictures if you do!

This week, I have been helping out with a kid’s drama camp at our church, so I haven’t made much head-way on other projects, but I have a lot of my list to tackle in the next 2-3 weeks!


32 Responses
I can’t tell you how much I love this. So, so stunning. Thanks for the inspiration!
I am amazed at all the things you can do. This mural is truly so beautiful. I wish I could have this talent, and I am thankful for the talents I do have. I think talents are God given.. I have one question. I love birds, dogs and cats and the beauty of all creatures. Did you place any small birds or animals in the mural? Could not see all the areas. Also I love the colors you chose,, especially the soft green.
Keep up the great work!
No, I did not. I love the idea, but I wanted to keep it simple. Maybe one day I’ll add some birds or something. 🙂
Marian you inspire me every day. The mural is lovely , absolutely lovely. But I do have a question: should an area of the wall get dirty, is it washable? Because, you know, kids and dogs….. And I love the glass pulls on the repainted butler’s pantry. It’s like a bit of jewelry that dresses up the piece and gives it a bit of formality. Thank you for sharing your talents with us.
At this point, it isn’t washable, so I will be sealing it with a flat polyurethane for faux finishes. If this was in a high traffic area, I would’ve sealed it right away, but given that it’s in the dining room, I’m not in a big rush. 🙂
Oh my, thank you so much for taking the time to do this teaching video for your readers. I learn by watching, then doing, so this is perfect for me. The mural in your dining room is lovely.
I’m in love with the mural!
OH, I just have to tell you I saw a mirror in an antique store today (browsing while waiting on a Drs. Visit) just like the one you have.
It was in perfect condition.
Reduced to 95.00
So, to clarify, if I want to paint something on a wall to be temporary, I could, in theory, just wash it off when I was tired of it?
Yep! After the paint has cured, it would take more scrubbing, though! You could always just paint right over it. Since the washes of paint are very thin, it doesn’t leave a texture on the wall.
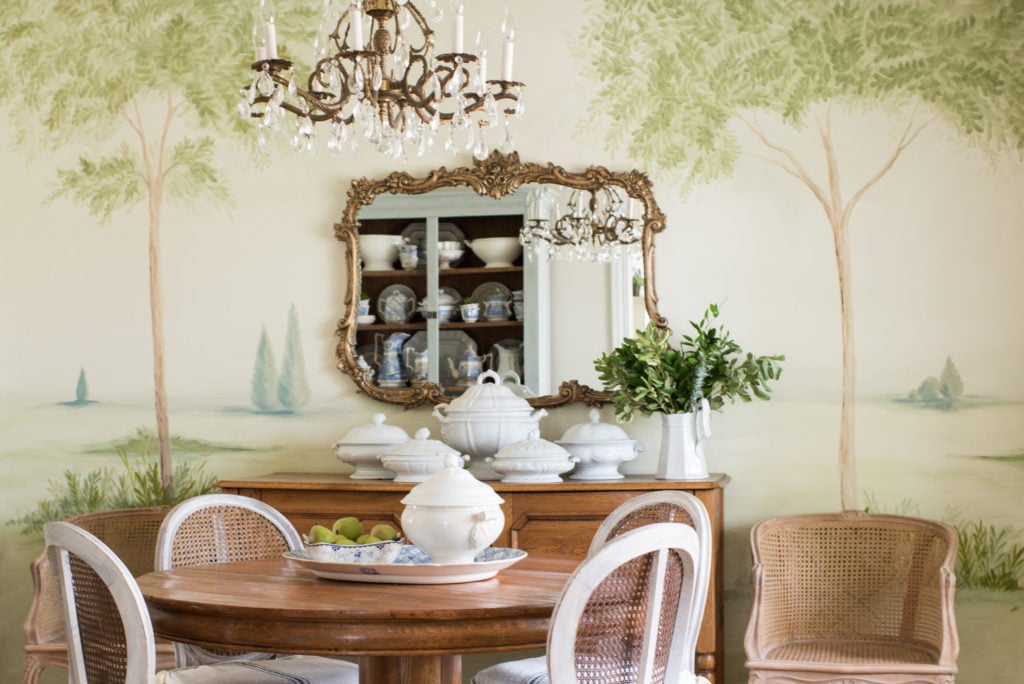
I just love your mural – it gives your dining room such a beautiful Old World look. Congratulations on completing your vision.
Wonderful! I would love a kitchen painted like this!
Thank you so much for the tutorial. I don’t know if I am brave enough to try, but it would be perfect for the dining room at the farm, and with boxwood on lower cabinets in kitchen. I just love the collection of soft colors. And when I showed it to my dh, I didn’t get the immediate rebuff I expected. (That’s an endorsment!) Question… would you say the grass is approx 1/4 of the wall, the mountains and trees 1/4 and the sky 1/4, with the Pearly White color approx 1/4? Thanks again Marion.
I would say the grass is about 50%, the mountains about 5%, and the sky color the upper 30%. That leaves 15% that was just the wall color. Oh, and my ceilings are 9′.
Living in New England I have seen a few “new” murals around town done by professionals. They always
bothered me because they were harsh and not soft and weathered like yours. So you have the look and
it is perfect.
I love “done is better than perfect”–I can’t seem to get to that mindset, but I’m trying!
I really think a video of you actually painting a mural would be so helpful for your readers. To that end, I volunteer a room in my house as a blank canvass for you. Come right on over any time you wish! 🙂
Ha! I agree it would be! I’ve been looking at other walls I could paint. 🙂 Thanks for volunteering yours!
I had been wanting to paint a design on my motorcycle helmet for awhile. But I kept making excuses, because once I do it, that’s it. Will other people like it, etc. Then a couple days ago I put my foot down and created a design I loved and just did it. I LOVED how it came out. Sometimes getting the courage and actually doing it is so liberating. I don’t care if anyone else likes it….Cindy does. 😉
I had an idea for your mural to eventually add at some point. Why don’t you paint your birds, bunnies and blooms from your fabric line in secret places. Kind of like a testament.
Love all that you do. Cindy
Hi Marion,
Thank you for the tutorial! What brand of flat polyurethane would you recommend to seal it with? You are always an inspiration!
Stunning!!! I LOVE it!!! ….and the new mirror too!!!
Okay….now don’t laugh…I am a little bit older then you and when I see some of these projects you have created in your home, my eyes tear up!!! Tears flow. I feel as though I am looking at Gods’ love for His child that is obedient and doing His will. God has given you many gifts. They are happy tears.
Oops you did it again. Made something beautiful that most of us can’t begin to wrap our heads around. This work of art is one of the most beautiful things I’ve ever seen. I studied it a little and I love how the trees are forward but they are faint and delicate enough so as not to overpower what’s in the background.
You should be so proud, your mama should be proud, your husband should be proud, hell-o I’m proud of you! This mural just elevated your already-beautiful-home to the next level.
Gorgeous! Bravo!
Thank you for your inspiration. I painted panels on the sides and the front of the chest of drawers. It’s beautiful in just the four colors you showed. It’s perfect with my soft green walls.
I’m selling this but I’m going to paint an Amoire I have the same way.
You’re the best!
Your milk paint colors are so beautiful in your mural! I didn’t realize that you could just wash them off. You certainly have a gift Miss Mustard Seed. I’m amazed at all of your creations but this one tops them all.
Amazing! It is so obvious this is what you are meant to be doing! Thanks for the inspiration and I love that boxwood color, it’s my fav shade of green!
I love this so much… I keep coming back to look at it over and over again!
#muralstalking
It’s absolutely gorgeous! I love the softness & completeness it gives to your entire room! Amazing…and so is the transformation of your new home. Thank you for sharing!
This is absolutely stunning Marian. The softness of the colours gives it a real vintage-y feel. Thanks for sharing your talents!
I love what you’ve done with your mural — it’s so soft and impressionistic in style. It’s just the perfect background for your furnishings!
This is so beautiful. It makes me want to just sit and look at the walls. I can’t imagine doing something like that in my home although I would if the talent were there. I have a huge wall in my den that something like a mural would be perfect for. The walls and ceiling in your dining room are beautiful colors before you added the mural. Do you mind sharing the colors you’ve used there? From the light coming in, this looks like something I could use in my own home as I’m trying to give it a facelift. Love your work and inspiration. Thanks for sharing all your many talents with us.
I’m not sure about the ceiling color, since it was here already, but the walls are painted in Pearly White by Sherwin Williams.
I like how to decorate your room, it is very beautiful and delicate.