
A few weeks ago, I shared my plan to paint a soft landscape mural in my dining room. The dining room is one of the smallest non-bathroom rooms in the house and it’s square with a large window and two large doorways, making it a little awkward. I feel like it needs something that is a show-stopper in order to make it a special room and I think a mural can be that show-stopper.
When I shared my idea, I also shared my inspiration – Susan Harter Mural Papers. Every mural that I found on Pinterest and Google image searches seemed to be by her. I just love the soft colors and traditional style of her murals, so that was the direction I wanted to go.

Well, one of her clients alerted her to my post and she reached out to me directly. We got along like two peas in a pod. I admire her so much as an artist, an entrepreneur, and how passionate she is about what she does. She also cares about making a custom product accessible on a wide variety of budgets. She sent me samples and we costed out my plan to see if it would work for me to use her mural papers in my room.
I was excited at the idea, since I would be getting “the real thing” instead of my copy. In the end, though, I decided I wanted to paint it myself. I will share all of the details of the process of working with Susan, though, for those who would want to use her mural papers to get this look.
If your interest is already piqued, Susan does offer free samples and you can order them HERE.
Once I made the decision to DIY the mural, I had to figure out my approach. I thought it might be a crazy idea, but I kept coming back to the notion of using MMS Milk Paint for the project. I’ve used it on walls before and I’ve used it for painting landscapes before, but I was still a bit skeptical about it. Did I just want to use it, because it was my paint or would it really give me the look I wanted?
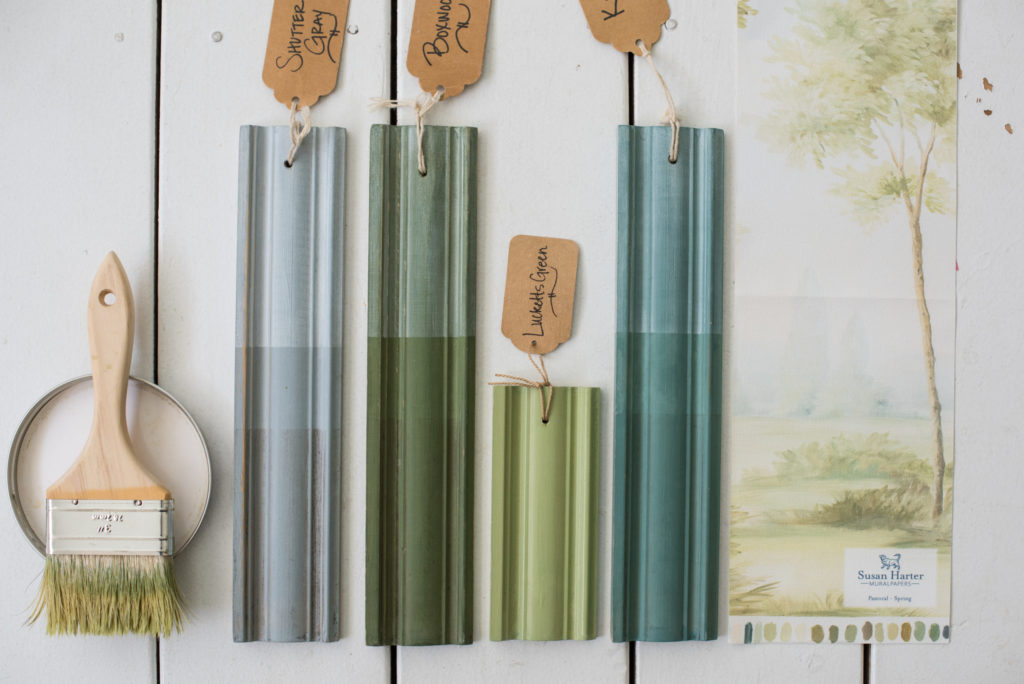
What finally convinced me to try it was the color palette. When I laid them out next to my favorite sample from Susan, the colors were perfect.

From top to bottom, it’s Shutter Gray, Boxwood, Lucketts Green, and Kitchen Scale. Aren’t they perfect? Of course, I’ll need to supplement the palette with some acrylics, but I’ll be able to use milk paint for the bulk of the mural.
On a whim, I decided to test it out this morning to see if it would work. There I was, mixing milk paint and brushing it on my walls while still in my pajamas. I was going to just test it out, but it looked perfect, so I painted the Lucketts Green base on all four walls.

I only used about two tablespoons of powder and mixed it with about a cup of water, so the mixture was very thin. I love how it ended up looking almost like watercolor and it was so simple to brush it on. I did all four walls in about 20 minutes.
I allowed the paint to be a little drippy in some places, so it will give some interesting texture. And remember this is just the foundation, so there will be trees and tufts of grass over it.

I applied the paint with a double-thick 3″ chip brush (similar to this one) in order create lots of texture with the bristles and cover a lot of area quickly.

I just loaded the brush with paint and applied it quickly in slightly crisscrossed, but mostly horizontal strokes.

As I got closer to the “horizon line”, I wanted the color to fade away, so it gave an illusion of depth. In order to achieve that, I dipped my brush in water…

And applied it to the wall, blending it down into the paint that was a little more opaque. I just let color from the brush carry through the water.

The overall result was great! I’m so excited about how it’s looking and I plan to work on it more tomorrow. I am going to raise the horizon line a bit more, so it’s a little higher than the level of the table and buffet. I’ll then start working on adding a hint of sky and some distant foliage and hills.

I’ll be refinishing the dining room table soon as well and I’m excited to see this room come together…


50 Responses
I am loving this. Your work is always the best. I loved all of your landscape dressers and wish I could have purchased one when you were doing while in Gettysburg.
Oh yes! This is going to look fantastic! Love the colors and can’t wait to see when it’s complete. You are so talented, Marian, I’m glad you have this blog to share your skills with us.
I can’t wait to see the finished product! I know it’s going to look so beautiful!
I’ve also been in touch with Susan Harter and she’s great! Unlike you, who are extremely talented, I’m going with her “staircase” mural when it becomes available. Hopefully, it won’t be as difficult as painting the area going down to an ensuite area, but we’ll see.
Your dining is going to be stunning! Good luck and enjoy it when done (and enjoy the process too).
I saw this on your Insta-story last night and it already looks like you! Sometimes we just need to return to our roots to get where we want to be. It’s going to be lovely and can’t wait to see the finished product!
Since you are capable of doing your own mural work, you SHOULD! No one else will have this feature in their home, and you can always change it out again down the road if you change your mind. The bonus perks of being an artist! What others have to pay for, you can do for free. It is going to be beautiful I am sure.
Susan Harter’s murals are absolutely beautiful, but I am happy you are painting your walls so we can see how you do it. This will be so interesting!
I love your idea and so far looks very nice. I’ve always wanted this for myself even as a child. It is one reason I loved visiting Winterthur so much as child and adult. I look forward to watching your progress.
I am blown away by this, almost to the point of a lump in my throat!!! This is the coolest thing ever and I want to try it too!! I will have to see how much more complicated it gets but I have the perfect guinea pig wall to try it on. So cool!!!!!
Marian~
Oh my goodness!!! These are not even my walls, but I have butterflies and CANNOT wait to see all the beauty unfold. It’s going to be stunning! Please show us more pictures along the way. 🙂
Deb 🙂
WOW! Excited to see your mural come to life. It is going to such a lovely feature in the room.
I hope u paibtvyour handsome dog in the mural it will be beautiful ! I’m anxious to see your table refreshed the wood is georgeous and a round table is so lovely for conversation Gale
I hope u paint your handsome dog in the mural it will be beautiful ! I’m anxious to see your table refreshed the wood is georgeous and a round table is so lovely for conversation Gale
Wow! It already looks good. Can’t wait to see more. As Karianne would say, you are amazing!
I love this! You have given me courage to try something like this! It is going to be Amazing!
That mural will do miracles for the dining room. No one will want to eat anywhere else! Bravo Marian!!
Looking forward to it too…please take lots of pics so we can follow your tutorial. Thanks for sharing.
Of course, you should paint your own, since you know how. I cannot wait to see the finished work of art. I know it will be stunning. You never cease to amaze!!!
Now truly, I know nothing about this process, but I would have thought you would paint the sky first??? No???
As I was reading this, I had to force myself to read and not skip down to see the end results!!!! I really cannot wait!!!
God has truly blessed you with an abundance of talent.
Love, love, love! Can’t wait to see more.
I am so excited to watch this room come together! Just seeing the green paint on the wall made my heart leap. It’s going to be so beautiful!
Wow Marian! I can’t wait to see all of this when you’re done!!!
Love it especially the softness. Recently I visited the Rufus Porter Museum in Bridgeton, Me. He was a well known
iternate artist who lived in the nineteenth century in Maine and traveled to NH too. Anyway, they only had one room of his work. To get texture he would use dried corn cobs for trees and clumps of grass as his “paint brushes.”
A friend of mine has a front hall and parlor done by John Avery and son. It is of Portsmouth, NH and has Lafayette on a horse. I know a contemporary muralist but I find that her colors are too harsh. Lafayette is from the 1820’s. Can’t wait to see the finished product. Rufus Porter would always include a little whimsey in his pictorials. He would also use
stencils for the houses. He completed his work very fast and would move on to the next project. Another house just down from my friend’s house also has murals. The bottom panels depicts the “neighborhood” which is very much the same today. I told the owner please please never paint over the work. So far she has listened!
OMG I love this!!! The colors are absolutely perfect… You’ve gotten me all kinds of inspired!
Cindy
I have to admit I was skeptical when you first shared your idea because it almost seemed fussy to me… but WOW does that already look so amazing! I am excited to see it all come together now and you have convinced me that this is definitely going to be some wow factor for what is proving to be a challenging room for you!
The green base is beautiful. I’ve been curious about using your paint on walls ever since you & Kriste put it up in her house house. I’m guessing it holds up well? And how smooth are your dining room walls? I love your colors — do they work on textured walls? Thanks!
Great ! I knew you could do it! Enjoy the journey. It will be fun!
It’s going to look soooo awesome! Love it so far and so glad you’re painting your own mural. Good for you!
It will be fun, enjoy this time, thanks for taking us along.
Bravo! I also applaud what looks to be a mid to light value composition with few deep dark contrast details
I can totally visualize this coming together. What a perfect way to use MMS Milk Paint as this is your pallet!
I am so excited to watch the progress on this!!!
Dear Marion,
Your style and talent just shine with this mural. Your dining room will be stunning, (it’s pretty great right now). Thank you for being brave and showing us, we can do it too!
Oh my gosh!!! This is going to be beautiful!! I can’t wait to see the finished project!!
Gutsy and creative!!! I love the fact you were still in your pajamas..,
Oh! Marian! This mural is going to be so beautiful. I’m so happy that you decided to paint this yourself. You are blessed with so many talents. Everything you do, turns out so lovely. Looking forward to seeing the end result! Blessings!
When you use your milk paint to do a mural, whether on furniture or a wall, can the original base paint be any type and finish ( chalk,latex or oil flat, satin eggshell etc. ) or does the piece have to have a new base paint to start?
Am soooo anxious to see the completed work. It’s going to be fabulous!!
It’s like all your hard work on 100 landscapes has led to this moment. Very cool.
I really like this idea! I look forward to seeing your progress!
I too have started a mural in the kid’s recreation space. I am working
on a lake scene. It will be more folk art style. I was thinking about
milk paint and/or chalk paint and dismissed it. You have got me
reconsidering! God Bless! – Heidi from Ohio
It will be so fun to this all come together! What a wonderful idea – kind of reminds me of all the landscape pictures
you took on that first trip you took to our beautiful Minnesota – particularly the Rochester area.
I love the colors you will be working with. Can’t wait to see your finished room. Beautiful!!
Our Father has blessed you with such talents.
You are a very talented lady and you have a beautiful home but many of your projects are hard to do when you have a very tight decorating budget . Would it be possible to do some projects that a person could do that is on a tight budget ?
Actually, this project would be great for a tight budget. All of the paint for this would be around $50. Also, if you look back in my archives, I share a lot of tips about using drop cloths for slipcovers and even nutty stuff like gluing moss to tennis balls to make vase fillers! 🙂
I’ll try to share even more budget-friendly ideas, though, and also share how a project can be modified. The first few years we lived in our house in PA, I had almost no money for decorating, so I got very creative!
What a formidable project, I admire you for taking it on!! The colors are beautiful, can’t wait to see the finished product!
My heart actually started beating a little faster when I saw your plans and then saw the beginnings on the wall. I am crazy excited to see how this turns out! I too am a big fan of the landscape dressers and this is going to be a true “Mustard Seed” mark on your home.
Please do a video. I would love to do one in my hallway. I think if you did a video it would give me the confidence to try it myself. I keep coming to your website to check for the next installment. Can’t wait!
I didn’t think that I would like a mural, but I love it. Great job Marian!
Miriam, a tip: if you raise the horizon line to get above the buffet, you’ll end up with the horizon line hitting in the middle of the wall. If you study landscape paintings (including Susan’s murals), the composition looks “off” if the horizon line is dead in the middle of the canvas. Aim for 1/3 land to 2/3 sky and the proportions of your mural will feel more natural.
Nice room, I really like the room decoration like that.