

Before I get into the post about our ensuite bathroom (master bathroom) makeover, I wanted to let my blog readers know that I’m going to take next week off. I have had a lot of work on my plate outside of the blog (all fun and exciting stuff that I can’t wait to share with you) and I need to take a week to put my work focus solely on those projects. I’ve really been trying to do too much simultaneously and I’m feeling a little scattered. I know it’ll help me so much to set a couple of things down in order to do other work with excellence. So, I’ll pop onto Instagram here and there, but I’ll be quiet here on the blog next week.
Our master bathroom (ensuite bathroom) is finished, but I haven’t shared very much of the process here on the blog, so I thought I would back up a little bit and share the progression. Here are a few before pictures of the bathroom to remind you what it looked like…


I’ve said this many times in posts about this bathroom in the past, but I’ll say it again… This is the best bathroom we’ve ever owned. It’s big, it has a great layout, I love the big, deep jetted tub and the vanity cabinet. We have never had two sinks, a separate tub and shower, or so much storage. It’s an awesome bathroom and I didn’t want to do a gut-job on it, but I envisioned the space with customized finishes that made it feel more luxurious and more my style. As you can see, the shower was just a cheap plastic insert and the tile is all 18×18″ builder-grade beige.
There was also the standard large plate mirror and some basic lighting fixtures.
Before the new countertops to go in, Jeff and I had to remove the plate mirror. We were both nervous about shattering this huge mirror in the process, but it was actually very easy to remove. We taped it with duct tape in case it broke, removed the clips, and eased a couple of shims behind the mirror. The shims start to slowly slide down behind the mirror, creating pressure on the construction adhesive holding it in place. It took just a minute or two and then the mirror just popped off.

We carried the mirror down to the basement to hang when we turn the playroom into a workout room.

With the mirror out, we had the new counter installed (with under-mount sinks) and had an electrician raise the boxes for the lights. I always thought they were a little on the low side and the new lights were going to hang lower. I didn’t want the mirrors to be crowded.

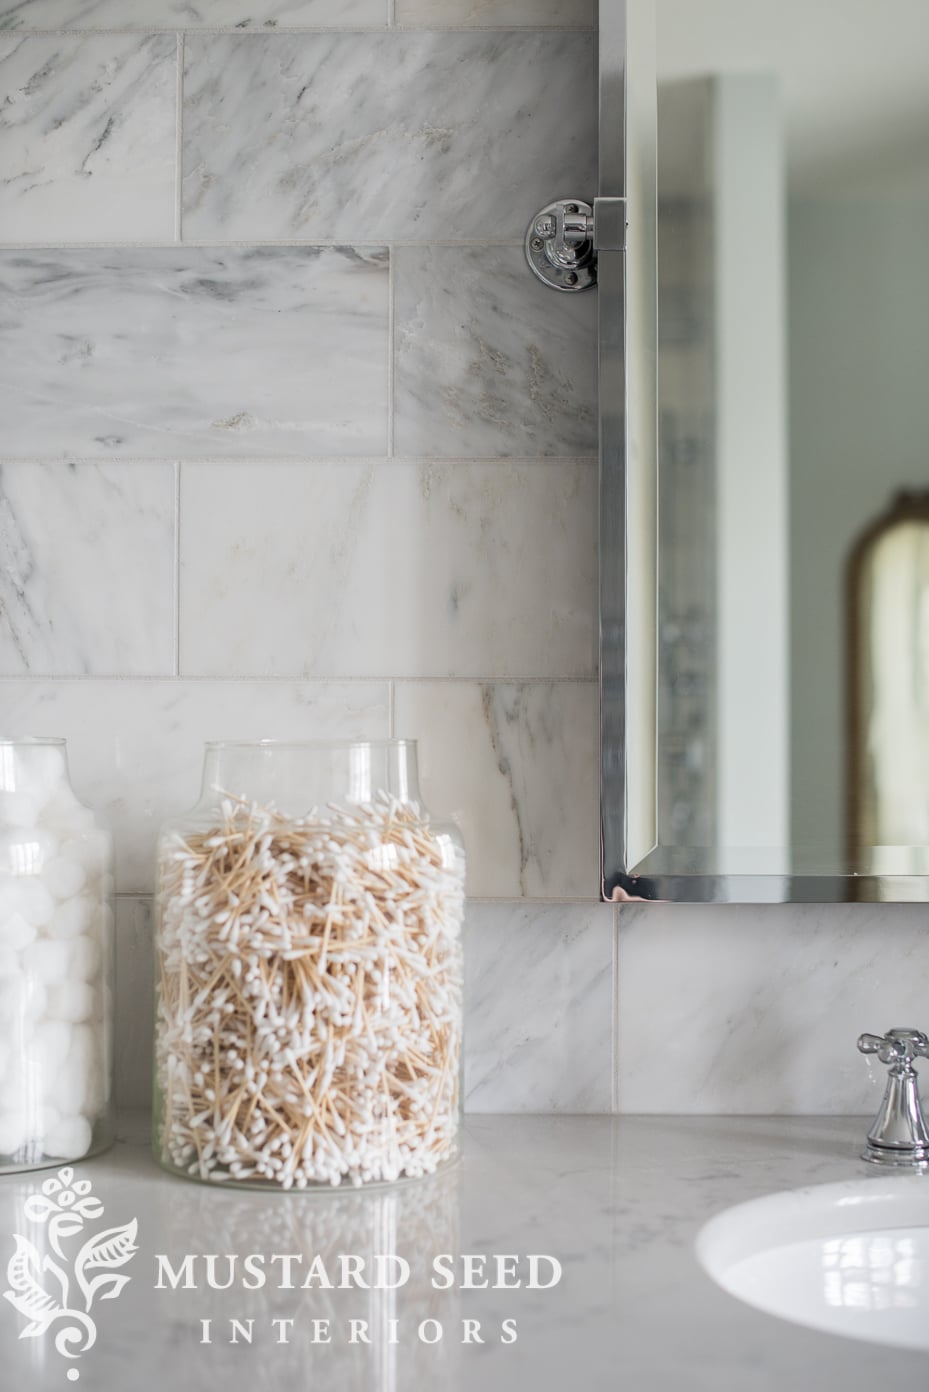
(I’ll link to sources in this post, but HERE is a post with all of the sources of the products and materials we used.)
We actually had to have the electrician come out one more time to move the boxes again, because they weren’t centered over the sinks! One was just a little bit off, but the other one was off by over an inch. We were having the wall tiled, so it had to be right.
Our tiler, by the way, was fantastic. His name was Matt Grant of Grant Tile in Rochester, MN. He was meticulous and definitely went the extra mile when it came to helping me plan and manage the project. I shared before that I originally wanted to install 3 x 6 subway tile, but it was about 1/2 the cost to go with the 6 x 12 instead. It gives me the same look for a lot less. Since we made some splurges in this ensuite bathroom on the counter, fixture, and lots of tile, I wanted to save where I could.

The nice thing about replacing the plastic insert with a custom tile shower is that we added about 5-6″ of width and depth to the shower without having to knock down any walls or move anything around. We did have to get a permit for the plumbing we had done (adding a handheld shower in addition to the rain head), but everything else was cosmetic.

Because the shower required specialized plumbing, was built from scratch, and we opted for a glass door, it was the most expensive part of the project by far.

I selected 6 x 12″ tile for the walls and 1″ hex for the floor, so that it wouldn’t be slippery.

In order to replace the tile around the tub, we had to remove it. Like the large mirror, we thought it would be much harder than it actually was. Jeff and I helped Matt lift the tub out pretty easily.

I wanted the wall around the window to be a feature, so I had the tile installed on that entire wall. It really does frame it out nicely and look pretty behind the arch.

My mom and I painted the walls in Stonington Gray (1/2 tint) and primed and painted all of the trim when other work wasn’t happening in the room.

I painted a shelf found at a consignment shop to hang in the niche above the tub. You can find that makeover HERE.

There was one bit of beige tile on either side of the cabinets under the tub that couldn’t be removed without ripping out the cabinets. So, I just primed and painted them white to blend in with the cabinets and trim.

The entire process was inconvenient and messy! This is what our bedroom looked like for almost a month! We were just making cosmetic changes, but the upheaval and duration made it feel like a full renovation.

Once all of the work by the pros was done, it was my turn to finish up… reinstall the show molding, touch-up paint, hang hooks, and paint the cabinets. These pictures were taken before I painted the cabinets and replaced the hardware.

|
I am so, so glad I had the vanity wall tiled. It really sets off the mirrors and fixtures and makes the wall a focal point. It’ll also be easier to wipe down and keep clean than painted drywall.

| counter | | | | marble tiles
As I said, our tiler installer went above and beyond and helped us install the mirrors. They pivot, so you can tilt them up or down.

The shower is worlds better than what we had! Not only do we love the combo of the hand-held sprayer and the rain head, but there is a lot more elbow room. It just feels and looks nicer.

One note, the plumbers installed a brushed nickel drain, but we replaced it with a chrome drain to match our fixtures. It’s a little detail that looks sharp.

This is the grout color we selected for all of the tile and it looks beautiful with the marble. It sets it off without being too high in contrast. And it’s not white! I have done the white grout in marble hex tile and it was so hard to clean. I did buy a steam cleaner as a part of the bathroom makeover in order to clean the grout, tile, and glass shower door. I figured it’s a protection of our investment and will keep things looking nice and clean!
Although, when I was cleaning it the first time, I felt like there should be a magical rule that brand new bathrooms wouldn’t get dirty at least for a year. That’s just not the case, though. This pretty ensuite bathroom needs a good weekly cleaning just like all of the others.


I finished painting the cabinets and installing a new rope light under the cabinets last week, so it’s all finished! Well, I still want to hang some art, but I’ve hit a wall of decision fatigue in this room, so I’ll give myself a break until I feel inspired again.
I will share some project management tips in a separate post, but let me know if you have any questions!


50 Responses
Looks beautiful so far. You mentioned that you purchased a steam cleaner to keep the bathroom clean. My question is have you ever used a steam cleaner for this purpose and which cleaner did you decide on? Thanks! Keep up the good work!
Penny, I was thinking the same thing. I also need the answers to your question.
Marion, your master bathroom makeover is absolutely stunning!
Thank you, ladies.
I’ll do a whole post on steam cleaning, since there are so many questions about it. I have used a steam mop for my floors for years and it’s the absolute best way to clean tile, hardwoods, the painted floors in my studio, etc. This is the first time I bought a steam cleaner that has multiple attachments, so I can use it on grout lines, the toilet, glass shower door, fixtures, tiled shower walls, etc.
It is all so beautiful! I’m sure you are enjoying it so much! Can you share what steam cleaner you chose?
Beautiful and peaceful bathroom! Great transformation! I’m interested in how you painted the cabinets, type of paint and prep treatment, and any sealer. Cabinets frighten me and it’s a big project on my list. Thanks!
Hey buddy, can you spare a Q-tip???!!
Everything looks FAB!!!! Love all the choices!!! You had a great room to work with, as it was nice before…..just no WOW factor. It REALLY has the WOW now.
So funny Addie! 🙂
Love this!!!!! We’re doing our bathroom as well now. I wanted to wait till we did our floors but our builder grade bathtub started to make seriously loud pops and cracks which motivated my hubs into action. And I was inspired by my beautiful chrome cross handle shower fixtures (which I’m hoping we can save and reuse in the downstairs bathroom) to choose chrome and give it a (hopefully) vintage feel. Love the choices you made! Good luck wi the everything!
Beautiful bathroom! I would love to see photos of how you accessorized it.
What steam cleaner did you choose?
I am so jealous – in a good way. Love your choices. Even really liked your before but wow, this is over the top amazing.
Your bathroom looks beautiful! I have the same type of mirror in my bathrooms and want to change the mirror and lights to something like yours. I’m saving the pictures to show my husband.
It’s absolutely beautiful.
I love your style and classic choices!
One question: Are you concerned with the tile floor being cold on your feet in winter? I love the look of tile, but the coldness is a concern for me. Or maybe you are having the tile heated underneath?
We have always had tile in our bathrooms and I’ve never found them to be unbearably cold. It would be a luxury to have a heated floor, but it would’ve been a huge expense, so we didn’t go that direction.
Where did you get the large jars for q-tips etc?
Would you please share where the jars with 1-tips etc came from?
The new bathroom is stunning! I love the look of the new mirrors, however they cover a much smaller surface area than the old mirror. Is the room darker? Do you regret the smaller mirrors?
I was concerned about that, but we added two extra bulbs (we went from two 2-light fixtures to two 3-light fixtures) and the mirrors are large! I don’t even miss having the extra mirror and we have more light.
I’m wondering gabout the steam cleaner you chose also
It is wonderful!
Rope light under the cabinets? I’d love to hear more about that.
Me too! Would love to see a pic also.
Job well done.I love it! It’s very classic and you’ll be happy with it for ages. Enjoy that big tub.
It looks beautiful! Did you change your floor, too? What style of shower door did you get? We’re about to have our master bathroom gutted and remodeled and your shower looks like the idea in our heads. We’re redoing the bathroom floor as well, so I was trying to see how your marble tile looks with your floor. The contractor we’ll probably choose, mentioned using rectified tiles in the shower so the grout lines can be more narrow. Also friends have told us to use a “new” kind of grout that resists mildew and stain. Did your contractor mention either of those things regarding your selections? I’d love to see a picture of your shower door as we want a frameless shower door, so I am curious about your selection. I know you’re enjoying it! Lovely choices!
Very nice indeed ! The tile size and material looks classic!
Looks terrific! Very clean, very fresh. I love the quiet vibe in here.
It’s beautiful!!! I would also like info on the steam cleaner. Do you use it on the glass too? I have glass. I’ve used everything and cannot get it clean. Thanks. 🙂
Lisa, my shower doors were 20 years old and looked like they needed replacing. I found a recipe for “the best shower cleaner ever” on Pinterest. I had tried everything. 1 cup epsom salts, 1/2 cup baking soda and 1/4 cup Dawn dish liquid. Apply in circular motion. Leave on for 10 minutes. Wipe off with wet sponge and rinse. The glass looks as new as the day it was installed. Good luck!
So beautiful – as usual! Does the marble need any kind of special / regular care? I would love to use marble but it’s softness and susceptibility to scratches and staining have me suspicious.
All the same, marble has been a standard, high end bathroom finish for a LONG time and will always look amazing!
Your new bathroom looks terrific. Great job that you were able to do a lot of the finishing touches yourself. The only input I have is this,,,, I have a few large glass jars in my master for trips, cotton balls, etc on my vanity. My suggestion is to get lids for the jars -They are going to get steamy in the bathroom and get damp. Also for the lavender bath salts – they will be damp, could get clumpy or even moldy – especially in the winter with the heat and steam from the shower and tub. Just a suggestion from my own experience. Are those wooden q-tips? From where?
The q-tips are from Amazon and I linked them in the post (right under the shot of the q-tips.) I actually do have lids for the jars, but Jeff would always leave them off and just sitting on the counter, so I put them under the sink. I’ve had them lid-less in this bathroom and the last for over five years without any problems with moisture, etc. We’re in and out of them regularly, so dust isn’t really a problem, either. I just have to clean the outside of them as they get dusty and sometimes splattered with water.
This is the bathroom of my dreams. All your changes are beautiful. I just have one question. Every single shower niche I see is on the wall that faces out where it is in full view. I hope to redo our own bathroom someday but want to have the niche on the wall opposite the shower head, so behind the person showering and not in full view when you look at the shower head on. I just think it will look better with a full wall of tile on that wall (and I hope to put in a glass partition to open up the small room–no more shower curtain). Anyway, is there a reason that the niche goes on that wall? I can’t recall seeing anywhere where someone has installed it where I want to put ours.
I am with you. We too have newly minted master bathroom. I regret not putting the niche on the far end…… Oh well next time around, maybe.
Beautiful!!? Am also wondering what type of steam cleaner you have??
Beautiful, thanks for sharing and inspiring. What color white is your trim?
The title said “Ensuite” bathroom makeover…I first read it as “Exquisite”…I was right! It is exquisite.
This bathroom looks very pretty and I like how you put things together. I’m with the crew asking the stem cleaner question.. Also I would like to know do they realyl clean the grout?
The bathroom make-over is beautiful!
Can you please explain how the mirrors were hung on the tile wall? Thanks!
Can you add a link to your wide mouth jars (q tip, bath salt ones)?
It looks amazing….great job!
I would like info on the following:
Steam cleaner
Under counter rope lighting
Why you did not tile the whole wall to the right of the window at the end of the tub
The makeover is beautiful.
Really nice cosmetic remodel! My I add one extremely luxurious feature that you will never miss until you try it? Heated toilet seats! Having spent some time in Japan where they are standardly in every bathroom, I insisted on getting an outlet installed within reach of the toilet for the new seats in the three remodeled bathrooms. Really exquisite. All guests who use them are immediate converts. Add plumbing if you want the bidet option.
It turned out beautiful! Here’s my tip for a glass shower door and tiled shower. Keep a magic eraser in your shower and use it on the tile and door once a week. It’s easy to do at the end of your shower and you don’t get wet trying to rinse it when you aren’t showering. We have had a glass shower enclosure for 10 years and there is no hard water haze due to using a squeegee after every shower and the magic eraser once a week.
Hi Marian. You mentioned that you purchased a steam cleaner once you finished the renovation. May I ask which one you purchased and how do you like it?
Hi. Great new looks! I have a personal distaste for single objects on the vanity. I am guessing you aren’t totally finished because I expected the loose items in the left side of the vanity top would be in a shallow basket. Am I right? Question is how well do I REALLY know Miss Mustard Seed?!
Long time fan, Bess
Everyone,
In one of Marian’s replies above, she stated that she was going to do a whole blog post about the steam cleaner and the steam cleaning process of the new bathroom.
Marion, I hope you believe that copying is the highest form of flattery. I ordered the tile from marble Warehouse I told Hamid I saw on your blog he was so nice and impressed you gave his information for where to order. I got my order in less than a week. I am waiting for the rest of the reveal so I know what to do. Lol. Thank you for the inspiration.
I don’t know if I missed it, but I would like to know the name/brand of the sink faucet. So pretty-the entire bathroom!
Very useful iinformation within this blog. I appreciate your makeover for choosing a unique design style. It is so beautiful.
Somewhere along the line, I missed this reveal. It’s stunning and so timeless! I love the new look and love that you also used some of the things you had seamlessly.