
I recently made slipcovers for my kitchen chairs and, I reserved the last one for the purposes of making a tutorial as I worked on it. I posted a dining chair slipcover tutorial HERE a few years ago, but the style is slightly different and the tutorial is in pictures and written directions. You can check that out, though, if you learn better that way. This tutorial is all on video, because I think that’s an easier way to show you everything I’m doing.
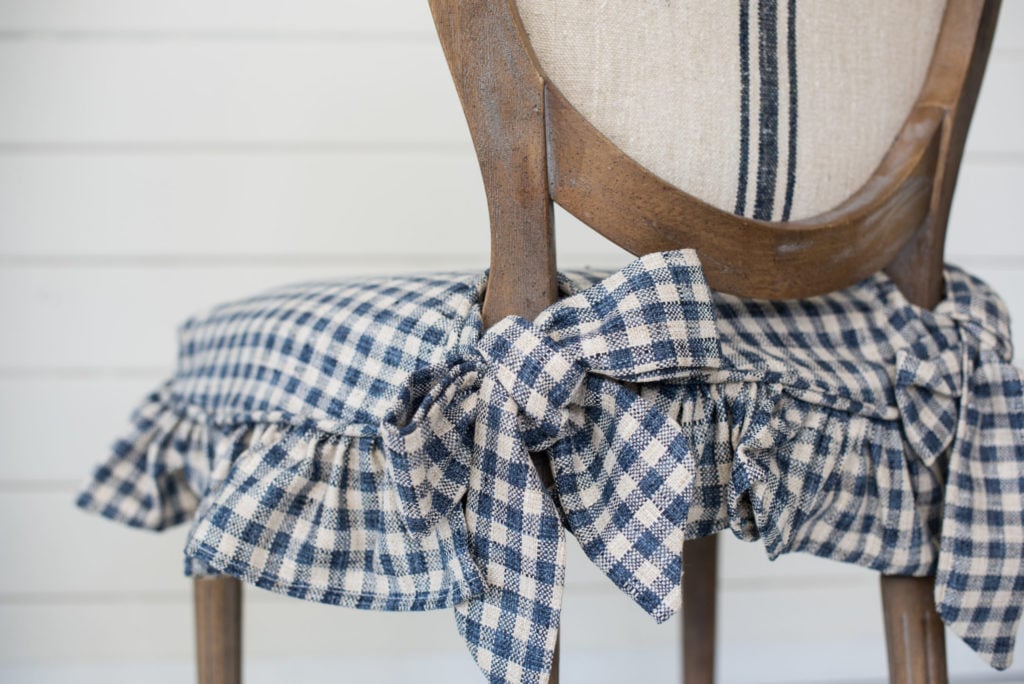
The style of the slipcover is tie-on with a ruffled skirt. You can make variations of this slipcover to have a longer skirt, a micro ruffle, a pleated skirt, or even something that looks cleaner and more modern, like a kick-pleat. You can also change out the ties to be thinner, use ribbons or twine, etc. The principles are all the same.
Here’s is what my finished slipcover looks like…

I didn’t include a specific cut list in this post, because that can change based on the size and shape of your chair. I do review the pieces you’ll need in the video, but here is a list…
- 1 piece a couple inches larger (both length and width) than the seat area you want to cover.
- 1 piece for the skirt that is twice the circumference of the chair and about 4″ wide. This is a long strip, so you will most likely need to sew two or three pieces together. Hem one of the long sides of the strip to make the skirt.
- 1 piece of custom piping that is long enough to wrap around the chair once, plus a little extra. (HERE is a tutorial showing how to make custom piping.)
- 4 pieces, approximately 5″ x 18″ for the ties. I’ll explain how they should be sewn in the video.
And, just a head’s up, the video is about 35 minutes long, but I show every detail and also share a bunch of tips for those new to sewing and slipcovers. I figured it was better to include more information and people who don’t need it can zip through to the parts they need.
And here is how the slipcovers look in my space…

In addition to the color and texture they bring to the room, they also add practicality. Spills are simply going to happen in a main eating area, but these can be removed and washed as needed.
A tutorial showing how to upholster the chair backs is coming soon…


15 Responses
Beautiful chair seat slips! Fantastic job! Love your patience as you explain the process. I do make slipcovers occasionally—and, I have such a one track mind that I don’t think I would be able to sew and give a lesson at the same time… 🙂
Also, I love your ability to be fine with the way things work out….slipcovers are quite time consuming…and, it is really difficult to sew these I think if you are a perfectionist. I love the smaller check on your chairs! The larger checks will be perfect somewhere—-love your attitude. Thank you for sharing!
debbie
Hi Marian,
Beautifully done and perfectly explained!
The covers are really pretty and full looking.
Absolutely beautiful! Your entire home is just gorgeous!
Very valuable information, what you have written is not on all blogs that I’ve come across.
I love these! Can you please share details on the fabric? You always seem to find the perfect gingham ?
Thanks!
I have enjoyed watching all the changes you have made in your new home- turning it into “your own”. It is beautiful! Also I appreciate your patience in the process. I find it not easy to have to wait and not have it all done at once.
one question, where do you find the aprons you wear in some of your video? I love they way they provide sure great coverage?
That apron is from Me & Mrs. Jones in Memphis, TN. She doesn’t sell online, but you can contact her about the apron I wear and she will know just what you’re talking about!
Hi Marian, it came out beautiful! Thanks for sharing your experience and explaining things so well!
Thanks for this amazing tutorial, Marian. You are an excellent teacher! I am going to look forward to the chair back tutorial!
Have a great week and thanks, so much, for all the wonderful help you give us in “personalizing” our homes! Bless you! We really appreciate you!
Hi Marian: Beautiful as always. I have a question though. I have never been able to get my dining chair slipcovers to stay in place. Every time someone gets up from the chair the slipcover needs to be repositioned. Any tips on this?
Heather
Yes, Marian, please share with us the maker of your check pattern. It’s delicious! Please and thank you, Gina
Hi Marian, c’est magnifique as we say here. Thanks for sharing. I hope i’ll be able to do this. I don’t understand everything you’re telling (my English is not fluent) but your video is so well done. Thanks.
Martine from countryside in Belgium
Hi Marian!
Just a quick question. It looks as if you might be using a industrial sewing machine-do you think someone could use a home sewing machine for this specific fabric?
Yes, if you have a heavy duty machine, but know that the machine will have a tough time with all of the layers of ruffles and welting. Get heavy duty needles and replace them often. I used a standard machine for years and was able to do most of what I needed.