
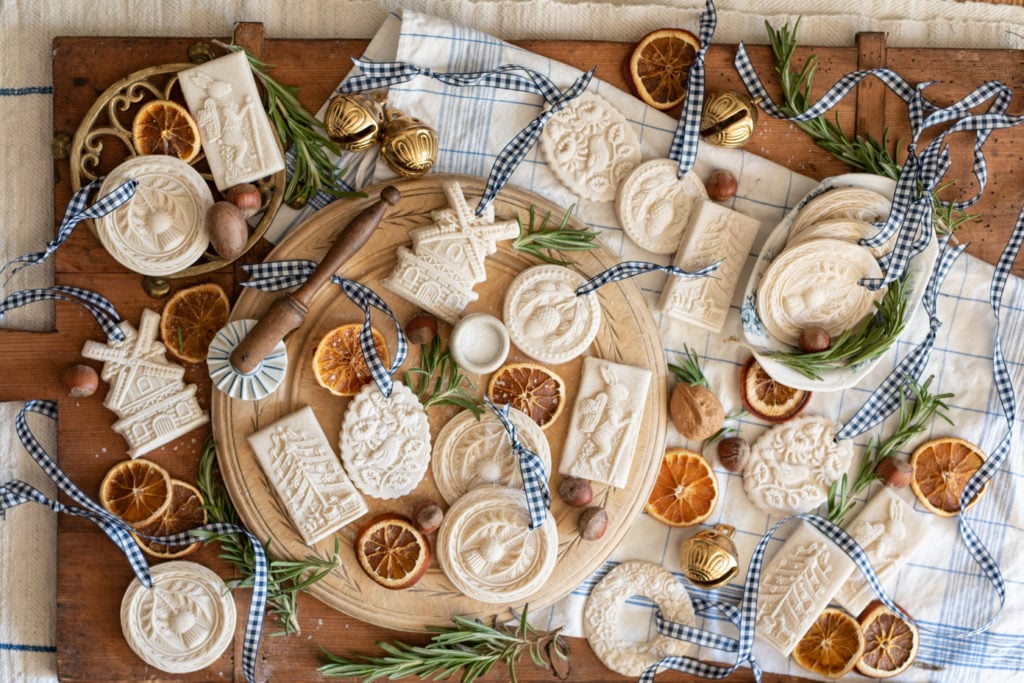
This salt dough ornament-making is going to be an annual thing, I think. They are just so fun, easy, personal, and pretty. I made them last year, both traditional salt dough and cinnamon “gingerbread” salt dough, and I enjoyed it immensely. I always thought of salt dough as sort of a kindergarten craft material, but it is definitely elevated when it’s put in pretty molds or even molded and cut by hand into custom shapes. While it can look fancy, it’s also still a great craft for young kids. It’s just a winner all around.
Salt dough ornaments can be stored, but I knew that our belongings would be sitting in a hot container for an indefinite period of time, so I decided to let them go and make some new ones. This also gave me the opportunity to try out some new molds that I bought over the summer.

Last week, I put on my music, mixed up some dough, and started playing.

A couple of the molds I use are wooden cookie molds, but the ones I added this year are resin. There are so many amazing molds available, but I am particularly drawn to the ones that are replicas of antique molds. (I link to each specific mold below.)

I included a printable recipe at the bottom of the post if you’re interested in making your own salt dough ornaments. You probably have all of the ingredients in your pantry. I didn’t make any changes to the recipe or technique I used last year. I tried a few new things just to experiment, but the way I made them last year really was the best. You can see how I made them in the video…
One of my favorite patterns this year is a thistle design from an antique butter press. I found it for a good price at a local antique store and I am so glad I bought it. You can find similar ones HERE.

Here are how the thistle salt dough ornaments turned out…

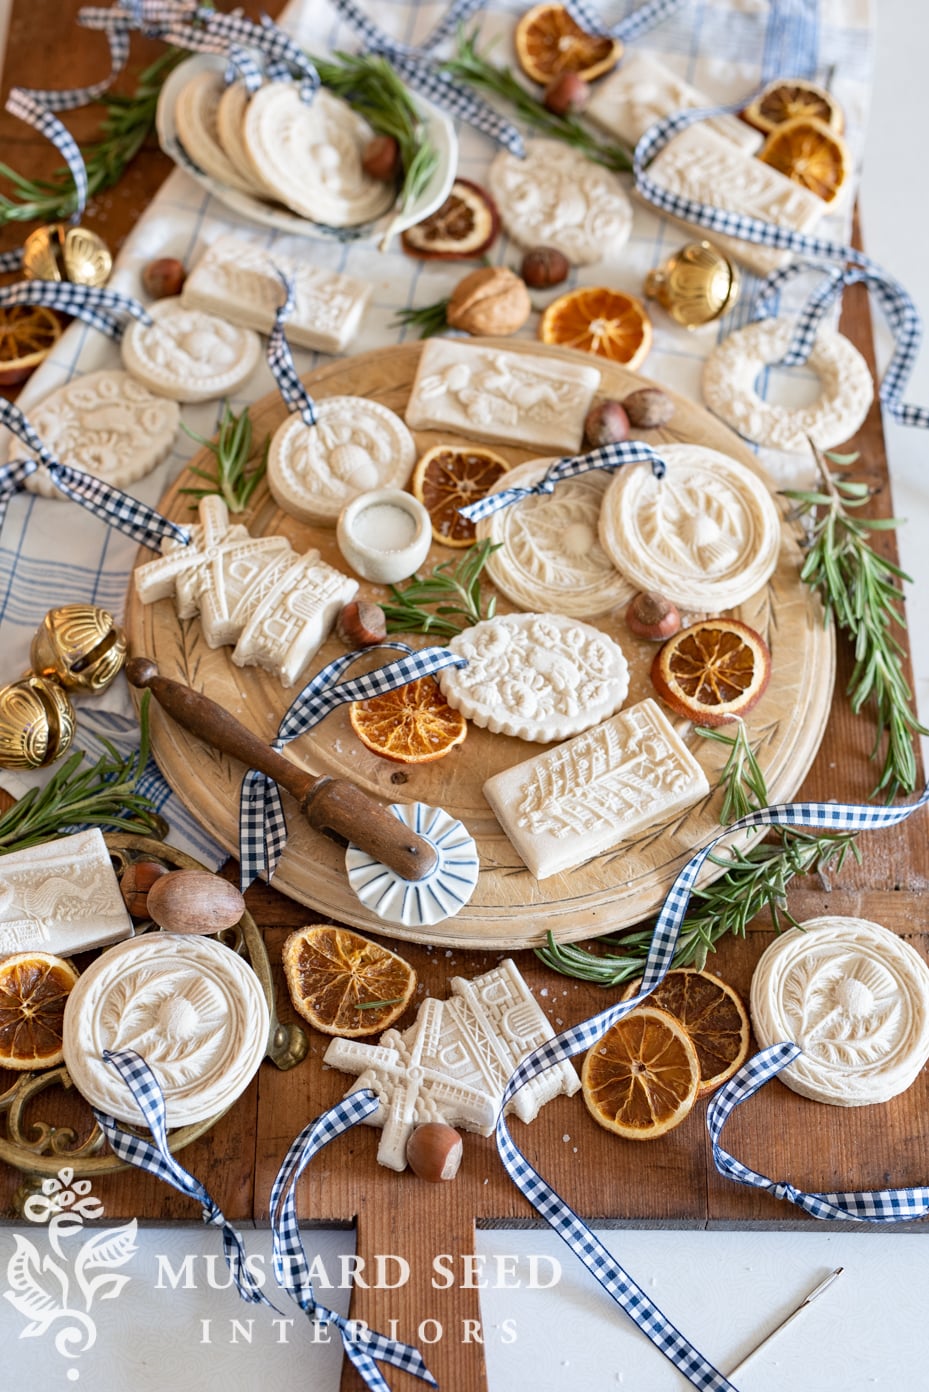
This year, I used a to poke the holes for the ribbon, and that worked better than a toothpick or plastic straw. I just put one in my cookie-cutter box to reuse.

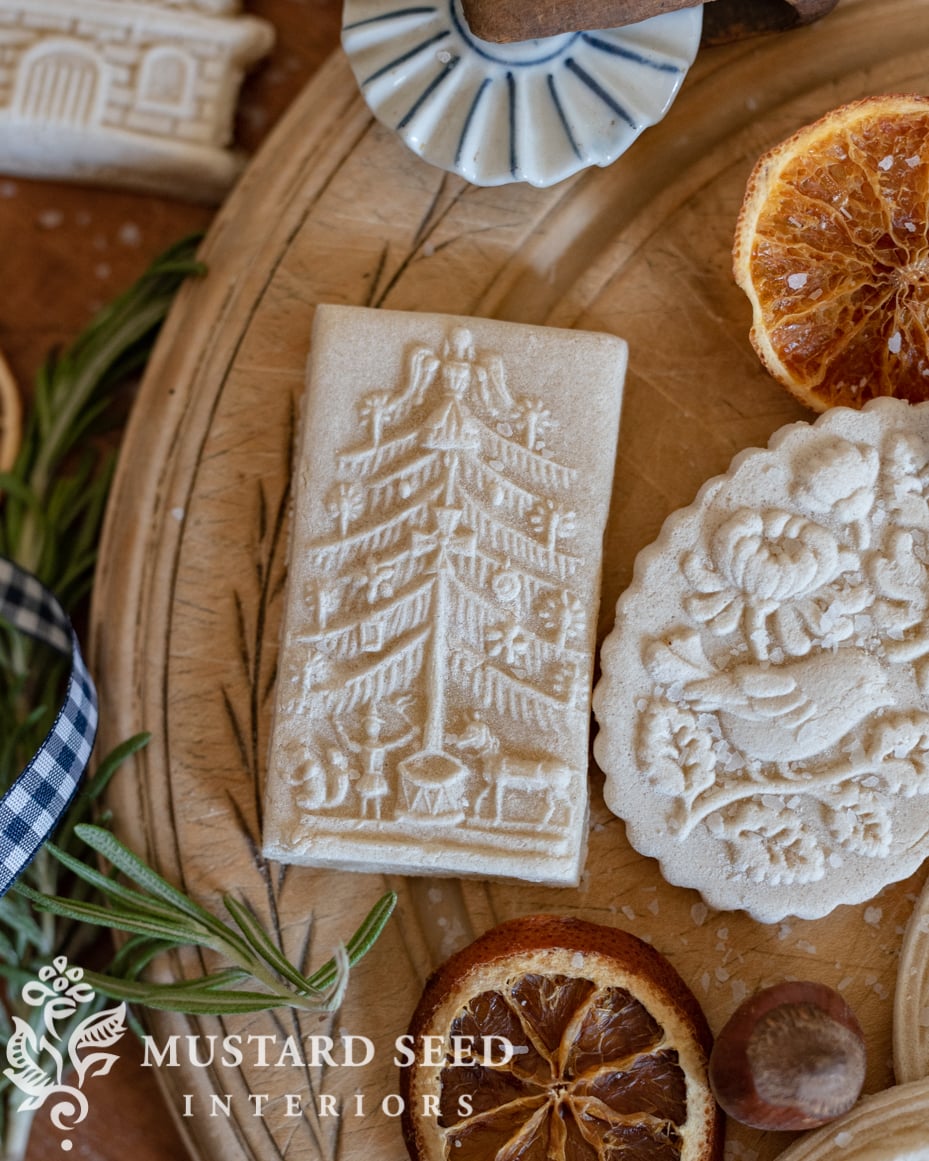
I couldn’t find a link to this specific vintage-style Christmas tree mold, but HERE is the seller I purchased it from. It’s possible they are only listed seasonally.

I didn’t want to poke holes in the rectangular salt dough ornaments, so I think I’m going to glue a piece of blue and white twine around the edge and make a loop at the top.
HERE is the acorn mold that turned out to be one of my favorites…

I made the first batch thinner and the edges curled up as they backed and dried. They look much better when the dough is rolled out thicker I just used a couple of the molds to help me gauge the thickness.
And, isn’t this hiking rabbit just the sweetest? I love his little backpack and striped pants. I also purchased that mold from THIS ETSY SHOP.

As a side note, I bought the antique circular breadboard from Ponder & Purchase.

This bird & flower mold is one I used last year. You can find it HERE.

The windmill mold is another favorite and I purchased it HERE.


Can you tell I had a good time styling and photographing these salt dough ornaments? I’m still learning the light in our new house, so there was something very satisfying about these images as I was figuring out the lighting.
Who knew salt, flour, and water could be so pretty?
You can find my post on making “gingerbread” salt dough ornaments HERE and “gingerbread” salt dough houses HERE.


Traditional Salt Dough Ornaments
Equipment
- stand mixer (this is helpful, but the dough can be kneaded by hand)
- cookie sheet(s)
- parchment paper
- cooling rack
- cutters & molds
Ingredients
- 2 cups flour (plus additional four for dusting)
- 1 cup salt
- 1 cup water
Instructions
- mix flour, salt, and water in a mixer or by hand
- turn dough onto a flour surface and roll out to desired thickness. (I have learned that thicker ornaments look better and don't curl when drying. I roll my dough to about 1/2" thickness.)
- Cut ornaments with cookie cutters and/or cookie molds. If using intricately cut molds, dust with flour first.
- Bake at 200° for 2 hours
- If hanging as an ornament, create a hole using a toothpick, straw, etc. I found that a metal straw works great.


31 Responses
how do you know how thick to make them? Your ornaments are so beautiful and I can’t wait to see them all hung. Thank you.
I made them about 1/2″ thick. When rolling out the dough, I used two of the molds as a gauge for the thickness and that worked well.
The photography is just elegant in this post. I’m intending to make your salt dough ornaments but am waiting for molds I ordered to be delivered. Your choices are so pretty. Thank you for the inspiration, Marian!
Love your ornaments but I think you placed the hole for the thistle ornament on the wrong end – so it hangs upside down but….maybe it works for you :-)
I debated which end to put the hole in, but I thought it looked like the thistle (and the acorn with leaves) were hanging if I put them on the stem end. It just made sense to me, but you could put the hole on either end! 🙂
I did notice all the care you took in styling the scene. Very appealing.
My daughter and I did some of these years and years ago but we did free form farm animals…over the years they did disintegrate in the hot attic but they were great fun while they lasted. We did paint them after they had dried and used small picture hanging eye hooks as a hanger.
Thanks for bringing back some happy memories…the farm animals are gone but the memories aren’t.
Great idea with the hanger hooks!
You can seal the salt dough ornaments with mod podge. This gives them a long life,
Looking beautiful! I did not have as much success when I tried it with my molds.
Some molds are easier than others. The windmill, for example, was the most challenging and I had to make some of those a few times. Getting the dough the right consistency is pretty key, too. If it’s too wet, it’ll just be a sticky mess.
Wow! These are so beautiful! I’ve made many salt dough ornaments over the almost 30 years of marriage since my husband’s family has an ornament exchange every year and they’re so fun! I haven’t ever used molds though, so I’ll have to try that. I dipped my finished ornaments in melted wax and so far it’s preserved them wonderfully. I wrap in plastic wrap or bag and in tissue and keep it out of extreme heat for storage. Thanks for the inspiration!
I noticed you did not poke holes in the rectangle ones. I got out my old springerlie molds and was looking at them and wondering how to use them to make salt dough ornaments. one thought was to just cut the top with extra space so the hole is not on the design. what do you recommend?
I am planning to glue twine around the edges and make a loop at the top, but I might also just glue a loop on the back or something. There are a few good suggestions in the comments!
You can also press a paper clip into the back of the ornament before baking them, leaving a little round “loop” of metal above the ornament.
Additionally if you seal the ornaments with a couple of coats of varnish, like they sell with craft paint. They will last much longer. I have some I made 20 years ago on my tree this year. I store them in a “candle melting” attic every summer. Keeping them dry is super important though.
I made what we called ‘bread dough’ ornaments more than 40 years ago. Some of them are still hanging on our tree every year. Wish I could add a picture. We shaped them into all kinds of things like Mr. and Mrs. Claus for example and a partridge in a pear tree. To make Santa’s beard we used a garlic press and plastic knives helped cut different parts. To attach an arm or any other attachment a paint brush and water helped them stick like glue. After baking them I painted them using water colors followed by a sealer which gave them a sheen and preserved them. Now a spray sealer could be used to help them last.Since that one year I haven’t made anymore but I should…I love to paint.
I meant to add that metal floral wire was bent to form an upside U and slid in the top of the dough before baking. That way a ribbon or ornament hanger could be used.
Marian, You already posted how to make these ornaments last year. What are you doing differently this year ?
I just used different molds this year and wanted to share how they turned out.
Wow. This commenter is consistently rude and demanding. Do you behave this way in real life? Why do you think it’s acceptable here?
Irene Kelly, I suspect you would be furious if someone used the same tone you’ve been using here against you. Treat others as you want to be treated – a basic rule of humanity.
These are definitely something I want to make in the future. I loved them last year and appreciate you sharing links to where I can purchase molds.
Marian I think I speak for everybody that now you are replying to all our questions. Thank You !
I read all of my comments, but I don’t always have time to respond. I was at my computer more than usual today, so I was able to sneak in more replies. It’s not that I get so many comments here, but they are scattered over e-mail, direct messages, social media. It’s just a lot and I can’t reasonably get to them all. I hope you’ll understand if I don’t always respond or respond right away.
They are beautiful! Thank you so sharing with us. Love that you enjoy doing these. I think I may have to give it a try. Only in my dreams would mine be as beautiful as yours.
These would make such beautiful “real” cookies! Have you tried doing any? Did any of your molds come with a recipe “stiff” enough to use? I can imagine putting some sanding sugar on them, they would look so festive!! Now I’m hungry for a sugar cookie.
They turned out beautifully! This post brings back memories of me making salt dough ornaments with my kindergartners years ago. You have taken it up several notches with the molds you purchased. Thank you for sharing!
I don’t consider myself very crafty but I had success with this project! They are hanging on my tree. The holes I made were too small and I was struggling. My husband got out his drill and soon I had perfect holes!
Why can’t people just be kind? Marian, I am happy for the refresher and the updated ideas and results. Thank you for all of the time and effort you put into each and every post. I appreciate it. I hope you have a wonderful holiday!
You can also press a paper clip into the back of the ornament before baking them, leaving a little round “loop” of metal above the ornament.
Additionally if you seal the ornaments with a couple of coats of varnish, like they sell with craft paint. They will last much longer. I have some I made 20 years ago on my tree this year. I store them in a “candle melting” attic every summer. Keeping them dry is super important though.
OH!!!! SO BEAUTIFUL!!! Years ago we made some of these too……but sadly they turned to pillars of salt after being stored in the rafters. Ours were not as gorgeous as yours!!!! I am tempted to just buy the molds and hang those on the tree!!!
Did you think the wooden or resin molds were easier to use?