

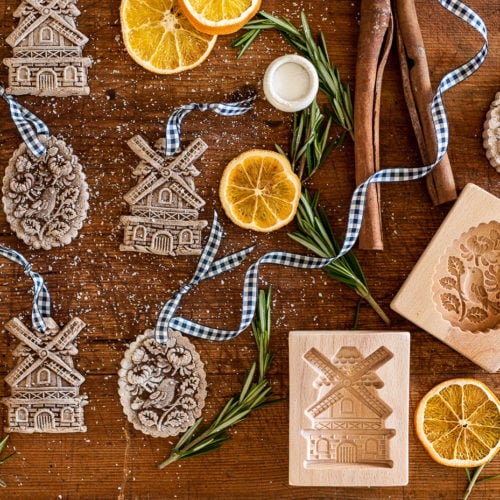
These molded salt dough “gingerbread” ornaments were one of those crafting happy accidents. They started when I made an impulsive purchase from an Instagram ad for a couple of cookie molds. Minutes after I purchased them, I thought it was a stupid purchase. But, I really loved the patterns and they were inexpensive (I think $16 for both.) I thought it might’ve even been a scam because the site had one of those not-quite-right names that I can’t even remember now. But the carved cookie molds arrived at my house a few weeks later. I was relieved they weren’t a total waste of my money, but I still questioned the hasty buy. I put them into the cabinet with my other baking gear, cookie cutters, gingerbread house templates, etc.

On Monday, I decided I would try making “gingerbread” houses out of cinnamon salt dough for Christmas instead of using traditional gingerbread. I figured they would last longer and be sturdier. I made the pieces for three houses and, with the leftover dough, I made six molded salt dough “gingerbread” ornaments. When cinnamon replaces some of the four in a salt dough recipe, it darkens it, making it the color of gingerbread. The hitch is that when you bake it, the salt rises to the top, leaving the top side pale and the bottom half dark. In the case of the gingerbread house pieces, I just assembled them “inside out.” I wasn’t sure what to do with the molded ornaments, though. They were sort of an experiment.
I peeked in the oven at 30 minutes and I was a little discouraged that the molded ornaments were so discolored. I flipped them over, so the decorative side was facing down, and cooked them for another 30 minutes. Here’s what I didn’t know about salt dough…because there are no leaveners, they don’t rise. I didn’t even need to start them decorative side up, because they were going to maintain their shape. But, like the purchase of the molds and pushing the leftover dough into them, this was another happy accident.

The salt rose to the top, leaving the recesses of the molded design a little darker. It basically made natural highlights and lowlights, which made the design even more striking. And, since the dough doesn’t expand when cooked, it kept the crisp details of the molds. It really ended up being perfect!

I no longer regretted my impulsive cookie mold purchase.
I kept looking at these salt dough “gingerbread” ornaments, these happy little accidents, and I was smitten. Stringing them on some blue & white checked ribbon was the clincher.


So, I made more of them today to hang on my own tree and to record a video tutorial.

salt dough “gingerbread” ornaments | what you’ll need
The printable recipe is below, but these are the ingredients and supplies you’ll need…
- flour
- table salt
- ground cinnamon (I used an entire 4 oz container on one batch as an FYI.)
- cookie molds
- baking sheet(s)
- parchment paper
- Bench Scraper (or you can just use a knife)
- scissors
- ribbon & twine (THIS is similar to the ribbon I use)
- tapestry needle

salt dough “gingerbread” ornaments | video tutorial
The dough I made for this video ended up being a little bit drier than what I made yesterday. It still worked fine, but I had to add a bit more water to get it to come together. The video is just three minutes and shows the entire process, which is very simple!
The best thing about these salt dough ornaments is that they can be used year after year. I’m actually looking for interesting antique molds (and I might even carve my own) to make some more next year. It’s possible I’ll even sell some! We’ll see what next year brings…


salt dough “gingerbread” ornaments | printable recipe
Salt Dough Gingerbread Ornaments
Equipment
- cookie molds
- baking sheets
- parchment paper
- toothpick
- scissors
- ribbon or twine
- tapestry needle
Ingredients
- 1 cup all-purpose flour
- 1/2 cup salt
- 3/4 cup ground cinnamon
- 3/4 cup water
Instructions
- mix dry ingredients together in a mixing bowl
- Add 3/4 cup water and stir together with a spoon. Mix in a mixing bowl with the paddle attachment until dough is brought together and all dry ingredients are absorbed. Dough will be crumbly but should hold together when squeezed.
- If the dough is too dry, add more water 1 tsp at a time to the mixer. The dough should be stiff and workable, not sticky. Turn out dough on a floured surface and knead for 30 seconds to bring dough together in a ball.
- Press dough into molds, scraping off excess with a bench scraper or knife. Carefully release from mold and transfer to a baking sheet lined with parchment paper or a silicone liner. Use a toothpick to create a hole at the top of each ornament for hanging.
- bake at 200° for 30 minutes with decorative side facing up. Flip over ornaments and cook for another 30 minutes. Put on a cooling rack to cool.
- Once cooled, string pieces onto a ribbon or piece of twine with a tapestry needle.













16 Responses
This the best accident! I love the look of these. They look like antiques.
Those turned out wonderful!
These are so pretty! The detail is wonderful and the ribbon def makes it! Bravo!
These are so darling! Just be aware salt dough is toxic to dogs and can be fatal. Please keep out of reach of dogs, they may think they are food.
You are just the most honest ‘sharer’ and we all benefit from you. Thank you. I do love these more than any other…
These are beautiful and really look to be antiques. I know what you mean about purchasing from an unknown retailer. We need many more products made in this country. There is a new website Mammouth Nation great site I have purchased from them.
Wonderful! I just pinned the recipe to Pinterest and saved the molds in my Amazon wish list.
I make the dark salt dough with coffee in place of the water. Just mix instant coffee into the measured water….make it as dark as you’d like.
just a little hint for your next batch — try using a pastry brush to lightly dust the inside of the mold with flour. The dough will come out quite easily as you tap the mold on your counter. Learned this trick when I used to do these with my (now grown!) children. Also works equally as well when making springerle
Very striking. Now we all need to go on the hunt for cookie molds!
These are so beautiful! Of course, I had to go search for authentic PA Dutch molds, since I live in South Central PA. They are made by a small business in PA. May I recommend SRWhiteCarvingandSon on Etsy? I found them purely by chance, and ordered a mold last night that shipped today already. Thank you for this wonderful tutorial. I get nothing from giving their name, I just wanted to help those looking for Made in the USA
Oh, I checked them out and they have wonderful molds. Thanks for sharing!
I would’ve bought these quickly. The details are so crisp!
I have seen Christmas decorations made from molds like these using thin toilet paper. You layer damp toilet paper into the mold (pushing it into all the detailed crevices); continue layering the paper letting it dry between layers. After many layers the piece has the look of porcelain…you could spray with a matte finish and punch a hole in the top to hang or use as a gift tag. They really don’t look like toilet paper at all!
The gingerbread ornaments are so darling. Thank you for sharing the instructions with us. You are so generous.
These are classic Springerle molds. Growing up my mom made springerle every Christmas. We didn’t like the anise flavor of them, or their “egginess,” as kids, but they sure were beautiful. You can get reproduction springerle molds in abundance from House on the Hill (www.houseonthehill.net). Just warning you, though, you will want ALL OF THEM, they are so gorgeous. You can even hang the molds as ornaments.
I love the salt dough idea, they turned out beautiful! I have used my molds for all kinds of dough over the years. Japanese paper clay also makes beautiful white ornaments that are also lightweight and can be painted.
In general, I have used my molds more to make ornaments than to make edible treats!
I love these! Bought the mold and trying it now. How do you get the dough to release from all the crevices intact?