
I know what you’re probably thinking. Didn’t you already do a post on molded salt dough ornaments? Well, yes, I did! You can find that post HERE. While this post is a little Deja Vu, this is actually a different post talking about working with a different kind of salt dough for a different look.

I enjoyed making the salt dough “gingerbread” so much that I decided to try working with some original salt dough. And of course, I wanted to test it out in the wooden molds. I used a basic recipe of 2 cups of flour, 1 cup of salt, and 1 cup of water and kneaded it in my mixer until it formed a ball. I made some shapes with cookie cutters and shaped the rest of the dough in the molds. They turned out beautifully, but I did have to adjust my technique since this dough was wetter than the cinnamon salt dough.
Scroll to the bottom of the post for a printable recipe…

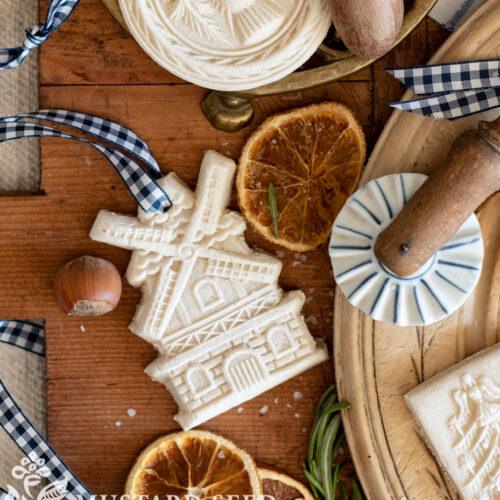
The first adjustment I made was based on a reader’s smart suggestion. I dusted the molds with flour applied with a pastry brush.

You can find the molds here – Bird Mold & Windmill Mold
The second thing I learned through trial and error is that a floured mold plus a wetter dough meant that trying to scrape off the excess dough with a bench scraper didn’t work. It would just mutilate the shape. So, I tried a few different things, and pressing the dough into the mold and leaving the excess dough was one of the most successful methods…

I would then cut the excess dough off with a knife. These ornaments were thicker with the excess dough on the back, but they held the pattern beautifully.

I also tried pressing the mold into rolled out dough and then cut out the shape and that worked pretty well, too.

Since these molded salt dough ornaments were much thicker, they took about 2 hours to fully cook/dry in a 200° oven.

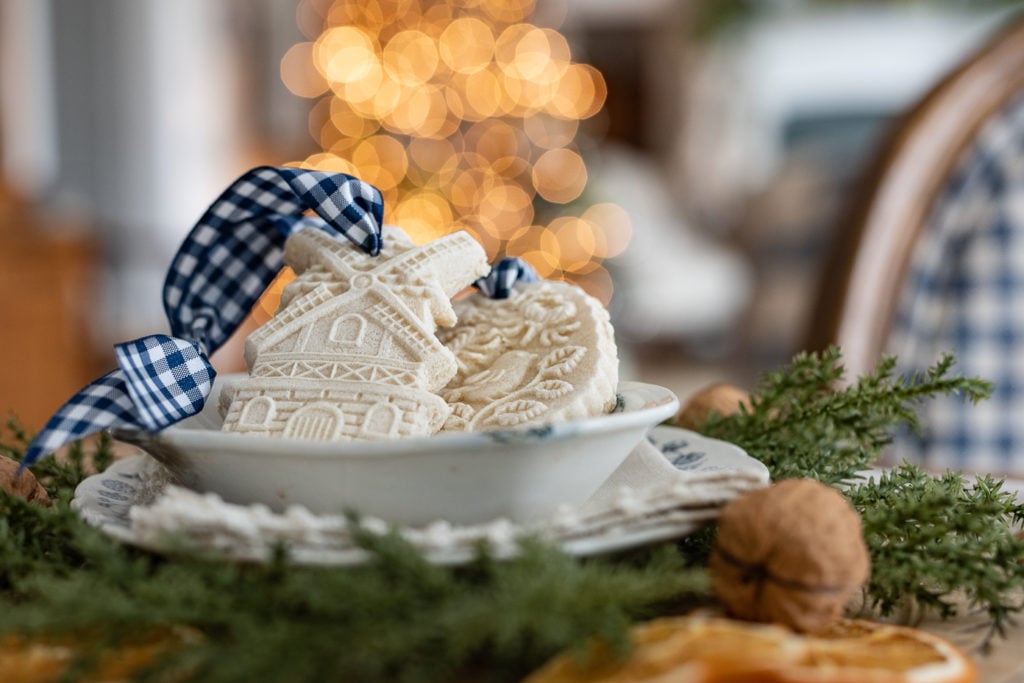
Just like with the “gingerbread” salt bread, the salt rises to the top making the top whiter than the bottoms. I really like the “frosted” look, though, and how it brings out the detail of the design.

Here is a very short video tutorial showing the process of making these molded salt dough ornaments…
Aren’t the molded salt dough ornaments so pretty?

I’ve always thought salt dough ornaments could look a little kindergarten-crafty, but these look very elegant.

As with the molded salt dough “gingerbread” ornaments, these would make great handmade gifts, ornaments, or present toppers.

I painted one of them in acrylics just to see how I liked these painted and I prefer them in their “natural” dough color. I like adding color through the ribbon. You could certainly paint them, though.


And, these molded salt dough ornaments don’t have to be ornaments at all. I sort of loved them just arranged in a bowl on a pedestal. There was something very simple and pretty about it.

I tried making some carved salt dough ornaments, too, which I loved, so I’ll have to make some more of those to share. I’m going to run out of time to share Christmas crafts, soon, but I’m trying to squeeze as much as I can in!
You can find more Christmas crafts, recipes, and decorating ideas HERE.

Molded Salt Dough Ornaments
Equipment
- cookie sheet(s)
- parchment paper
- stand mixer optional
- cookie/springerle molds
- pastry brush
- rolling pin
- bench scraper or spatula
- straw, toothpick, or skewer for making holes in the ornaments
Ingredients
- 2 cups all-purpose flour, plus extra for dusting
- 1 cup salt
- 1 cup water
Instructions
- Put all three ingredients in mixer bowl (or large bowl to mix by hand)
- Knead the ingredients together until a ball is formed. The dough should be stiff, and neither wet nor crumbly. Adjust the flour-to-water ratio as needed.
- Roll out dough on a floured surface and use cookie cutters to cut out desired shapes, or take a small handful of dough and press it into a floured springerle mold. You can also press springerle molds into rolled out dough and then cut out the shape.
- If using as an ornament, create a hole in the top with a straw, toothpick, or skewer.
- Bake on a parchment paper-lined cookie sheet in a 200-degree oven for about two hours or until the salt dough is completely dry.
- Allow ornaments to cool, then decorate or hang on a ribbon.


20 Responses
Can you use craft air clay or plaster of Paris in these molds? I would love to take the time to make these beautiful ornaments if they could be used from year to year as keepsakes. Suggestions for the best place to buy molds like your flower one. I want to make a set of floral ornaments since I am a master gardener. I have problems with my hands so I do not want to make a dough type. I enjoy your posts very much. You have inspired me many times to try new projects.
Hi Nancy, just in case you are not aware of them, if you want to make molded ornaments to keep from clay or even resin there are silicone craft decor molds that are easy to remove the clay as you can bend the mold – some with Christmas themes. Just do a search for IOD molds or Redesign molds. 🙂
Nancy – you can use either acrylic clay or paper air dry clay. I have used bit in my springerle molds. The air dry are particularly lovely as you can make then quite thin. You will get a lovely deckle edge which looks lovely as is but shows up beautifully on colored paper.Did the latter for Christmas cards one year – they were gorgeous! Julie’s tip for sources for molds is great. Also check out House on the Hill – she only sells wholesale now but lists where her resin molds can be purchased. You can also finds some vintage or antique beauties on EBay or Etsy!
Just beautiful. Thank you for sharing.
Just beautiful ! Did I miss where the molds can be found !
Wondering if you put the hole for the ribbon in before you baked them or maybe used a Dremel after? Thanks!!
I did it both before and after and it worked either way. I think it’s best to make the hole before to minimize damaging the ornament once it’s dry, but I used a sharp tool and wiggled it to expand the hole and it was just fine. I only lost one that I made too thin, anway.
Here is a link with beautiful wooden molds from Russia. I might get some!! Being Dutch, I love the windmill. Look for Textura Workshop on Etsy. Not cheap, but the quality is stunning. Not affiliated at all, btw.
It’s easy to trim the excess with a piece of wire
Every project is that much more beautiful because of your staging and photography! Love your work and the care you take in making all things look so lovely!
I wholeheartedly agree Judith!
I made something similar a few years ago using coffee instead of the water and also adding ground clove to the dough. This gives the dough a gingerbread look; smelled great also. Funny enough, I used gingerbread on your site as inspiration to decorate my ornaments with paint instead of frosting. Each year I put them on a little tree in my kitchen. I put a few drops of cinnamon essential oil on a couple of ornaments to bring the scent back. Next year, I’ll try using the molds because they are just gorgeous. You’re on a creative roll! I am loving all your Christmas crafts–thanks for sharing.
I always enjoy your posts and this one is no exception. The ornaments are simply beautiful and I so enjoyed the music playing in the background. Happy holidays!
Some years ago, I had terra cotta molds that were used for pressed paper molding of some sort. Don’t really remember the correct term for the craft or whether I remember correctly that paper pulp was used. Might dust those off and try using them for salt dough molding. Thanks, Marion, for the inspiration.
These are Beautiful and so Elegant. I would’ve never guessed they were salt dough. Thank you for sharing the tutorial ❤️
These are gorgeous. I’ve made salt dough ornaments in the past but had trouble with them crumbling due to moisture in the air. Do you seal them with anything? Any suggestions?
Where can I buy these molds? They are so detailed & beautiful. Thanks, Joyce
Couldn’t you just add enough additional flour to equal the amount of dry ingredients in your cinnamon recipe? Then the dough would be drier and might work the same way as the cinnamon dough.
I have a question about the white salt dough ornaments. Do you think you could color them by adding powdered pigments to the dough? I love the look of the gingerbread as well as the white, but I was thinking…I have a botanical wood mold and thought that might look really pretty tinted green. Thoughts?
Beautiful decorations as always! I am wondering where you got your ‘fox’ cookie cutter and your little wooden ‘scoop’ that you use for your flour in this post? I will try this recipe, I love the windmill and how simple and lovely these look.