
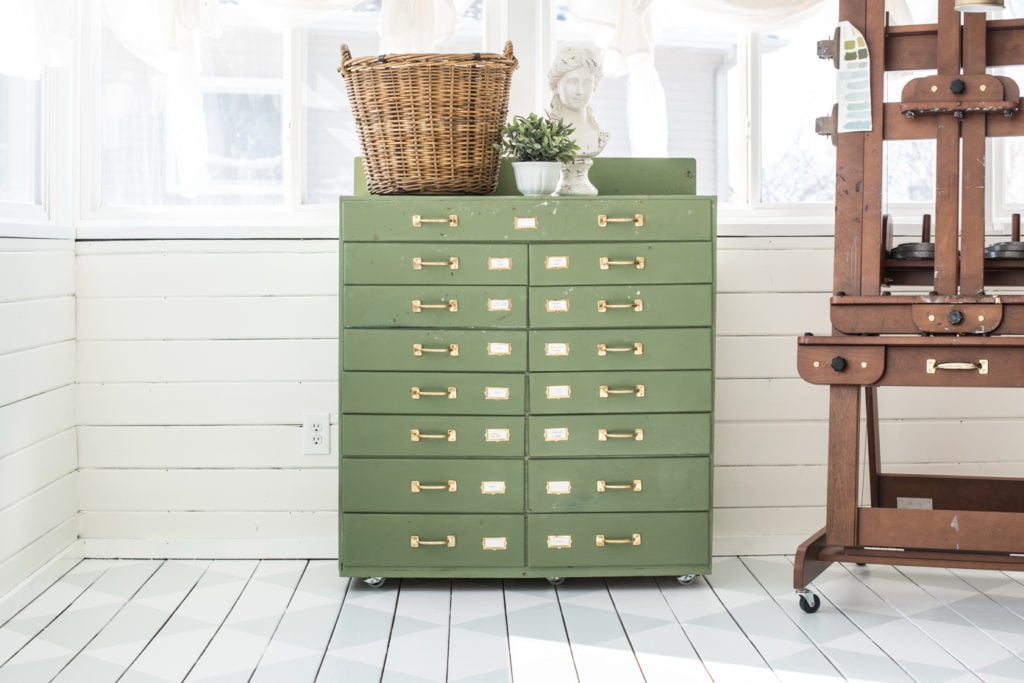
When you last saw the floors, they were all taped off and ready to paint. You can find that post HERE if you missed it.
The taping was definitely the most time-consuming part. After that, it’s pretty much smooth sailing for this project.

I initially purchased the same color I used on my kitchen walls – Stonington Gray mixed at 50%. I wanted the squares to be a very pale blue/gray, so the checkers would be subtle and not too high contrast with the bright white. I painted the first row of squares, removed the tape and knew, even before it dried, that it wasn’t what I wanted. The color looks very blue/gray in my kitchen, but in the studio, it looked like a pale beige. I pondered it for a few minutes and decided I spent waaaaaay too much time and energy taping off those squares to settle. So, I pulled out my paint decks to look for a better option.
I selected Farrow & Ball’s Skylight. I took the swatch to the paint store and had them match it. Matching it was tricky and took three tries, but we figured it out and the color is perfect!
I applied it with a 6″ microfiber roller and a 2.5″ angled sash brush along the edges…

When it comes to removing painter’s tape, I prefer to remove it when the paint is still drying. It decreases the chances of pulling paint off that you just applied and may dry to form a seal over the tape. That doesn’t happen often, but it doesn’t happen at all if you pull off the tape while the paint is still wet!

And pulling off the tape is so satisfying!
Here is a video showing the whole process from taping to painting…
I was laughing when I edited the video, because everyone in the family visits me at some point except Sebastian.

At one point, I stepped in a painted square and had to take off my socks! I had to constantly remind myself to just step on the white squares!

I let the floor dry overnight (and let my back and legs rest) and then I touched up some paint on the walls and baseboards…

This room took a ton of paint when we first moved in and I just faded towards the end. I didn’t care if the baseboards could’ve used one more coat of paint or the walls against the hardware cabinet looked a little splotchy! I’m sure you can relate to being at that point with a project when you just want to be done.
With all of the furniture moved out of the way, this was the time to put on that extra coat of paint and make it all look sharp and finished.
And, it looks great! I love how it adds a pattern without being too busy or overpowering.

And it looks even better now that the furniture is all back in place. I’ll show you how that looks tomorrow…

For quick reference, here are all of the products used in this post…
- Frog Tape
- Wooster 6″ roller
- Pelican Paint Bucket
- Rust Scat Semi-gloss Waterborne Enamel (factory white)
- Farrow & Ball Skylight (Mixed in the Rust Scat)
- Walls – Benjamin Moore Simply White (Aura, matte)
- Trim – Custom White, Benjamin Moore’s Advanced in Semi-Gloss (You can find the recipe in THIS POST)
- Art Cabinet Makeover PART 1 and PART 2 (It’s painted in a custom mix of MMSMP Boxwood & Lucketts Green, finished with Hemp Oil.)










34 Responses
Love the floor! The video is pretty funny too! If only we could speed up the work in real life! Very nice. Have a great day!
‘Got it. Templates preserve sanity & consistency. I love the bright playful taping, but taping THAT pattern would have bee 4Xs the work! Sane work makes beauty.
What an interesting life your kitties have supervising!
Once again, you knew exactly the colors you wanted and didn’t “settle” just to get the job finished. The checkerboard pattern definitely adds to your room. I love it!
Looks great, Marian!
Ack! You’re killing me! I can’t WAIT to see the whole thing! But I just love the little peeks we’ve gotten so far!
I think my back would be broken at this point, but certainly a wonderful result. I love that it is so visible, but subtle at the same time.
It looks wonderful! I love it! Quick question, what sheen did you use (satin, pearl, matte, etc.)?
Very nice! Much softer color than I expected.
Did you seal it? So it won’t wear off? I am glad to see that your shoulder is doing so well, and ….the floor looks nice!
Oh my-what a beautiful floor!!!! You do such great work & you get into so many things!!! I have a friend that’s just like you. She can get more done in 1 week than most people can in 3 months. You are the same way. You’re so motivating.
I wish the color was a bit darker? As it is, it looks like a shadow. If that is the look you wanted, well done. But after all that work, I would want it to be a bit more obvious. Esp after the furniture is in place. Or maybe it looks lighter via the camera vs real life?
I love it! It’s beautiful!
Beautiful ?! I’m so glad you’re feeling able to tackle this difficult job. I’m 66 now and have had both knees replaced. No painting of floors are in my future! But I did enjoy watching you!
All your hard work has paid off it’s beautiful. I Did do something similar in my garage but years ago using 1/4″ tape with one paint color on all squares so it looks like tile with grout lines. Now I’d like to use your pattern of alternating squares but first I have to Marie kondo the garage Oh my!
Love this! It adds a bit of whimsy to your space. It looked like tedious work, but job well done. Kick up your heels, enjoy some tea, and admire your work!
I love it. And it will wear nicely since it is not so bold. BeUtiful job!
That’s quite a workout!!!! Holy moly. I would be stiff for DAYS!!! But it’s so worth your effort. It’s so pretty.
I just love the subtle and soft contrast. It’s so sweet and not overpowering. Love it!
Marian,
It looks FANTASTIC!!! I love a painted floor and you did such an excellent job!! It’s just beautiful. Congratulations for such a successful project. I’m envious! (again)… ha ha!
It is so great and subtle . So funny when you admit to step on the wet the paint..done that too and even worse, while getting tired and I started to paint in the wrong part, ouch, I’ve done that too.
This looks GREAT!! Perfect color!!
Absolutely beautiful!
Marian,
Tools like you shoulder for quite a workout! The floor is beautiful. I thought you would go bluish, and the color looks amazing. Can you seal this so it lasts a very long time 🙂
Well done!
C
I am sure this is a really dumb question but I have never done any taping and painting of squares. Why can’t you do diagonal tape lines that are the full length of the room, going in both directions from wall to wall and have a handful of tape lines instead of 4 per square?
I am sure there is a reason, I just have no experience to know what it is and was curious as that is what I thought people did to get diamonds until I saw this…..
Yep! It seems like that is the way you would do it, but then imagine that painted and the tape removed. You would have a grid the width of the tape. The corners of the squares wouldn’t line up.
I was tickled that I actually remember your post from way back when in which you explore the idea of painted floors in your old house! I guess you have been inspiring me a long time, and I thank you for it! I actually have tackled drapes, and cushion covers (with piping and zippers), and an upholstered window seat with more piping and a zipper in the past couple years. Thank you for being an artist and finding a way share your gifts!
Just perfect, Love the subtlety of that color.
I immediately think of Vermeer’s off painted checkerboard floor. ? Nice work! It looks like your shoulder is back in action! Make sure to do some spine extension ex after all that bending.
Love the floor. The color is great…soft but definitely THERE! I have NO patience & my knees would never take this! You did a great job.
You did an awesome job! I am so happy for you that you didn’t settle with the paint color that wasn’t working!!! Great job!!!
Love the floor and the color. Just perfect in your studio. thanks for the steps, my mind would have gone bonkers figuring out the taping, spacing. Loving your blog!
As I watched I thought, oh my, I would probably step on the wrong squares. Learning you did exactly that made me feel less intimidated by the project . It looks great, but I’m not sure my replaced hips and knees could handle all the floor work, you are a dynamo!
I like it, great job!
Looks gorgeous. We will be doing our kitchen floors in our beach house and am so excited! Have always loved painted wood floors but never had a space that was just crying out to be painted until now!
One question. I’ve reread your posts and I don’t see you’ve mentioned what size your squares are? Right now we are still undecided….,