

Other than letting everything grow, the front garden is all finished! Well, for now. I am still a novice gardener, but one thing I have learned is that gardens are dynamic and they are never done. All of the plants are in the ground, though, and I love how much curb appeal it’s added to the house.
The yard and landscaping were some of the last things we worked on at our last house, so we didn’t really have a chance to finish it or enjoy seeing many of the plants mature. With this house, I wanted to start planting, so I could have hedges of boxwood and hydrangeas, a flower garden, herbs and vegetables, and all of that fun stuff. It is going to take a few years to get it all done, but we’ll work on it bit by bit each spring and fall until it’s done.
We started with the front garden beds, since they are most visible. Unfortunately, this project wasn’t as simple as putting new plants in the ground, but we’ve had to remove rocks and old weed-blocking fabric, so it’s tough, dirty work that is slow going.
Here are the previous garden posts about removing the old to make way for the new and my plan, if you want more details on the process as well as the plants used…
As a reminder, here is how the garden looked when we first moved in last summer…
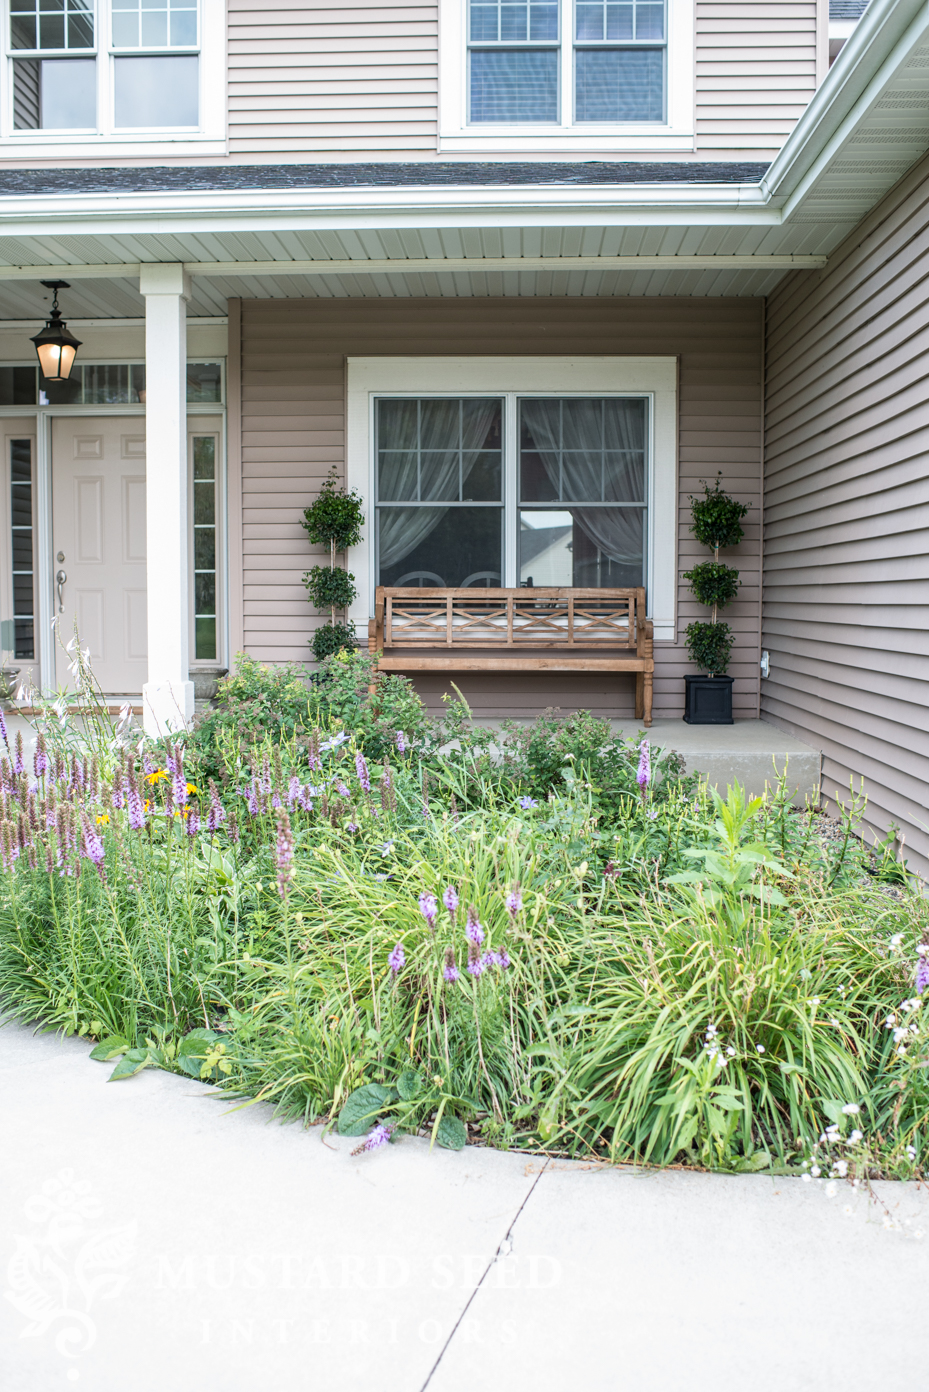
…and here is how it looks now…

We installed the trellis last week. It’s THIS ONE ordered off of Amazon. (Affiliate link) The size of it was a nice fit for our space and I like the traditional style of it as well. It was easy to assemble and we secured it to the wall with large screw-eyes inserted into studs and some white heavy duty zip ties. It’s made of PVC, so it won’t warp, rot, or need to be repainted.

Once the Sweet Autumn Clematis vine grows, it’ll add some nice height to the garden. This week, I worked on the space to the left of the front porch by replacing some peony bushes with Annabelle hydrangeas I bought on sale. I was a little sad to dig up the peonies, but they weren’t positioned very well and the blooming season is so short. Plus, I got the hydrangeas at a 30% off sale, making them $40/each. I thought that was a great price for bushes so large. I didn’t have a new spot for the peonies, yet, so I gave them to a friend who was happy to have them.
I planted another row of small boxwoods to form a hedge in front of the hydrangeas. I read that they help to hold up the Annabelle stems and I like that they’ll add some structure and green during the winter. They’ll also hide the gutter when the hydrangeas are cut back.

Speaking of the gutter, it used to empty right by the steps, but there wasn’t anywhere for the water to drain, so it would just pool against the garden bed, making it difficult to grow grass there. It was also unsightly having the gutter jutting out by the steps, so Jeff rerouted it to empty away from the left side of the house, which goes into a swale between our house and our neighbor’s house.
It does mean there is a pipe running under the window, but it’s low and the bushes will hide it as they grow and fill in. We’ll plant some new grass there in the fall to fill in the bare spots.

I also need to figure out a border solution. I removed the black in-ground border, because it was popping up in some places. I spoke to my neighbors, who used to have the same border, and they said they were constantly digging it up and putting it back in, so they finally got a cement border. I can see around our house that it will be a constant battle to keep it in the ground. (Maybe because of the freezing and thawing of the ground?)
Anyway, I’d like to do something with bricks or stones, but haven’t found just what I have in mind. For now, I cut a little channel with a shovel to give some separation from the grass and the newly mulched bed.

On the porch, I added the rug from my kitchen that was starting to unravel. It’s not really an outdoor rug, but I was going to pitch it, so I figured I’d give it a try. The boys and some neighborhood kids have been sitting out on it, playing and eating ice cream, so it’s a winner so far. It adds a little softness literally and visually, which is nice. It’s fairly protected, so hasn’t gotten wet, even with some strong thunderstorms that rolled through last week. .

I finished off the front tonight by installing a flag pole bracket, fitted with an American flag just in time for the 4th of July.

It’s been interesting how sticking with a white and green palette for the garden has somehow improved the appearance of the siding color. It all looks more harmonious to me now and the siding doesn’t look as “pink”.

I will keep you update as the garden grows!
When the weather is nice, I do plan to work on removing rock from the garden on the left side of the house and then we’ll do more planting and mulching in the fall. For now, gardening will be watering and weed pulling.
And, while I was working on the garden this evening, Jeff started work on the garage. I cannot wait to have this space completely organized! It’s been such a mess since we moved in, so I will appreciate all of the shelves, hooks, cubbies, and open floor space all the more.

Once last thing before I sign off… Thank you so much for all of the kind words about my dining room mural. It felt like a risk and it’s so nice to get such positive feedback on it.


45 Responses
What an amazing transformation to the front of your house. The trellis is pretty and is going to look awesome when the vine climbs. The hydrangea is going to be the star of the show, but that urn is the star on the right side. You put a lot of work into this and you’ll reap the rewards. Great job!
The gardens are beautiful and are making me want to relandscape ours now. I’m totally in love with the hare pillow on your bench. Can you share where its from? Thanks!
That was from Target in one of their spring collections.
Beautiful! Love the green and white color palette. Where did you purchase the white trellis from?
The trellis was from Amazon and the link is in the post. 🙂
Looks great! A couple of tips. Did you not put weed fabric back down? If not, you might want to consider that when it’s time to add new mulch. Cuts down on weeding so much! You can always have Jeff lengthen where the gutter piece is added and bury that. Our gutters are buried and run out away from the house. I love that trellis. Is your siding wood or vinyl? If vinyl, be very careful about putting any holes (even nail holes) in it. It can allow water to get in behind the siding which you do. not. want. We have had a sweet autumn clematis in the past and it is beautiful if only for a short time, and blooms at a different time (at least here) than other clematis. I’m not sure what some mean about it being invasive. We didn’t have a problem at all. I love clematis!
It is vinyl. I researched online and that was the suggestion for attaching things to vinyl siding (just inserting a screw into wood.) We are planning to add a bit of waterproofing sealer, though, to make sure the hole is sealed up.
i have the black in-ground border and do not have a problem with it popping up if anything it goes in more and i live 3 to 4 hour from you.
Maybe ours just wasn’t installed properly? It’s popping up all around the house and looks really sloppy.
My 50-foot Annabelle hedge was fronted with 50 feet of boxwood balls. Just a heads up on your spacing there, they are WAY too closely planted. The Annabelles will spread out to at least 6 feet around from the centers, totally engulfing the boxwood. It would be better to extend that bed outward now and move the boxwoods forward! Annabelles are monster-sized plants!
Also, you do not need to use landscape fabric, it is TOTALLY unnatural and will be the bane of existence over time, as it does not prevent weeds at all and will eventually have to be removed. What you need is a 5 to 6″ deep layer of mulch and your weeding worries will be reduced to almost zero to a bare minimum. Virtually nothing gets through that.
The black plastic edging is also a nightmare and totally unnecessary. Cutting a trench edge a couple of times per summer (grass is a thug plant and will always be trying to grow in) is easier, neater, and looks fantastic, and doesn’t take long to do at all once established. A poured cement curb or brickwork would be nice too, but will eventually crack and heave, needing repair.
Totally agree with all of this! (Except about the hydrangeas … the deer think they’re a delightful salad, so no hydrangeas for me. I have no experience with them, unfortunately.)
Wow! We’ve had good luck with our landscaping fabric, but we finally had some professional help and don’t move plants about. (No annuals in beds either, only in pots.) It has prevented weeds for us although we do have a thick layer of pine straw. I agree the annabelles are too close together and too close to the boxwoods. The hostas will also spread. I like a trench edging. We have stacked stone, the lower end (slopes toward basement) is terraced. THAT was professional done though! (*wink*)
Good to know about the spacing. From what I read on the tag and online, it seemed to be okay. Some sites suggested planting them closer together, so they will support one another and I saw several pictures where the spacing of the boxwoods was quite close as well. I’ll have to look into it a bit more, but you’re right, something might need to be moved.
I totally agree about the fabric, which is why we’re removing all of it as well as the black plastic border. Instead, I’m doing mulch and Preen to prevent weeds.
Yes, I agree with you on the spacing. My mother-in-law gave me an Annabelle hydrangea four years ago and wisely told me to give it space. I am so glad she told me do that because it is huge now (and beautiful of course). I planted a phenomenal lavender about 4-5′ from it and it complements the white blooms.
As for the edging, I got so tired of black plastic edging heaving and cracking so we ripped it out last year. For my birthday, my husband bought me a Black & Decker Edge Hog. Now we have perfectly edged gardens every year and it only cost $89.99! I prefer the natural look to any edging.
I have always wanted an edger! I’ll have to look into that, because I do think a garden (and lawn) with a nice edge looks so sharp!
Just a thought, I used fence boards cut down to 10″ – dug a trench (narrow) and used them as edging. I was able mulch deeper since they are taller than standard edging and it looks amazing in my cottage garden. I did used the treated boards since they would be in constant contact with soil and treated the cut edges before installing.
You must get a thrill when you drive up to your house…it looks like home!
Love the initial pillow! Where can find it?
Only thing missing is a bird bath! !Birds are such a joy to watch.. not to mention they need a place to drink and bathe. Makes me want to share a story with you. My husband died here in our home from cancer. He was so devoted to caring for the birds we would tease him that he took better care of them than his kids. We witnessed the most amazing sight the day he died
. We had a split rail fence across the front yard. The ambulance was called to remove him and I was looking out for them and was dumb founded to see the whole fence lined with birds. It was an amazing sight. Every type we have here came to say goodbye. I try to keep up his good work by making sure they get fresh water everyday. I am convinced they are a lot smarter than they get credit for.
Barbara, thank you for that sweet story about the birds. I have no doubt that they were aware of and appreciated your husband’s kindness. How observant you are to notice what was happening on the day of his passing (deepest sympathies, BTW). It is a fitting tribute for you to continue his work looking out for the birds. I’ll bet they appreciate you!
They bring much joy to my life. Remind me of humans once in a while. Fight, selfish, greedy and sometime terrible bullies. I really study their behavior. If I do not put safflower seeds out the cardinals chirp non stop. I just found out last year squirrels will not eat safflower seeds which makes it a joy to feed birds. No more sunflower seeds here. Thank you for your kind remarks. In my next life I want to come back as Marion. She can do anything.
Barbara,
This is beautiful story which brought a lump to my throat. I, too, love the birds and could only hope to have such a touching send-off. God bless you for continuing to care for them. It would please your husband very much.
Judith
I have heard seeing a cardinal is your loved one watching over you. I want to think it is true. I have many cardinals around. They even remind me when I forget to feed them. Constant chirping. Thank you for appreciating my story. I do not tell it very often as I am afraid I will appear nuts. My sister was standing right next to me and we both were just jaw dropping.
Your yard is gorgeous and will look so pretty as the plants mature. It has been such a lot of work for you and Jeff but oh so worthwhile! Enjoy! Blessings!
Go to funkyjunkinteriors.net and search for How to Edge Flowerbeds like a pro. You can edge them and won’t need anything for the border.
Looks so crisp and pretty! Love the green and white color scheme! You guys are amazing at getting so much accomplished in just a year!
About your garage, attach a pallet to the wall with the boards horizontal and stand you tools, shovels etc in it. A free fix! We also have 2 for fishing poles.
The trench you dug is the perfect border, if you can keep up with the maintenance. Should you decide to go with a physical border on the lefthand bed, you might consider a low stack of concrete-compatible material.
A cool material that’s friendly to the environment and your wallet is urbanite, aka broken concrete. Used skillfully in a dry stack, it’s quite attractive. It is a building material of the future. For some creative examples, just do a search for “urbanite garden edging.”
Great job! I think the spacing looks great. You can always cut back or move things later. Enjoy!!
Everything looks so pretty, Marian. I have an idea for your gutter/downspout extension – find some spray paint in the same color as your foundation and it will be barely noticeable once the foliage is gone for the winter from the hydrangeas. Please don’t put in any edging; what you dug looks perfect and it’s so much more natural. I love the lattice on the post – what a good idea.
Yep, that’s a good idea to try to find a paint that matches the brick, so it will be camouflaged a bit better.
Love the garden. And I love the front door color..everything goes sooo well together!
Dee
Amen about removing the landscape cloth. It eventually builds up with soil on top anyway over the years and is not good for the soil aeration. I have some I need to remove this fall. Too darn hot to do it now.
First off, love, love, love the dining room mural. Regarding the border between the beds and grass, we have many, many beds and if there’s a little trench between the two there’s no need for anything else to maintain the separation. Regarding your green and white pallet, brilliant! It became the focus and the color of your house pretty much disappears.
Marian,
What a beautiful, inviting front garden for your home! I like what you are doing and can see the future garden in my mind.
Judith
Love what you have done!!!This color scheme is so restful;and yet,it’s beautiful….!I’m sure you will “figure it all out”as you go along.Thank you for sharing the loveliness…keep on keeping on!
Beautiful now but will probably look overplanted in a year or two. You’ll want to put some space between that large trellis and your siding. At least 6″ to protect the siding. It looks like it is just leaning against the house right now. Space it out and make it sturdy. Plants are surprisingly heavy.
Oh and I love love love the white garden. Sometimes called a full moon garden or moon garden. It will be absolutely luminous during a full moon in the summer if your artificial lighting doesn’t ruin the show.
Lovely gardens. Happy July 4th. May it be filled with family, friends, fun food,and no mice ?….a blog friend from Canada
I use a metal edging purchased at Home Depot on all of my gardens, they are extensive. As I age I’m trying to have these gardens as low maintenance as possible. Most estate gardens have very high quality metal edging around their flower beds. The one at Home Depot is not as thick and deep, but I’ve been happy with for almost 10 years, and I’m still installing. I place the wheel of my push mower in the mulch and cut away, make sure the edging is buried deep enough, and I have a perfect edge.
Marian,
I have been reading your posts for about a year and look forward to it each day! Your dining room mural is beautiful, so soft looking and the colors go perfectly with your rooms. The front garden is lovely. I’m an avid gardener and your design has given me some ideas to change my front garden up. God has given you the gift of art & design. Keep it up!
Laura
I can hardly wait to see what your next project will be! Where did you get the trellis that’s going up the post?
During the process of selling our house last fall, during the inspection I was chatting with the inspector mentioning that we never had a mouse problem in our house or I would have moved! (I hate mice and bats!) After inspecting our attic, he had a weird look on his face. He told me we had evidence of mice in our attic! WHAT??? He asked me what we had around our house – mulch or rocks. Mulch of course! He said that mulch is a good bedding for mice and they had found a way into our house from the exterior into the attic. He also said many houses have an attic/mouse problem and it is often discovered during inspections. Luckily, there weren’t so many that we could hear them in the walls.
Needless to say, in our next house, we will not be using mulch around our house. I’m wondering as I walk around our new neighborhood and see rocks around the perimeter of houses with mulch in garden areas away from the house if that is the reason why?
As much as I loved the look of fresh mulch vs. rocks, I don’t like mice and don’t want to attract them in any way to our new place!
Opinions?
Very interesting! We have had some mice around our garden area and then one found dead in my car, but we haven’t seen them or any evidence of them in our house, though. I am definitely keeping an eye out, though!! We see a mix of mulch and rock in our neighborhood… Hmmm.