
Do you have the builder-grade, brass, chandelier blues? There is no need! With 2 cans of spray paint, a glue gun, and some scrap fabric, you can give that cookie cutter chandelier a whole new look! I purchased this one on Craig’s List for $20 for the new retail space our shop is moving into.


1.) Remove the candle sleeves and (in a well-ventilated area) spray paint the chandelier. This one is sprayed in Oil Rubbed Bronze by Krylon, but you can use any color you choose.
2.) Unfortunately I don’t have any pictures of this process, but you can use the glue from a glue gun to make “wax drips” that make the sleeves look more like real candles.
3.) Spray the candle sleeves in a color of your choosing (I used Ivory by Krylon in a satin finish.) A great tip for spraying these is to put them on the end of an old broom handle. Then transfer them to flat surface to dry. This is the result…


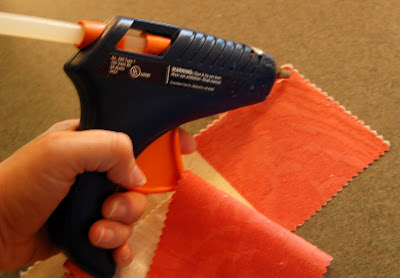

6.) Fold the fabric length wise with the right sides together, run a line of glue and press together. Work in 6 inch sections, so the glue doesn’t dry before you can stick the fabric together.
7.) Once you have a complete fabric “tube”, turn it right side out. This process can be a little frustrating, but you just have to work with it. A good tip is to use a large safety pin on the end your pushing through and a wooden spoon handle to help get it through. 8.) Thread the completed cord cover on the chandelier cord.
 9.) Put the candle sleeves back on…
…and tada! Brand new chandelier for about $27.00.
 This is going up in our shop, so it’s not wired, yet. I can’t wait to show you pictures of our new shop. We’re scheduled to move at the end of October, so be sure to check back for pictures!


48 Responses
What a bright idea! hee hee. I have a bunch of ol' brass chandeliers waiting to be transformed. Thank you for the inspiration!
: )
Julie M.
You said my favorite word ~ harlequin! Can't wait to see that! Love the finished chandelier; the color is much better than the brass and I love the cord cover idea.
That glue gun trick is genius! I bought the same exact chandelier at goodwill and painted it black too. Such a huge difference.
Love it! I think I threw one of these chandeliers in the trash years ago:(
I love it! We have a brass chandelier in our dining room that Ive been wanting to paint since we moved in. I just haven't gotten to it yet. Cant wait to give this a try. I am totally doing the cord cover…love that!
Simply Fabulous!
I bought a chandelier exactly like that at a charity yard sale for 50 cents. I also bought the rubbed bronze spray paint. It did not come with the cardboard candle covers. I don't know whether to leave it electric or pull the wires and make it a candleobra. I leaning toward electric.
I am so impressed with your tips. Great job on the chandelier. Love your work
ta da….i love it!!!!
Great job….love the tip on adding the candle drips. It looks beautiful and I look forward to seeing it hanging in it's new spot in your shop!
What do you mean you don't normally sew with glue? That's the only way I know how to sew! Haha! Sad but true.
I LOVE the idea of using the glue gun to make candle drips!
It looks absolutely lovely.
Wow…what a NEAT idea with using a glue gun to make candle drips…might need to try this out, thanks for sharing.
Blessings,
Linda
Me again! I featured you again today! Thanks so much, you rock! 🙂
I love the wax drips and would LOVE to see a cute fabric shade on top of those "candles"!
I painted two chandeliers this summer and they are just waiting to be hung. I am trying to get my butt in gear to make the cord covers so I can hang them. I like your no sew idea!
As with all your stuff – I LOVE IT!!
It looks gorgeous, I love the faux "candle wax" so creative.
ahhh, Miss Mustard…this is precious. I am on the lookout for a chandy about like this one. I love that paint you used…
Wonderful tips here…
What a great idea! I think I'm going to put drips on mine!!! I'm so excited! Why didn't I think of that! Your chandelier looks so much better painted!!
What an improvement from the brass! Great job on this! ~Ashley
Thank you, thank you!!! I've been looking for a way to revamp my old chandelier. This post was meant for me. I found you through Better After. Love your blog.
OH MY GOODNESS THIS IS ABSOLUTELY GORGEOUS!!!
This whole project was fabulous. However, I have to say my favorite part was the tip of using hot glue to make the "drips" on the candle sleeves! INGENIOUS! Too bad I didn't know that when I wanted some of those darn "drippy" sleeves. It would have saved me from running all over town looking for them! 🙂
Awesome chandelier! It's soo funny that you posted this, because I too just redid the same chandelier! lol I am going to post it tomorrow! Thank goodness I painted mine white, because I don't want you to think that I copied! 😉
Look for my post in the morning! Have a great day!
-Ruth Ann
i love, love, love it !!!!!!!!!
Oh that just looks fabulous! I so wish I had a different light fixture in my dining room so I could have some fun with it (and beads!)
I have a linky party going on come on over and link up! http://theshadesofpink.blogspot.com/2009/09/room-month-shade-tutorial.html
Great transformation! Love the "wax drips" – so creative!
This looks amazing! I would love to do something with the one over over dining room table. I might have to add this to my DIY list. Thanks for sharing!
thanks for posting this! i have the same exact looking chandelier in my dining and i have been waiting for the hubs to take it down so i can do the same exact thing! painting it in a black color as well. i hope to get to it soon and share my finished product!
ps following you now! come check my out and follow me too!
Stopping by via Kimba's blog. Great job – love the drips!
You did an awesome job on this! Love the striped chain cover!
Debra
looks SO much better! I have a brassy light fixture that I'd LOVE to update, but I'm terrified of taking it down to work on and have to figure out how to get back up because I have no idea how to work with the wiring aspect. Any words of wisdom in this regard?
now, that is my kind of "sewing"…LOL…what an amazing transformation!!! your new chandelier looks great!!!
very cute! Love the 'glue gun candle wax drips'! How exciting to open a shop….can't wait to see it!
Shellagh
Brass chandelier blues..tee hee hee!! Nice makeover!! I'm also enjoying your slideshow. I keep messing up with my comment because I keep looking down at the fabulous transformations. Miss Mustardseed, you are one talented chick. Thanks for the link!
~Andy@ Poppies @ Play
I love the glue gun wax drips! I need to find a chandelier!
That's amazing! It looks gorgeous. What great ideas. Thanks for sharing. I'm having a giveaway today. Stop by if you get a chance and enter.
Oh my Goodness…that's exactly like the one I just recently purchased for our dining room. I spray painted mine black and put shades on it. I love how you added the candle drips. Can't wait to see your new shop. Be sure to keep us posted.
Blessings,
Gail
That glue gun trick is GENIUS!!!
Wow. there have been some great projects today, and this one is one of the BEST! thanks so much for sharing your project with Trash to Treasure Tuesday readers. I'm staring at my dining room chandelier right now, planning a paint job!
another project for the to-do list. I have this same brass chandalier to transform
looks great! so much better!
SMiles!
Michelle
Fabulous!!! love the black.
Cindy did your project at My Romantic Home with a link back to you! Just stopping by to give credit where it is due! wonderful job and great idea!
blessings. Dixie
I added the drips to my covers and I posted it on my blog today. I couldn't remember where I had seen this great idea but I knew one of my readers would know, and they did so I linked to you and gave you the credit. Thanks so much for this great idea!
Did you sand and/or prime the chandy before painting? ~Thanks!