
I had several questions on how to make the ruffled bed skirt I had on the antique iron bed frame, so I thought I would make a tutorial. In addition to sharing a tutorial on how to make a ruffled bed skirt, I am sharing a no-sew option for those who either don’t have a sewing machine (or sewing skills) or simply don’t want to bother. Really, no one will ever know!

Bed skirts are the kind of thing I’ve always preferred to make myself. I feel like most store-bought versions are skimpy on fabric and are rarely exactly the right “drop” or length, so I’ve opted to make my own for years. Even before I was sewing with any amount of proficiency.
This is the kind of thing you can no-sew your way through and no one will ever know. I’ll let you know the no-sew steps when we get to that part in this tutorial on how to make a ruffled bed skirt.
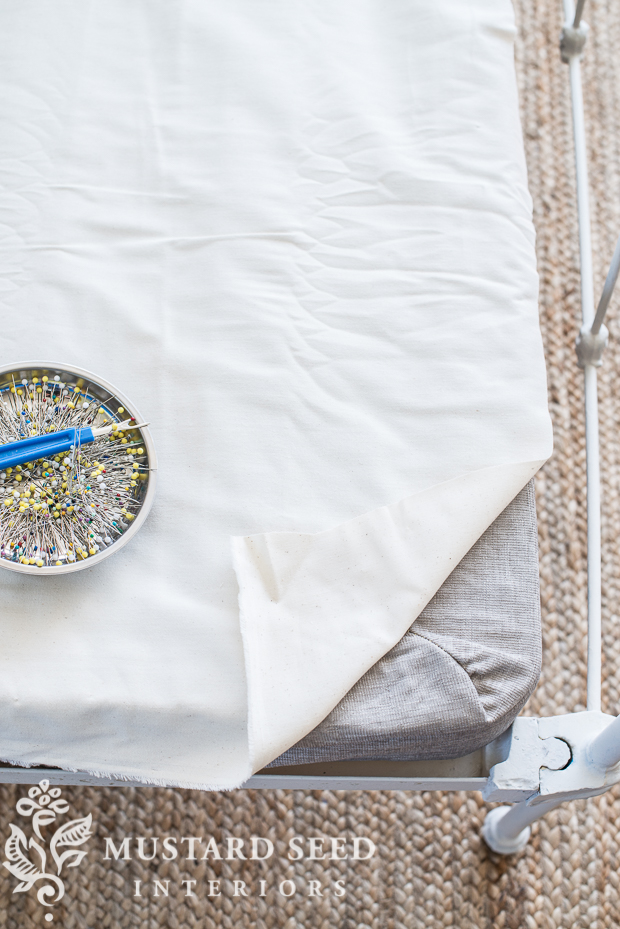
So, you start with a piece of fabric that will fit between the mattress and the box spring. A cheap flat sheet is a perfect option, but it can be any kind of fabric you have on hand because it won’t be visible.

Cut it to size, about an inch larger than the boxspring on all sides, to give yourself a generous seam allowance.
Now we’re onto the fabric. If you’re a no-sewer, I would suggest using a fabric that already has a hem, like a fabric shower curtain, drop cloth, or tablecloth. I happened to use a tablecloth because I was looking for a blue & white “window pane” plaid fabric and this was all I could find. I was also on a tight timeline, so I needed to order fabric with expedited shipping. At $30/each, I didn’t choose tablecloths because they were a less expensive option, just an FYI. THIS is the one I ordered. Actually, I ordered two of them for a full-sized bed.
I cut each tablecloth in thirds, so I had six 20″ x 60″ pieces of fabric. Because it was hemmed on four sides, I had four pieces with one 60″ hemmed edge and two pieces that needed to be hemmed. Are you tracking with me?
So, I pressed and hemmed one long edge on those two pieces. If you’re no-sewing this thing, you can use a small bead of fabric glue or fusible interfacing to hold the hem.
The trick to a nice hem is ironing. Even if you’re a no-sewer, you need to be an iron-er. It’s one of those steps that seems like a good idea to skip in order to save time, but it makes it harder in the long run and the finished product doesn’t look as sharp. This is coming from a former non-iron-er.
Fold the edge you’re hemming over about 1/2″…

…and press it down with a hot iron.
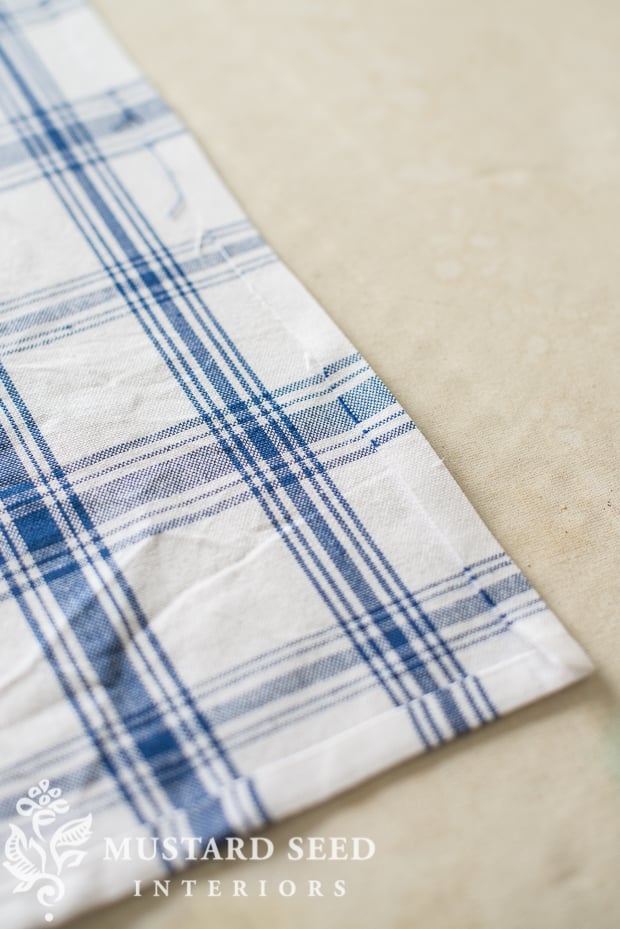
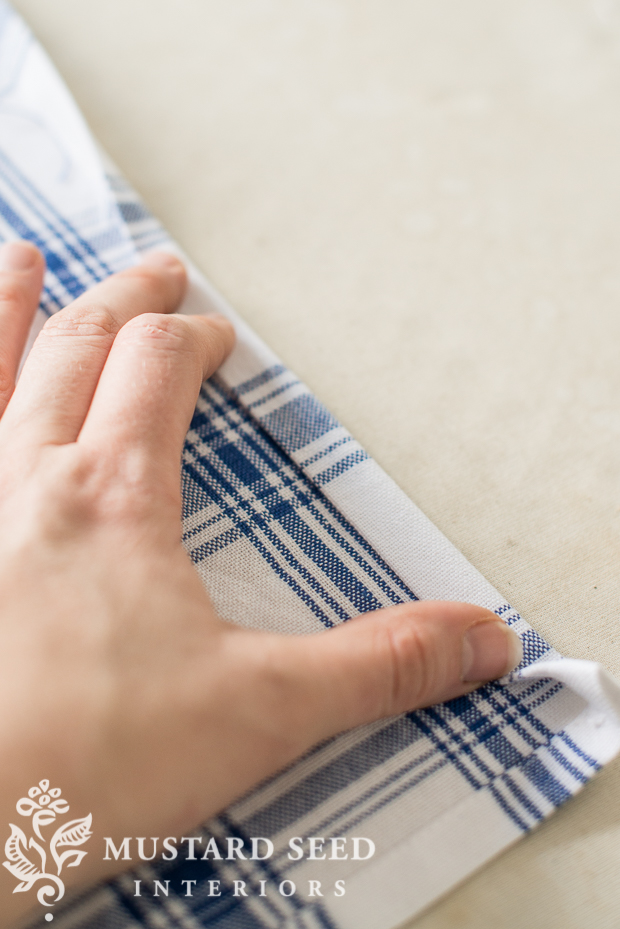
Fold it over one more time and iron that fold, so you have a nice crease. Pin it in a few places to hold it until it is stitched. If you’re using fusible webbing, insert it into that fold and iron until the adhesive is activated. (I have found fusible webbings more time-consuming than sewing if you’re using a decorator-weight fabric. Just an FYI.) You can also run a bead of fabric glue and pin it in a few places until it dries.
Once the bottom edge on all of the pieces were hemmed, I pieced two of the 20″ x 60″ pieces together, to make one 20″ x 120″ piece. To do this, put the right sides together and lined up the hems. Pin pieces together along the edge you want to sew and sew them together.

Since I was working with a tablecloth that was hemmed, I had to cut off the hemmed edges to reduce bulk at the seam.

And I ironed the seam open, so it would lay flat.
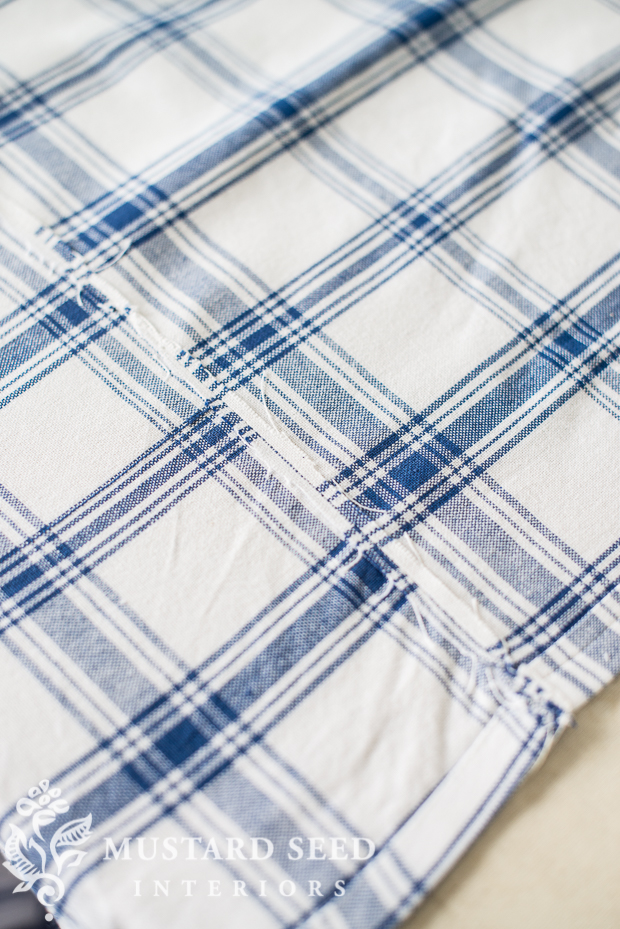
You’ll notice that the pattern is a little off where the seams meet. Ideally, you want to match up the pattern, but I was working with a limited amount of fabric, so I just went with it. It won’t be noticeable, because I’ll hide the seam in a ruffle.
For the no-sew option, don’t even worry about piecing them together. Just overlap the two pieces when you ruffle.
Repeat this with the other four pieces. I pieced three sets of two together since I needed an “opening” in the skirt for the bed frame leg.
I pinned the skirt into place like I do slipcovers, inside out. So, in the photo below, the right side of the fabric is facing in towards the bed frame. I pinned each end, then the center, then the center of each side between the end of the bed and the center of it. This ensures that the fabric is distributed evenly throughout the ruffle. (The raw edges of the decking and the skirt should face the same direction when pinning, so none of them will be visible when sewn and turned right-side-out.)
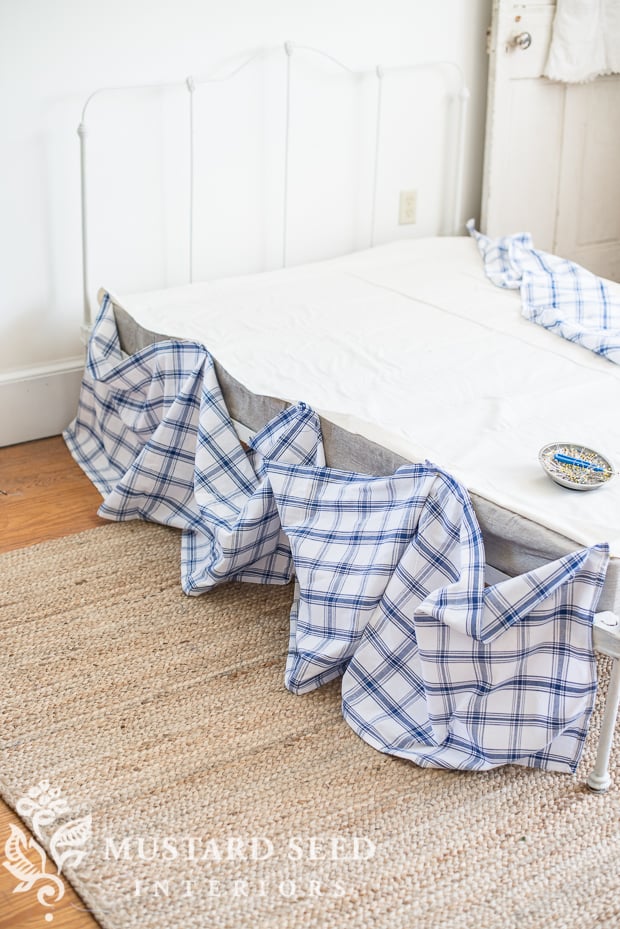
For a no-sew option, I would use a hot glue gun and glue it to the fabric “decking” (the piece that fits over the box spring), and would work right-side-out. You can also just pin the fabric in place, pinning the fabric a couple of inches towards the center of the bed, so the pins will be covered by the mattress. I have several things in my home, like closures on the underside of slip-covered cushions, that are just pinned close. I’ve yet to be pulled over by the sewing police.

I then ruffled and pinned the rest of the skirt. You could make these by measuring, which I did with my mom’s bed skirt, but I really like pinning on the actual boxspring, so I know it will fit properly. I can’t tell you how many times my fabric has “shrunk” when I work off of measurements! (Really I just mis-measure or get a little too generous with my seam allowances.)

I repeated this on the other two sides (although I used a little less fabric for the end of the bed, since it’s a full and didn’t require as much fabric.)
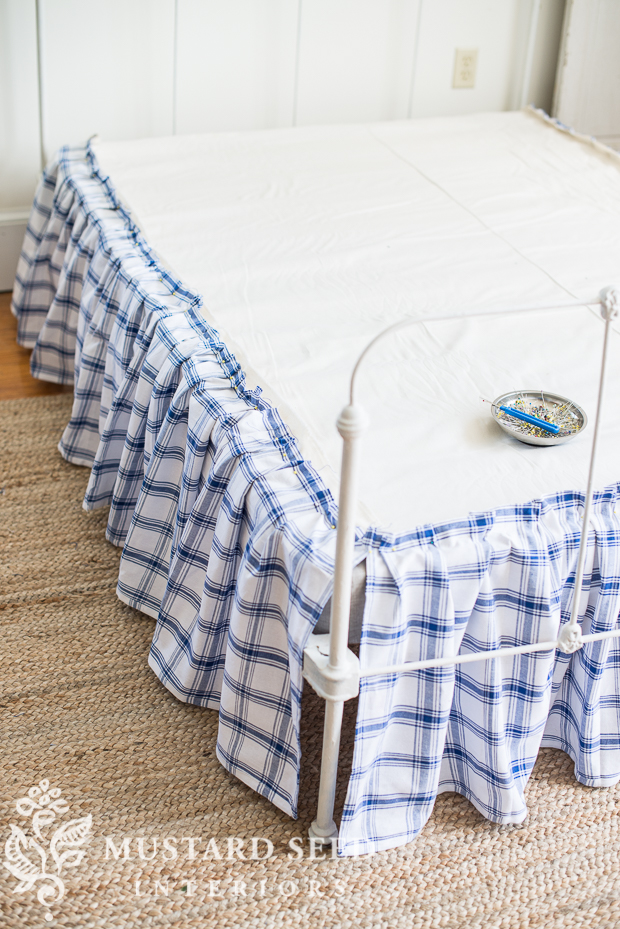
I stitched along the pins, trimmed the excess thread, and put it back on the bed with the right side showing.
I used this same technique to make my parent’s bed skirt, but I made it in one, long continuous piece of fabric since they don’t have a footboard.
And that’s it! That’s how to make a ruffled bed skirt. I think bed skirts are very forgiving, so if you’re new to sewing, it’s a great project to start with!
You can find more sewing and slipcover tutorials HERE.


27 Responses
What’s that beautiful fabric you used for your parents bed skirt?
NM! Found it in your other post! Gorgeous!
Thank you for the no-sew option!
Great tutorial, Marian!
You’re a dream~ I was dying to make my own~ The dust ruffle I ordered is still 2 inches to short~ UGH~ it barely touches the ground~ This is perfection~ thanks ~ and yes, my MIL taught me the ironing trick, I tried to skip it~ but wasn’t a good idea~ so IRON it is~!
Thanks for the show/tell~!
Great tut! Can’t wait to see the newest haul.
toot, lol!
Thank you so much for this! I’ve wanted a print bed skirt for so long and every one I find is far too expensive. I can do this!
I have a question about your ruffles – are you really sort of pleating the material that you have pinned and then sewing? This does seem simpler. When I made mine years ago, i had to pull the thread to ruffle the skirt – which I found hard to do without the thread breaking to make it full enough.. If you are “pleating” the material – folding it over at short intervals – do you fold them all different directions or all the same direction. I love the way both skirts look. I have never found a skirt that is the correct length or fabric that works for my beds – so this is the way to go! I love your choice of fabrics. I now need to get to work and make new skirts for my beds.
Yeah, it’s sort of more of a random, unstructured pleat that ends up looking like a ruffle. I know you can do gathering by pulling the thread, etc, but I usually work with heavier fabrics that it wouldn’t work as well on.
You are so amazing (and funny!) saying it is a easy project for non sewers, you have the “Blue thing” laying in your pin bowl that makes me sweat just seeing it! I hate ripping out!!!!
Thank you so much! I have wanted to do this to our bed because anything you buy in the stores, never fits. You’re awesome and thanks again!!
Thanks for this very useful post, Marian. For years I have had no luck finding bedskirts that I liked or that were long enough to reach the floor. I’ve thought about making my own, but just never have attempted it. And I am a sewer from way back! I just wasn’t sure what to use for the covering for the mattress. I tho’t an old mattress pad would work, but never put one together. Now I have NO excuse!
Can’t wait to see the haul!
I bought a very cheap bedskirt and put mine over it. This provided the top and additional bulk to the skirt!
What kind of sewing machine is it and what foot? Great job!
a little intense for non Diy but great info
What do you do about laundry when needed? I also like the non flat sheet but just elastic casing around panels
Good option for those who sew but really easy
thx for tututorial
Linda
Inside Etc &Design
Accept my apology in advance! I am a DIY’er yet I found that tutorial most difficult to follow & comprehend. My friend an accomplished seamstress (she creates wedding gowns, draperies, women’s & men’s suits, and dresses in her atelier) likewise found that tutorial difficult to follow. Perhaps, that is an inspiration for you to create a new book exclusively on sewing, upholestry and quilts? Otherwise, I love all you do MMM & send blessings for Luckett’s wishing I could attend.
I felt a tad confused, too — when it got to the ruffling part.
Now I get it, though.
Our beds both have bars at the foot of the bed which require 2 sections of skirt.
I’d have sewn skirts but was dreading the pulling of the thread part!
Good luck at your show!
Oh, sorry about that! I’ve made them so many times, I guess it made sense to me. Was there a particular part where you were confused? Sewing tutorials are always hard to write with clarity, which is one reason why I like making video tutorials. You can show the fabric in action, which makes it easier to understand.
Oh my gosh I love this! you could add velcro and make it so easy to take off and wash. I have a dog that gets my dust ruffle so dirty. I bought one that is “easy off”…so easy it falls off every day, grrr. plus it’s so ugly. this is limitless.
I love this idea. I think the bed skirts you made are more beautiful than any store bought one.
Thank You for the Tutorial… I do have a silly question here…I have an oak queen bed with side rails with the slats that run across rail to rail. Does the skirt go over the side rails or tuck in behind them. Then I would have to have sections between the slats, but then there would be gaps because of the slats… Is there a right way to do this?? Thanks, Faith
Love everything you do, Marian! I make my own bed skirts, too, but always attach them to a cheap fitted sheet. Just put the fitted sheet on the box spring, mark around the top edge with a marker, remove and use that line as a guide for attaching the bed skirt. Not sure if all that makes sense, but it sure makes sewing a bed skirt easier!
The information given by you is very amazing and exceptionally good and aanyalinen as well give this navy blue bed skirt its greatly OK With incredible quality at low cost.
How wide were your panels–double, triple the length you were covering before gathering?
I love this. I’ve just decorated 3 bedrooms and know if I make my own balances they will look better. Thank you for your easy to understand tutorial.
Thanks for sharing these ideas.