
Several people asked for a tutorial on the part upholstered/part slipcovered French chair I revealed yesterday, so this is it! This isn’t a comprehensive upholstery post, but it will give you an idea of what’s involved in upholstering the back and arms of a chair in this style.

To get you started, you can read THIS POST on stripping upholstery. I didn’t strip the upholstery off the seat and cushion, because I’m going to make a slipcover instead. I had to take everything off of the back and I stripped the arms down to the muslin. There just wasn’t a reason to strip them down beyond that.

I salvaged the batting, webbing and burlap to reuse and used the fabric pieces I removed as templates for the new fabric pieces. I cut all of my pieces and set them out so I was all ready to go.

When upholstering a chair like this, you start with the piece of fabric that shows as the back panel. Make sure it’s facing out, since it will be seen from the back! I like to staple it in a few places around the frame to make sure the pattern is straight and the fabric is tight and even.

Then I’ll go back and add about 2-3 staples per linear inch, so it’s secure and there aren’t any gaps in the fabric. Let me talk about the upholstery gun for a second. I use a pneumatic upholstery staple gun by Porter Cable. It hooks up to a compressor. I have tried using a manual staple gun and an electric one and they just don’t cut it with upholstery. They are too bulky and not powerful enough. If you’re going to upholster, the proper tools make a huge difference, so get whatever brand you want, but get a pneumatic, upholstery staple gun.

Once the back is on, I trimmed the fabric, so it’s not hanging over the frame, causing excess bulk.

Then, I rebuilt the back as it was before I took it apart. If you’re working on a complicated chair, it’s a good idea to take pictures and notes, so you can put it back together the same way. In this case, it had a layer of thin batting…

…a vertical strip of upholstery webbing stapled into the frame at the top and bottom…
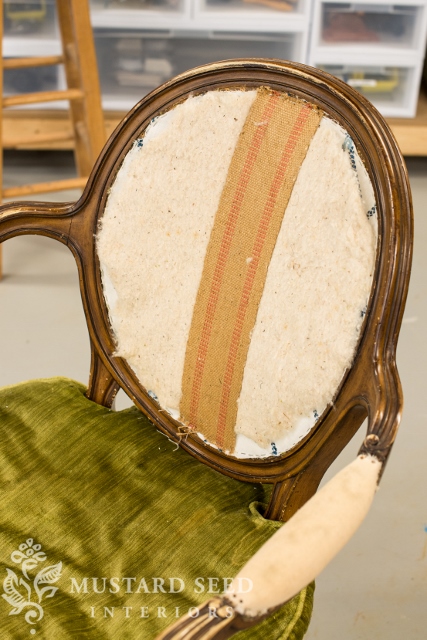
…burlap to add further stability, stapled to the frame around the perimeter…

…the cushioning and then the top layer of fabric. I stapled the top layer of fabric the same as I did the back, so the stripe was properly positioned and I didn’t end up with pleats, gaps or other wonky things that can happen in upholstery.

Even if you try to cut the fabric to exactly what you need, you might have to trim or you might come up short, because different fabrics have a different amount of stretch to them. I always give myself a little bit more fabric to work with, because I’d rather trim excess than not have enough and have to remove the piece and start over. That’s not fun. I know.
Obviously, this grain sack fabric needed a trim, so I clipped it with some sharp scissors.

I did the arms in the same manner…replacing the layer of batting and then stapling on the fabric.

I covered the line of staples with gimp trim affixed with hot glue. You could use a double welting here, but gimp trim is just so much easier!

If you’re new to the world of upholstery, I think this style of chair is one of the easiest to start with, since the panels of fabric are framed in wood. So, if you have this style of chair and want to tackle it, don’t be intimidated. It’s a very doable beginner upholstery project…
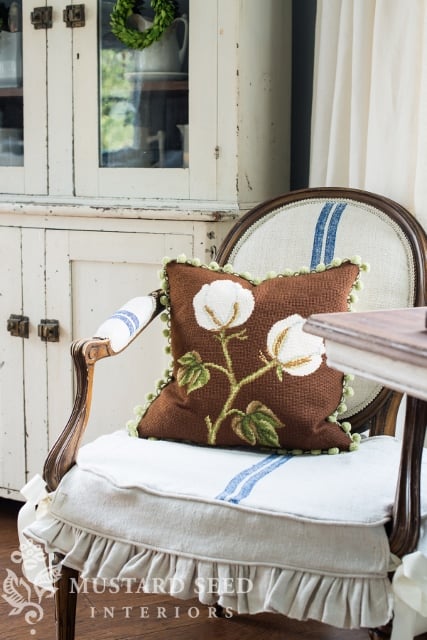
…with beautiful results!


62 Responses
Looks beautiful! I have a very easy trick to get rid of the wavy welt cord on the front of the slipcover. Once I learned it my life was never the same! I could show you sometime 🙂
Please DO share! I hate wavy welt cord on upholstery/slipcover, and I’d love to know your trick!!
HI
What a beautiful chair! I attempted a similar one about a month ago and it wasn’t to bad. I painted the frame in your Ironstone Milk paint and I love the chipiness.
Great explanation on how to do the back and arm. I have done a little of most everything (couch slipcover and chair slipcover for a chair similar to this) and I think it looks pretty easy peasy. Wish I had a chair to try it on! I think I will do a top slipcover and bottom one (as you did here) on my similar chair with the hemp fabric I got on Decor Steals a few days ago. Order #2 of that fabric and I haven’t used the first order yet–for pillows. I wanted more on hand for when we build our mudroom 1-2 years from now. 🙂
I have a question about the removing of the fabric. I am currently redoing a french chair and having the toughest time removing the old fabric. the staples WILL NOT come out and they are all breaking when I try to remove them. Is there a special tool that I can use? There are just soooo many of them too, I can’t even try to work around them with the new fabric. UGH please help!!!
Read her post that is linked in this one right under the first picture of the chair. She gives all that information.
Thanks, Carla! All the tools are shown there and it’s very helpful!
Wow!!!!! You give me so much hope Miss Mustardseed…
This is great. I have a chair sitting in the garage waiting to be reupholstered. With my new sewing machine (a gift from last Christmas, never been used…yet), I’m willing to tackle an upholstery project this winter! And I LOVE the fabric you used for the back of the chair! So informative – thanks for sharing!! ox
Very nicely done! i have two chairs to tackle and I plan to borrow a pneumatic stapler and air compressor! I too learned the hard way! do you have any tips or tricks to get nailheads on straight? I have this lovely old wing back with dark wood trim that has about 1000 of them lined up in the gimp. I’m terrified, but if I don’t tackle that choir soon someone is going to end up on the floor! LOL!
I am curious about the average price you pay for one of these chairs (not necessarily this in particular)?
I have found them for as low as $10 and have paid as much as $125 for some that were really special, so the range varies greatly depending on the source and the specific chair. From a dealer, you can expect $125-250/chair.
Thank you for your answer, that is very helpful! I have two we inherited from my husband family and I love them! I am going to keep my eyes open for more. You have inspired me with you grain sack slip covers!
Thanks for sharing. You made it look easy. If I do much of this, I’ll have to invest in one of those guns. My regular electric staple guns don’t cut it.
I am soooo glad you stressed the use of a pneumatic stapler. I think people get frustrated TRYING to use a hand or electric staple gun and give up. They are worthless when it comes to upholstering anything! This gun and the little compressor is one of the things I suggest should be in every woman’s tool box!!!
http://beckwithstreasures.com/every-womans-tool-box/
If you have the right tools, you are more likely to tackle those “impossible” jobs…because truth be told, with the RIGHT tools, you can do anything!!!
That is an excellent post Beck. Thanks.
I’m doing a chair just like the one showing only it had tacks. My problem is
in so can hardly use it it is too hard for me ,now what do you suggest ?
I’m doing a chair just like the one you are showing and it has tack’s. Some steps I
have to use a Stapler so I purchased one and it is to hard to use for me .What do you
suggest ?
Your workmanship is beautiful and you have such a keen eye for putting fabrics together. I love the chair and the back is simply darling. Upholstering looks so complicated but your tutorial makes it look easy. Thanks so much for sharing!
Ahhhhh, so that’s how the back is done so cleanly! Thank you for sharing! I definitely want to redo my two similar chairs.
That is once we finish remodeling the guest bathroom and powder room, paint my end tables, finish decorating my master bedroom, landscape the backyard in the spring…you get the idea 😉
Love homemaking!
Thanks Marian for the never ceasing inspiration!
Going to pin it now so I have it on file 🙂
Thank you so much!
I have a question: what size staples? I clicked over to check out the stapler and several sizes were recommended. I would like to recover some chairs and I imagine you don’t want them too deep or too shallow. What size do you typically use?
It depends on what I’m doing. I get longer staples when I’m working with thicker fabrics or going through more layers and shorter ones when I’m using light fabrics. You can order a few different sizes and see what works best for your project.
Wow! You made it look so easy! Now I won’t be afraid to buy a chair like this that needs some TLC. Thanks for sharing!
Brandy, I haven’t found a pneumatic stapler that takes anything wider than a 1/4″ width staple…and the shortest depth I can find is 1/2″…which is fine on MOST pieces. But if you can find 1/4″ long ones, that would be awesome!. The only downside I have found is that on some fabrics, like linens and burlap, you have to be VERY careful when you stretch the fabric because the staples set so firmly that the fabric can tear. If that happens, I IMMEDIATELY apply a dab of fabric glue on the spot and let it dry completely before I finish stretching and stapling the piece.
The wood on older pieces (even soft woods like pine) is going to be very hard because of the age…which is why the hand staplers just don’t work!
Try ROWLEY online. I have 1/4 ” staples and an electric gun from them with a narrow nose.
Thank you both so much!
It’s just gorgeous!!
Fotini
Thank you so very much for the tutorial. I’m about to attempt my first sofa, and it is constructed a lot like your chair. Now I’m all pumped up and ready to go! THANKS!!!!
You really should be a teacher! I feel pretty confident that I can do this…now all I need to do is find a $10 chair!
You’ve done a wonderful job. Did you do anything to build up the seat even though you covered it. I have a chair I’d love to do and the seat is pretty well without cushioning.
No, I didn’t for this one. The cushion is down, so it’s a little slouchy, but I like that for this style of chair. If you wanted to build a eat up a bit, though, you could do with with foam or wrap the cushion with batting before covering it.
I LOVE your tutorials! Makes me want to try this!
2 questions……What tool/s did you use to remove the old fabric and trim? And….what is the stuff that seems to still be on the chair where the upholstery had been attached? Or is that an optical illusion?
Thanks!!
I use a staple/tack puller that is an upholstery tool. Then, I use a pair of wire cutters. I use those to rock out staples and tacks and to slip off broken staple pieces.
Make sure to wear gloves! It will save your hands from blisters.
Oh, and the stuff on the frame is just the holes from the staples and tacks. I cleaned everything off, so it’s just bare wood.
Would love to know where you found the cotton boll pillow. We are cotton farmers and I have looked everywhere. Loved the tutorial! Long time follower…..
Thanks for the tutorial, Marian!
And yes, your result is truly beautiful.
Love your blog! FYI, I’m a designer in Birmingham Al, and the brown floral you featured yesterday is available @ a local fabric shop in town for 21.99 per yard. They also have a website. The shop is King Cotten, check them out!
Happy Decorating!
Thanks that was very helpful!!!!
Kellene
Ohhhh… that was great! I soaked up every picture and every word. I have a couple of chairs like this. I might just try it!
Cindy
I know this question has nothing to do with your post, but what happened to the white wool rug in your bedroom? I love that rug and noticed a few posts back that it wasn’t in there anymore. Just curious!
Thank you Marian for posting your tutorials! The chair is adorable-I love what you did to the back of it!
What an amazing job you made. I haven’t been too keen to tackle upholstery thinking it required lots of sewing. This tutorial is great and given me an idea for my mums piano stool I am going to re-paint and need to re upholster.
Lee 🙂
Thank you Marian! You make it look so easy 🙂
Love how this chair came out and thank you so much for writing a tutorial. I wish I could find them for $10 here in MA!
This was great, but as usual, I always think of my likely pitfalls…Do you ever run into problems with staples layered upon staples? I can just picture myself attempting to shoot staples where I think I need them only to find that I am literally bouncing off of a staple from a lower layer. Does that make sense? Thank you!
Yes, it does. That’s not very common, though. Every once in a while a staple will just “crunch” because it’s hit another one, but the staples are so thin, it’s not usually a problem. 🙂
These tutorials are just so fantastic – they are the main reason why I come to mms2.wpengine.com.
Many thanks for the time and effort you’ve put in to include this 🙂 Cheers
Thanks so much for posting this, so informative and helpful info. One day I will attempt!! You truly are a blessing in my emails! Love your chairs and all your work!
Thanks a lot for a geat tutorial! Together with the Pictures it´s easy to follow and IF i had a chair of this type, I wouldn´t hesitate de do it!!
I loooove the result you got too!
Great tutorial! I am so glad you suggested the pneumatic stapler to everyone. I have had one for about two years and cannot live without it! A great tool for any DIYer!
Beautiful! The hot glue that you use to attach the gimp trim, is it regular glue stick/hot glue gun glue, like from a craft store, or is it special upholstery/fabric glue? Thanks!
Yes, it’s just regular glue stick.
Thanks so much for the tutorial! I love these chairs, but I don’t have any. I recently walked away from a similar one (at a good price at our ReStore) because I decided it was beyond my limited upholstering skills. After seeing this, I know I COULD have done it after all! I am tempted to go back and see if the chair is still there! (Hoping that everyone else who looked at it maybe walked away for the same reason!) 😉 Thanks again– I love your blog and always find inspiration there! …And Merry Christmas to you and yours!
Thank you so much for this post. I just bought a chair almost identical to yours & thought I’d have to send it to the upholstery shop. You also solved my husbands problem about what to get me for Christmas, an upholstery staple gun. Can’t wait to get started.
I love the fabric you chose, and you really do make it look easy! I’ve done seats before, but never the backs or arms. I believe I am ready to move up in the world of upholstering…or at least try it.
Debbie 🙂
Darling, darling chair. But what really caught my eye was the brown cotton pillow. Is it one of your “finds” or did you do the needlepoint? Love your sense of style <3
Absolutely perfect! I have been searching for a posting like this for awhile. I should have known you’d have something on your site! Thank you, thank you, thank you!
Where did you get this fabric?
So glad that I found your site–and thankful that you shared this information. I have four chairs that I have put off redoing for years because I was uncertain how to approach redoing them. Now I can tackle them and finally be able to enjoy them!
Where did you buy the grain sack fabric for the front of the chair?
Hi,
I love the nail heads showing is there a air nailer that you’ve used?? I looked up the stapler you use and it looks like it only uses staples.
Thanks, Joyce Tampa Fl.
Those are upholstery tacks and I just left them showing! I hammered them in by hand.