
We introduced the Tough Coat a few months ago as part of the MMS Milk Paint line. It was a product that was many months in the making.

You see, I’m a pretty tough sell when it comes to adding new products to the line. I have to really love them, use them and being okay with them sporting my name. I never planned on carrying a water based poly product, because my preference is for oils and waxes. When I first started furniture painting, I used water based poly and was usually disappointed with the finish. It got so much better when I found smooth applicator pads and even better when I started using my sprayer. I never imagined going back once I started using waxes and oils, though.
Then, I had to deal with this piece…

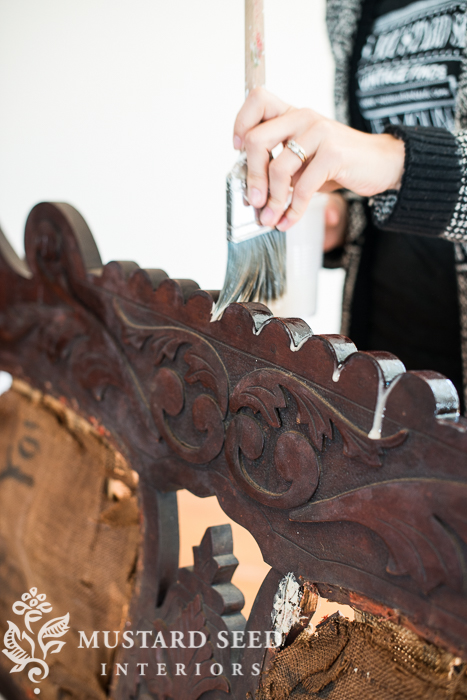
I painted it with one coat of milk paint that almost all fell off! I have had pieces chip before, but this was crazy. Just a few scraps of paint were clinging on for dear life. I decided it was time to pull out the sample of Tough Coat I had been ignoring for a few months. I lightly sanded the chipped milk paint and applied a coat of Tough Coat to seal the chipping and, hopefully, help the next coat of milk paint adhere. I ended up learning a lot about the product and saw what a great compliment it would be to the line.
It stopped the chipping, it “primed” the piece, so that milk paint would stick to it, and it even sealed the yellowish stain that was bleeding through. I was able to get a really cool finish with it, actually. I e-mailed the manufacturer immediately and let them know I was finally ready to consider it for the line.
A few months later, we were in production and it was launched this fall.
I’ve since used it to seal the “crusty counter” (it did an amazing job at that)…

…and we used it to seal several pieces before painting them for the Chapel Market.

A video for this product is long overdue, so Kriste and I made one to cover the basics of the Tough Coat.
And here it is…
- Make sure you give it plenty of time to cure before heavy use. This would include setting heavy/wet/hot things on the surface or banging it around a lot. Most dings and chips will happen during the cure time, so it’s important to be gentle with it. (Remember it’s like nail polish. Don’t go “digging through your purse for your keys while your nails are wet”, so to speak.)
- I would suggest this for all finishes and paints you’re using for the first time… test it out on a small spot to make sure you like the way it looks. Everyone has different preferences for feel, thickness, gloss level, etc. Make sure you like the look before you slather it over an entire dining room set.
With four alternatives for top coats in our line (Furniture Wax, Hemp Oil, Tung Oil & Tough Coat), plus all of the other options available on the market, you should be able to find one that’s just right for you and your project!
![]()
Before I sign off for the night, I wanted to highlight a few projects Kriste shared on the MMSMP blog. She has been painting up a storm and journaling all about it. I don’t see her projects until they are posted on the blog and I was really inspired by her. I am totally copying some of these!
I thought these painted wooden bead garlands are so pretty and simple…

And these hand painted clay ornaments are my favorite…
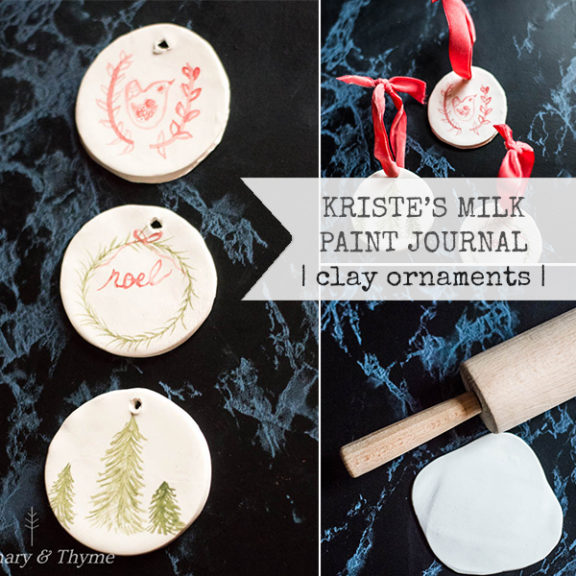
…totally copying.
I’ll see you all tomorrow for Furniture Feature Friday, our last one before we take a break for the holidays!


14 Responses
Very informative video, however I have one question, if you use the tough coat as a primer then paint with milk paint do you still use an oil or wax topcoat?
Great question! Yes, I do. In the case of the settee and the dresser, I applied the Tough Coat, then one or two layers of milk paint (without the bonding agent), then applied the Hemp Oil or one of our waxes. The surface you’re applying it over is the milk paint, not the Tough Coat, so it soaks into it like it should. Does that make sense?
I have a question too.
How is this different from adding the bonding agent to the milk paint. Am I missing something?
Is this primarily a chipping sealer for the wood before adding paint? And would the bonding agent not do the same thing when added to the paint before painting. Am I making sense? 😀
I’m about to use your bonding agent in actually chalk paint to paint a couple slick night stands.
Should I use tough coat instead? Sorry…I’m just a little confused.
Yep, sorry for the confusion! If you know you don’t want the piece to chip, add the bonding agent and you’re good to go. If you have a piece that might bleed through a red or yellow stain, I would suggest using the Tough Coat first. If you choose to not use the Bonding Agent on a piece and it chips a lot, you can seal it with Tough Coat to prevent it from chipping further. You can also sand, use Tough Coat and apply another coat of milk paint. I hope that helps!
Basically, it’s a versatile product that can be used in a variety of ways and you can choose which ways work best for you. 🙂
Thanks for the video. It answered my question I was wondering for use with the waxes. I like the fact there is different choices after I paint and now I know thaat I can use this on those especially dark pieces I want to lighten and not have bleed through….
Yes, this is just another choice. 🙂
I totally loved Kristi’s blog and immediately went and created the clay ornaments!! I blogged about it here http://mishmashers.blogspot.com/2014/12/personalized-ornaments-or-gift-tags.html and linked back to Kristi. Thanks for introducing us to your friend 🙂
Nothing about technique and all about feeling … you are so loved Marian! For the beautiful work you do but also for, and so much obviously so, the beautiful person you are on the inside. Thank you. Take care, Merry Christmas and happy holidays! 🙂
Thank you, Mia. What a sweet comment. Merry Christmas to you as well and thanks for reading my blog!
How long does it take to dry?
Is there a “cure” time before you suggest using the piece?
Do you typically only need one coat if your using as a topcoat?
Today is question day for you 🙂 I painted a new farm style kitchen table and waxed it; big mistake because it gets lots of kid use; I let it cure and set for a week or so; once we started using it kept getting dings and scrapes; I like the distressed look but this looks awful; would this be a solution to seal the table with – again, I’m okay with the distressed look and a few dings are going to happen but this just looks unfinished, and I wondered if you thought this might help? thank you 🙂
Where can I purchase tough coat? I’m having hard time finding any link to purchase and really wondering if it’s the right choice to use on a chippy, old fireplace surround.
Hi, I’m about to paint an antique small dresser I found (which is a really dark wood) in either grain sack or farmhouse white and was wondering if being it is going to be my bathroom vanity should I use this tough coat on it or would the wax or hemp oil be enough protection for a bathroom? Appreciate any advice.
Thanks for the helpful video! Quick question…Would using a foam brush help with eliminating brush strokes?
Thanks!