
We are finally here…get your staple guns out and let’s start upholstering!! I know it’s hard to believe that it takes four parts to get to the point when you can actually upholster, but that’s often how DIY projects are – you have to do several steps to get to the fun part (or at least the part when it starts looking like an improvement and not an epic fail.)
This episode is the longest, because I wanted to show each step in detail, especially the tricky places. I know it also helps visual learners to actually see what I’m doing as opposed to just hearing me describe it. I also wanted to do a bit of hand-holding for people who are brand new to upholstery.
I talk about the staple gun I use in the video, but I thought I would link to it here as well. It’s a Porter Cable Pneumatic Upholstery staple gun. It’s key that it’s pneumatic (powered with air) AND that it’s a staple gun meant for upholstery. Trust me, I have tried the manual and electric ones and they just don’t work for this kind of project. Don’t torture yourself by using the wrong tools.
I’m using 3/8″ 22 gauge staples, but make sure you check what size your staple gun accepts.
As a sign that this tutorial was successful, Kriste (a first-time upholsterer) felt comfortable enough to work on the second chair on her own and she’s doing a fantastic job with it. I’m planning to sell these, so they have to be good and so far, it’s perfect. (No pressure, Kriste!)

She actually told me not to touch “her chair”, so she can finish it.
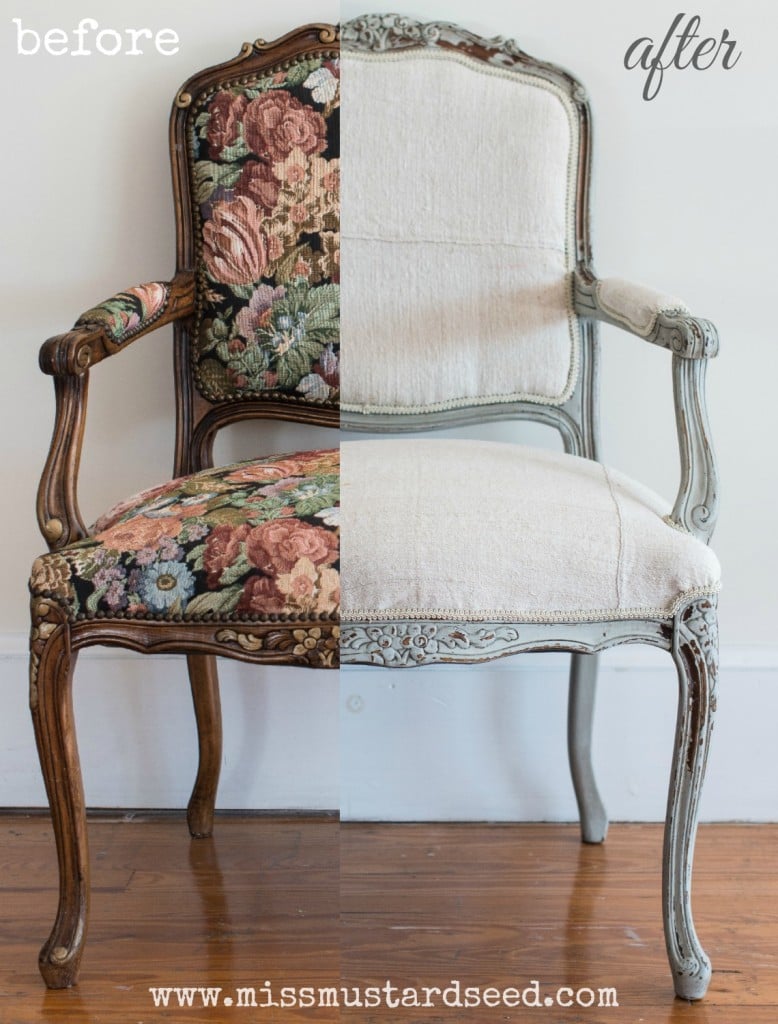
And, we’re far enough along that I thought I would share how the finished chair turned out…
I love how it looks from the back. That fabric adds the perfect pop.
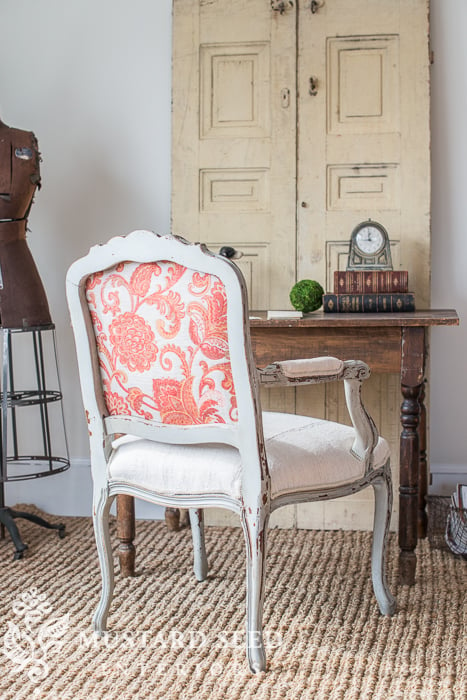
…and it’s nice and neutral from the front. (Kriste compared it to a mullet. Business in the front, party in the back. Nice.)

In the final episode, I’ll show how to attach the gimp trim that hides the staples and then this furniture makeover series is in the books.
You can find part 6 HERE.

I’ve been meaning to update my slipcover series, so that’s on the t-do list, but what else would you like me to teach through a video tutorial?


30 Responses
Gorgeous! I love it when you side by side the pics that way for the before/after. All the more wow 🙂
Also I don’t hear a compressor. What kind/size do you use for your gun?
I think it’s a 5 gallon compressor, but I’d have to look at it. The compressor did kick on a few times while we worked on the chair, but we edited it out. It’s really loud!
Nice, nice, nice!
What a beautiful redo! I love that pop of coral color on the back- so fun and unexpected!
I need to put a party on the back of my chair! Best descriptive explanation ever!
I would love to see a reupholster tutorial on a stuffed piece like a wing back or club chair…
This was a great tutorial, your tutorials have come a long way! Not that they weren’t always pretty terrific but the clarity is awesome in this one. I also was wondering what kind of compressor you used that was sooo quiet lol. Mine is very loud. I would love to see a new DINING CHAIR SLIPCOVER TUTORIAL.. Like the one you did with the ruffles. Also, a tutorial on how to do the initials you once had on your dining chair covers with the blue and white striped grain sack materials.
Love all the videos you have been doing with Kriste, you two really compliment each other you are both so funny and cute!
This has been such a great series – the information has been so helpful… in depth where it needs to be. I truly feel comfortable enough to tackle something like this myself. I would love to see some video tutorials about repairing furniture pieces – maybe areas where there is peeling veneer, water damage or scratches? I guess it wouldn’t be as interesting to watch as something like this series, but would be helpful to talk through it versus just viewing photos. Thank you for making me feel more comfortable to tackle these projects and make improvements in my home!
I would like to see a tutorial for upholstering a wing-back chair. I know they are complicated, and may require a slipcover instead.
It would also be great to see more tutorials on sewing – pillows, curtains, etc.
Where do you get your staples? I have the same staple gun and need a new source for staples. I would also like to see super close up shots of exactly how to cut around the arms and back of the chairs for future tutorials. I think these are the sticking points for most people. Maybe you can also show them what happens if you cut your “v” notch too long and end up having to redo it–or something like that. Also, I highly recommend that you wear safety glasses–even when you are pulling out staples during the deconstruction phase. I had mine on when I stapled over an existing staple and it broke off and shot right at my eye. Better safe than sorry! I would love to see some tutorials taking us shopping in your area at flea markets or garage sales–or even some video from your Luckett’s sale so we who don’t live in your area can get a feel for what it’s like to be in your neck of the woods! Tell Kriste to not be afraid of sewing, either! It is so fun when you learn even a little bit! I am no seamstress, but I started with pillows, then curtains, and I have done upholstery on stuffed chairs with cushions. Basic youtube tutorials are priceless!
Re ‘Amy’ ditto …. to her requests. ☺ -Brenda-
Can you tell me more about the scissors you used?? Maybe you have a link where I can get them??? I need them and you nailed it when you talked about them getting closer. Other scissors don’t work at all!
I know, right! These are the scissors I used… http://www.amazon.com/gp/product/B00083QPVW/ref=as_li_tl?ie=UTF8&camp=1789&creative=390957&creativeASIN=B00083QPVW&linkCode=as2&tag=mismussee-20&linkId=TRBPGIEHT2CZ4IBL
Great tutorial, I just purchased a chair for my mother bedroom. The information was very helpful. But I do need to purchase that Porter Cable C Crown Upholstery stapler. Thanks alot!
Beautiful
That fabric looks like a dream to work with. Was it fraying at all? Didn’t look like it. That’s always the most frustrating part of stapling for me is when fabric pulls out of the staple. Maybe that isn’t an issue with the pneumatic.
Could this french chair have a cushion layered on top of the seat (maybe with ties to the back)? I have this chair and everyone who has sat on it complains quickly. My room is small. I need to make it more comfortable. Any recommendations?? Thank you.
Thank you so much Marian for making this series of tutorials. We all appreciate the hard work that went into making them. I am now comfortable enough to tackle a chair similar to yours. Great job.
A friend of mine found a free set of chairs like these literally the day before your first tutorial, and they’re now in my garage. I can’t wait to get started! The hardest part for me will be deciding on a fabric – I just know myself. In episode 4 you recommended starting with a fabric that isn’t expensive, if you’re a newbie. Well, these will be my first chairs – what would you say is cheap pricing? All upholstery fabric seems expensive to me – how much a yard? Also any “cheaper” fabrics you would recommend?
I’d live to see a tutorial on a minor furniture repair (for nice older furniture that may need a little help), or a tutorial on how to replace the cushion of a chair (you mentioned that as a possible need for some furniture).
This is the exact video I needed! True, I will need the next one, too.
I love how the chair turned out, and I almost think it would have looked even better completely upholstered in that bold print… and I am not a “print person” to begin with. 🙂
It turned out awesome….great how to video
Twice now I have watched the video and it has turned off when they are
doing the seat! I want to know about the gimp (trim) application. Thanks
Thank you for the great step by set instructions…………….what I do when upholstering I mist the fabric with a spray bottle filled with water over the fabric.
This takes out and any creases and kinks and when it dries you have a really nice taut finish.
Beautiful work! I love love love the pop of color in the back! It’s so fun and not so stuffy 🙂
xo Ashley
pennypickedrevival.com
I loved this tutorial. Learned so much. I need to get myself one of those staplers. Who is the manufacturer of yours?
I would love to see a tutorial on double piping.
I’d love to go shopping with you – so a virtual shopping “tutorial”
Bless you Marian for loading a mobile version!
Thanks to your very helpful French upholstery series I was able to tackle a set of dining chairs I got off craigslist. I was feeling good about how everything was coming along but the seats have totally stumped me! The foam was super old and basically turned to powder when I took the old fabric off so I threw it all away. Could you please recommend what type of foam I should buy for the seat? It looks like in the video that you have 2 pieces of foam. If you could give me a recommendation, I would appreciate it so much. Thank you.