
The crew finished the wallpaper and glue removal and the priming on Monday, so then it was time for us to get to work. So, last week was all about painting and priming and, since I’m trying to pace myself, that will continue into this week.

The crew did a good job stripping the wallpaper and did an excellent job of priming the dining room. Still, I think they got a bit antsy to finish the job on the last day and the details of the job ended up being a bit disappointing given it was done by professional painters. There were drips, bits of paper stuck in the primer or painted over, and specks of paint on the floor. They were not supposed to paint the doors and trim in the hallway, but they threw that in as a bonus, and, unfortunately, it was poorly done. They used a 3/8″ roller meant for use on walls (as opposed to trim & doors), the hardware wasn’t removed and ended up with primer on it, and the front door was painted shut. As a side note, the kind of roller you use might not seem important, but a roller meant for walls, with a 3/8″ nap will leave a slightly stippled texture, which doesn’t look very good on doors or trim. You should use a microfiber trim roller (that leaves a smooth texture) and/or lay it off with a brush. Professional painters should definitely know better.
I feverishly ran around and wiped the primer off the hardware and floor before it dried. While the details were a bit of a bummer, I was still relieved to have the paper removed and I’m glad I hired it out. The tidying up I had to do was well worth it.

I had appointments Tuesday and Wednesday of last week, so I started painting Thursday with the ceilings. When possible, it’s best to paint a room from the top down. I actually hired the crew to paint the ceiling in Marshall’s room since they were already working in there, but the coat was uneven. (Ack, and they got paint on our newly installed recessed lights, but I was able to get that washed off.) I put one final coat of white, flat ceiling paint on so that it would be even. ceilings are tricky because even the slightest variation can be obvious, especially when viewed in natural light. The light coming in from the window showed some spots were missed.

I primed the ceiling in Marshall’s room, in the hall, and the foyer. Since Marshall’s ceiling already had a coat of paint on it, it just needed one coat, but the ceiling in the hall and foyer needed two. When Jeff got home from work on Thursday, I pointed out the frustrating and mindboggling fact that when you paint a white ceiling white, you somehow have to do two coats! Why do you have to do two coats when you repaint something white with white paint?! Well, you often do and I did have to do two coats in the case of our ceilings.
It was a long day of painting for me, but the ceilings really look sharp. It doesn’t look like I did much with my time (I mean, who gets excited about freshly painted ceilings), but a ceiling that’s uneven, dingy, or stained can detract from a beautiful room. A freshly painted ceiling enhances everything else, even if it goes largely unnoticed.

(The paint was still drying in the photo above.)
I also took the time to patch holes, and sand drips, scrape away remnants of paper, and get things cleaned up and ready to prime.

Now, I did learn from the ceiling-painting experience that my body is just not what it was even three years ago. Spending hours pushing a roller over my head, going up and down the step ladder to cut in, and scooting around on the floor was too much. I was hurting when I went to bed Thursday night. My shoulder joints ached and kept me awake, my neck was tight and sore, and I was just spent! Okay, Marian, we need to take the rest of this project at a more reasonable pace.
Jeff volunteered himself on his days off (Friday and Saturday) to help me with painting. We started on Marshall’s room with the primer tinted in Newburyport Blue. Several people had questions about the tinted primer trick I shared last week, so I wanted to expand on that a bit more.
You can have any regular primer off the shelf tinted just as you would any other paint. Simply take the primer you want to the paint counter (or you can confer with the paint expert about the kind of primer that would be best for your job) and ask them to tint it to a color. I bought my Benjamin Moore and Farrow & Ball paint decks so they could tint the primers to the colors I selected. (You can read about the colors I chose HERE.) The primer might not be an exact match, but that’s not really the point. The point is getting color on the wall that will reduce the number of coats you need to apply in the actual paint color.
This is Marshall’s room primed with the primer tinted to Newburyport Blue. You can see how rich and dark the color is on the walls and I’m guessing we’ll only need to apply one coat of paint now.

I know priming is a bummer. It’s not anywhere near as satisfying as applying the final coat of paint, but it’s the best way to get a professional, durable finish on your walls. I used to not prime before I painted walls or trim, but I started to do that in our Minnesota house and I noticed a big difference in how well the paint would wear. The trim and doors that I just painted ended up with chips and scratches in the paint. The trim and doors that were primed first didn’t. Especially if you’re painting in a new-to-you old/previously owned home, putting on a primer coat before the paint will address a variety of issues. It’ll block stains from seeping through, seal in odors (even if it’s just a mustiness or a smell that doesn’t smell like “your home”), cover problem areas (like where overspray may have happened from cleaners or cosmetics or adhesives are left from tapes), and give you a fresh start. In our case, I wanted to add a bit of extra insurance to make sure any remaining wallpaper glue wouldn’t affect the final coat of paint.

We were able to get the foyer primed, but we left the hall, which is over 20′ long and has seven doors in it, until the next day. It’s a lot of wall, trim, and doors, but it felt good to get it primed and to take the time to really do it right.
Here is how it looked before the glue was sanded off…

And here is how it looked after we primed it on Saturday…

Esme thought all of the towels and dropcloths in the hall were put there for her to cuddle up in so she could be with us while we worked.
The walls are primed in Farrow & Ball’s Light Blue (although the finished color will be a bit different and we’re going to add wainscoting, some more trim work, and new lighting.) When priming the walls and trim, I patched holes and dings and scraped off any bits of glue or paper that remained. I also took the time to work on the front door, which needed some scraping and sanding to get it looking nice and neat. It’s a beautiful solid wood door with sidelights, but it needed a little TLC.

The primer was still wet when I took this picture, but it looks so good and freshened up!

When I paint individual panes like the sidelights on this door, I cut in carefully, but if I do get paint on the glass, I’ll use a razor to scrape it off once it dries. It looks a little sloppy during the process, but it looks great in the end. I’ll show you when it’s all done.

I am replacing most of the hardware in the house, including the door stoppers, which are caked with old layers of paint, but I decided to try to clean up this little stopped that is screwed into the trim going into the dining room. It stops a closet door in the hall from bumping into the trim.

I scraped off the paint with a putty knife as gently as I could and then scrubbed it with a and . It ended up cleaning up pretty well! At least, it looks a lot better not slopped with paint.

It’s not real brass, so some of the “brass-like” finish scraped off, but it looks a lot better! There is something to be said for things looking neat and clean even if they aren’t top quality.

Now that the priming is done, we can finally get to the fun part – painting! I know it’s the same motion as priming and we’re covering the same surfaces, but it’s satisfying knowing it’s the final step. And we’re at that final step much sooner than I expected! I can’t wait to have some pretty finished shots to show you. Trying to find pretty corners to photograph when a house is in a constant state of projects is a little challenging, but that’s real life…


30 Responses
to get paint and years of gook off hardware i seem to remember you are to put everything in a crockpot with vinegar and water and just let it cook in that and it cleans everything off and looks brand new.
Judy that’s how I did all the door hinges in our old house. Worked great and only used water didn’t know about the vinegar. Let them simmer on low overnight. (Crock pot cost me $1.00 at a yard sale.
A lot going on in your beautiful new home. We spent months working on our current house before we moved in it 10 years ago. The last few months we have pretty much re-painted most walls. Boy that 10 years aged us more than the paint! I feel your pain. You have to remember with folks you hire that most are not, and will never be, craftsmen. Craftsmen are few and far between. Most of what you hire are laborers. You can’t do good work if you don’t know what it is. Many of these folks don’t know good work. Like you, we do a lot ourselves. Caring makes up for a lot. Love watching your home come together. Thanks for all the sharing.
Marian,
Things are really starting to come together in your new home! Priming and painting might not be fun jobs, but the finished product makes all the difference in the world and will look amazing. Thats really a shame that you had some less than stellar work done by the paint company. When you pay good money for a job and then have to go behind them to correct their boo-boos it really can aggravate you. I would have a conversation with the owner for sure. Finding experienced, skilled workers are harder to come by these days.
You can buy a rubber bumper for that stopper. It’s missing.
Somehow it isn’t surprising at all that you overdid it. You are tough on yourself. Glad you are slowing down to a healthy happy reasonable pace if choosing to do yourselves. Your bodies will (eventually) thank you. Looking fresh over there.
Whoo hoo! What a journey, eh?
Your house is so similar to mine — a one story, built around the same time, same slate and sidelights on the door in the front hall, a really long narrow bedroom hall . . . We moved into this house in 2005 and all the decor – and yes, every room was wallpapered, was original. Your recent posts are giving me flashbacks:) At least you don’t have textured ceilings, they’re such a mess to get down. I don’t think now, almost 20 years later, I could even begin to do what I did then. You’re amazing!
The least of your worries, but I like that vintage door stop and a little Rub ‘n Buff, now that you have it cleaned up, will make it look like new. What a big job you are undertaking. Painting ceilings is the worst. Best of luck.
Tinted primers are such a great product! When my younger daughter moved bedrooms, she requested a deep raspberry accent wall. I had the primer tinted and it saved so much time. Of course, when she moved out, it took 2 coats of white primer and 2 coats of cream paint to cover it again.
What color green is on the front door?
Everything is coming together and is looking great. It’s amazing what primer and paint can do. We moved into our home 12 years ago and with the help from our daughter we painted most of the rooms. Now we are doing a little more painting including our bathrooms that are being renovated. We feel your pain because this has been difficult this time around. Pace yourself, it will get done.
The priming and painting looks great! Currently we are doing some painting and my husband and I are finding that it has definitely taken a toll on us compared to twelve years ago when we last painted. Luckily our daughter helped us with that big job. Continue to pace yourself because it will pay off in the end.
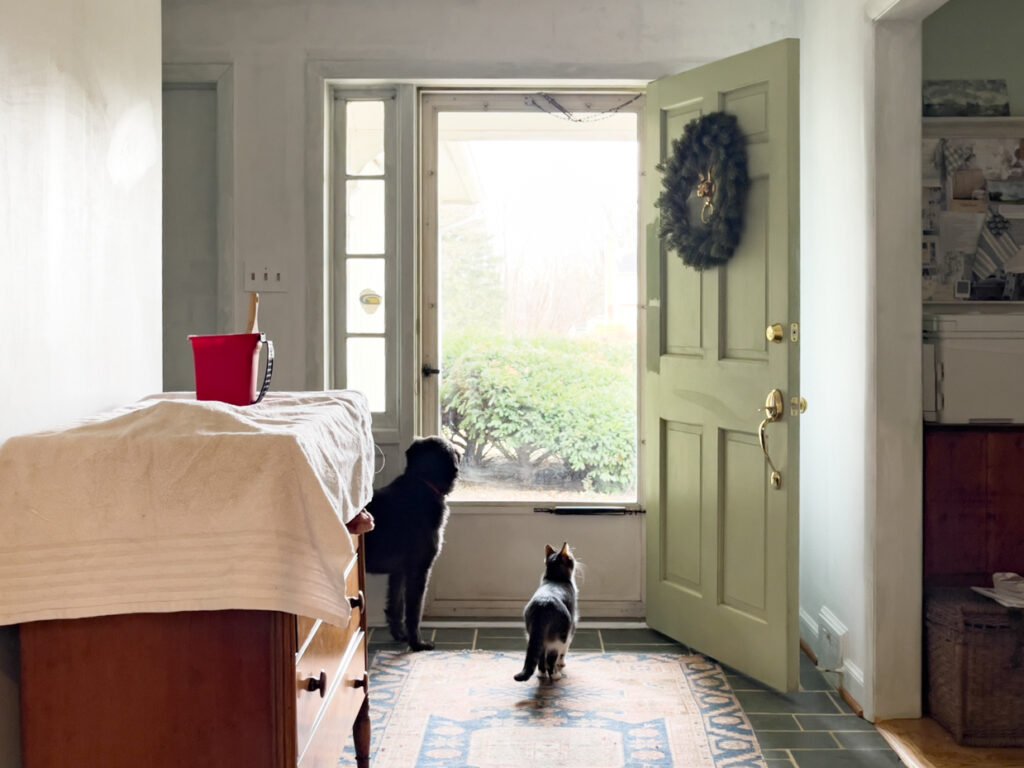
Just love the picture of Sebastian and the little kitty looking out the door. Precious ! And those door stops are really nice even though they are old they look substantial not typical hardware store type. You are progressing very well.
It’s so disappointing when workers do a sloppy or careless job. My husband and I have always done our own home maintenance and painting because we are kind of picky. Now that we are older and cannot tackle all these jobs we will have to rely on paid help. Sometimes we are pleasantly surprised and sometimes not. What are you going to do? Our new mantra is “Well, at least they showed up!”
Looks wonderful and I can’t wait to see all the lovely painted rooms once you are finished! Paint can be such a huge transformation! So smart to pace yourself and prep and prime every surface. The prep work is tedious but the payoff is big! Bravo to your new freshly painted walls!!
Marian, you have accomplished so much in your new home. Everything is looking so good! How nice to finally be doing the last coat of paint. Painting ceilings is such a hard job and sure takes its toll on the neck and shoulders. Do pace yourself. You have been working so hard. It will be so good to have the painting finished. Take care!
Thank you for the tinted primer idea!
These painted rooms will look great. I’m SO sorry the painters did such poor work and caused more work for you to fix and clean up after them. It’s so difficult to find workmen who take pride in their work.
Hang in there. With your touches it will be gorgeous in the end!
I just finished 18 days of painting the whole house. I should have primed too, but it was exhausting doing it the way I did.
I have a question about how you get such a crisp straight line where the ceiling and wall meet? My brother uses a sharp tool to make a “groove” to keep the wall paint from going on the ceiling. I do pretty well, but not nearly as good as you do!! I’ll keep watching you posts, and hopfully you’ll tell us how you do that.
Yes up and down off the ladder and moving furniture is exhausting for sure! Plus I fell off the ladder one time. Anyway… it’s finished. Looks like you paint the whole wall and leave the ceiling/base trim last.
Take your time. It’s looking SOOOO pretty!! and please don’t hurt yourself.
Whenever you have paint stuck on hardware all you have to do is let it soak overnight in warm water with TSP. Lifts right off. By using a scrapper you can scratch it and you worked tooooo hard. I hope they didn’t get any paint on your new doorknobs. I totally understand your frustration at hiring people and them not coming through. AND not even using the right tools for the job. It’s a hard pill to swallow.
You are on your way now!!!!
Marian…You work incredibly hard with great results. This trick may be one you already know or is in the comments, but…
I was told to soak old fixtures (not anything electrical), doorknobs, screws, hinges, doorstops, etc in full strength white vinegar for hours, days, whatever it takes to remove layers of paint. It was amazing how it works and does harm the pieces.
There was little scrapping to be done and the brass or metal could then be shined as you did.
Your stories are a delight and an inspiration. May the Lord establish the work of your hands and bless your many endeavors to His glory.
Marian, I know it is hard work but just think how beautiful it will look when it is all done! I remodeled my home in 2020 when I bought it and I came across some of the things you did. Everyone always remarks how lovely the paint in my home is. I painted every room myself and stripped wallpaper off the only room it was in (the front guest room). It took be 2.5 weeks of working 9 hour days to get it off. It came off in 1″-1.5″ strips, uuggghhh! It looks beautiful now and I don’t regret any of it. Good luck with the rest of the work! Your house is coming along beautiful!
UGH, I had a wallpaper removal job like that once, and it made me vow to never ever buy a house with wallpaper in it ever again!
When I readying my Ohio house for sale I hired painters. This crew was in between price wise of the 3 I talked to. They were terrible! Like your job they splattered paint everywhere had to fire one guy for goofing off and created more problems than I bargained for. Ugh! But going up/down ladders and stretching arms and neck is too much punishment for this ol bod. I feel your pain. It looks so fresh and clean and your attention to detail will be 100 % worth it in the end.
Oh I am sad that the painters did a shoddy job. I know you must be so relieved to have all the wallpaper gone – that is HUGE. I really appreciate the tinted primer trick as well. It is so fun to watch as you “Marianize” your new home! Just don’t forget to pace yourself – as hard as that can be, ask me how I know.
Thank you for the ‘primer’ tutorial. I had some interior rooms painted about 20 years ago and painters used primer first. They were the best painters, old school.
Sad how your guys ‘finished’ the job. This is what keeps me from hiring anyone. And it’s hard to get honest references. Sadly, we live in a throw away society now, where quality in anything is no longer…. if you don’t like it today, can buy something new tomorrow and repeat the cycle.
Even so, think of all the time you saved and and not overworking your shoulder from taking down the paper. Can’t wait to see all those beautiful new colors. Marshall’s room is so dreamy – you need to paint a constellation on a wall!
Everything already looks so much better, even with its trials. The paint color in Marshall’s room is really nice. I will definitely use tinted primer when I repaint my interior doors this Spring. I painted them year before last and paint is already wearing off the heavily used ones. I like that little stopper. You could use some RubnBuff on it to match your chandeliers.
Thanks for sharing your strategy for painting and all the prep. You said the hall has 7 doors. Just curious how the house is laid out. You had so many rooms in MN with an office, studio, sewing room, guest room, living room and family room. Plus. Any tips on how to best use space and meet everyone’s needs?
The house is a U-shape with the studio in the middle (it was the former formal living room) and the bedrooms are on one side, the living spaces on the other. And yes, we downsized about 1500 square feet from our MN house, but we wanted to go a bit smaller. That house sometimes felt too big. We do have to be a bit more strategic with space, though, and most will serve more than one function. My studio and office are now combined until one of the boys moves out (then I get an office again!) We just have one living/family room. The guest room and sewing room have been merged. And we only have two bathrooms instead of four. We do have a huge basement, though, with lots of potential to make it a more functional living space.
Do yourself a big favor. Buy 2 “work platforms” in the ladder department of your hardware store. Think of it as “baby scaffolding.” That will give you a safe, comfortable place to stand while painting the higher areas. When placed correctly, 2 of them will divide your climbing by 3 or 4. That’s a big deal when you’re painting a whole house. If you have an intermittant helper who moves the platform you’re not standing on to the next location, it’s possible to do the whole upper part of the room with a single up/down trip to the platforms.