

I recently taught the Advanced Painting Workshop with my very good buddy, Shaunna of Perfectly Imperfect, at the Haven home blogger’s conference.

We had a blast and I think it may have been my favorite class ever. In the two hour hand’s on workshop, we taught three paint techniques. Being an advanced class, they were pretty complicated treatments with multiple steps, so I promised I would share the “recipes” on my blog.
Before you set out to try these techniques, I want to remind you (or make you aware) of something – you can follow these steps exactly and still achieve a very different look. I wish you could see the variety at each table. The colors were the same, the sample board was the same, the steps were the same, but the end result was different. My boards look different from Shaunna’s and even looked different in each class. I think that’s one of the frustrating parts for people who are trying to achieve a specific look. The look achieved is so different depending on who’s painting and distressing it. It’s also one of the awesome things about these techniques. You create something very unique every time. That’s very good news if you’re a designer or if you sell your pieces.
All of this to say, just relax. It’s okay if your sample or piece looks different than these examples. Embrace that!
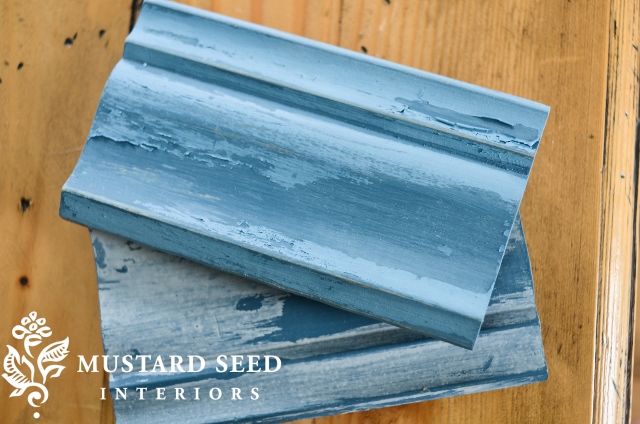
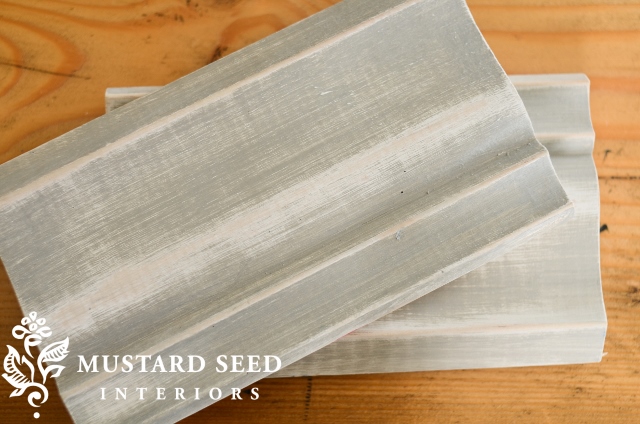
The first treatment is called “The Layered Look.” We showed how to layer two colors of paint with different resists between the two colors to control how much of the undercoat would be visible. If you just put one coat of paint directly on the other, it might be hard to see that you did that. When you distress, it’s hard to take away one coat of paint without taking away the other.
For this board, we used three different resists. (A resist is anything applied under a coat of paint that will make it resist from adhering to the surface. Think watercolors over crayons.)
The three resists we used were a Wax Puck, Hemp Oil and Vaseline.
Step 1: Apply a base coat of paint in a full, opaque coat. We used Annie Sloan Chalk Paint in Aubusson (which I can never pronounce properly.) Allow the first coat to dry completely.
Step 2: Apply resists where you do not want second coat of paint to adhere. We just applied the Vaseline and Hemp Oil with our fingers, but a small brush could be used on a larger piece. The Wax Puck was rubbed against the “high points” and edges of the piece of trim. I’ve talked about it before, but this is the stage when you want to think about how the top coat of paint wore away and where it would naturally do that. Paint generally doesn’t wear away smack in the center of a drawer front. It wears away around the edges and handles. Places where it gets bumped, rubbed and touched a lot. This technique looks authentic when it looks natural and makes sense in the fictional history you’re creating for the piece through these techniques.
Step 3: Immediately apply the second coat of paint, which is MMS Milk Paint in French Enamel. This isn’t important with the Wax Puck or Vaseline, but it’s important with the Hemp Oil. If the Hemp Oil sits too long on the first coat of paint, it will be absorbed and won’t act as a resist. Paint the second coat when the hemp oil is still wet. Also, don’t overwork the paint. It’s going to pool a bit on the oil and maybe look a little gunky over the Vaseline. Just relax and leave it alone. Step away from the brush and leave it alone to let it do its thing.
Step 4; Wait until the second coat of paint is completely dry. It should be flaking away from the places where the Hemp Oil is applied. It might look crackled where the Vaseline is and you can’t tell what’s going on with the areas rubbed with the Wax Puck. Use a damp cloth or fine grit sand paper to take the paint off from the resists. We rushed our pieces along, so mine chipped away from the Hemp Oil in my suitcase! Note: If you are adding any decorative painting or stencils to the piece, do it before wiping/sanding the paint. The decorative painting will come up with the second coat of paint, giving the piece a more authentic look.

Step 5: You can distress the piece further at this point, if you want the wood or base finish of the piece to show through. Finish with you choice of a topcoat and it’s all done!

![]()
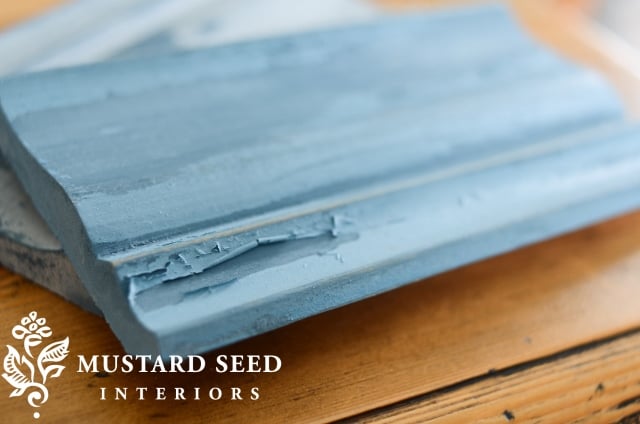
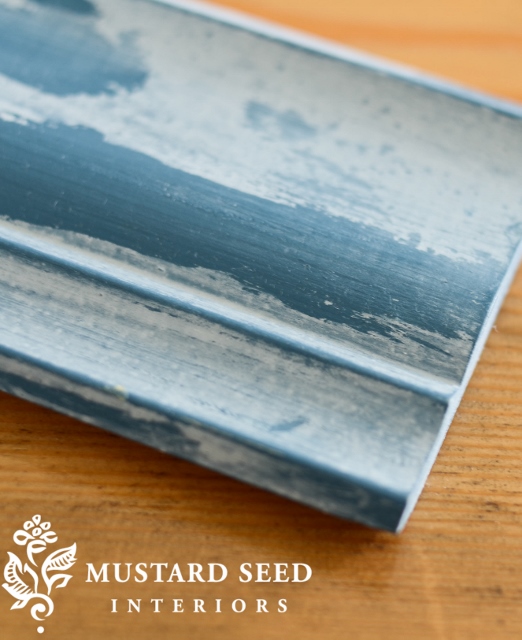
We called the second finish “Driftwood”, but it’s sort of a soft, grayed-out washed finish.

Step 1: Apply MMS Milk Paint in Typewriter in a full, opaque coat and allow it to dry.
Step 2: Apply a wash of a mixture of equal parts MMSMP Grain Sack and Shutter Gray. To make a wash, just add more water to the paint to make it thinner. This coat should be thin and translucent. Wipe excess away with a rag if it’s looking too opaque.
Step 3: Once wash coat is dry, dry brush MMSMP Ironstone on top. This coat would be a little brush-stroke-y, so it creates texture; almost like wood grain. Trying pouncing the brush or blotting the paint with a rag to get different looks. (I wiped away some of the paint off the high points of my trim with a damp cloth, to create more dimension, which is why you can see the Typewriter through more dramatically in those places.)
Step 4: Allow finish to dry and then apply your wax of choice. On the board above, I used White Wax on half (the right side) and Antiquing Wax on the other half (left side.) It really shows the different looks that can be achieved just by using a different wax.

The waxes really shine when they can settle into some texture. See how the White Wax collected in the edges of this piece?
![]()
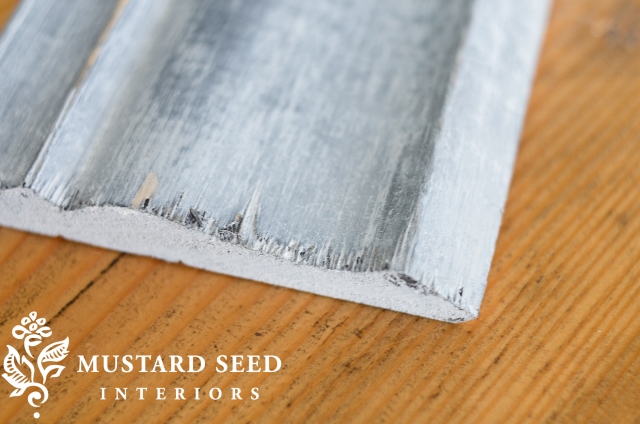
We called the final look a “Restoration Hardware-ish Finish.” We’re super professional with all of our fancy, technical painting terms.
The truth is that to achieve a Restoration Hardware finish, you need to start with the right piece. More specifically the right kind of wood. They take advantage of grainy woods, like oak, and apply a wash that settles into the grain. If you’re working on a piece with a smooth finish, you don’t have any grain to work with, so you’re immediately at a disadvantage. This is a technique Shaunna created to simulated that look on a flat surface.
Step 1: Apply a coat of ASCP Pure White and allow it to dry.
Step 2: Apply a coat of ASCP French Linen and allow it to dry.
Step 3: Use a damp cloth and rub off paint until desired look is achieved. We rubbed against the grain on our trim pieces, but you can play with it a bit to see what look you like. This technique can be very subtle, but it can also be more dramatic with a heavier hand. I went for it on my samples and took the finish down to the wood in a few places.
Step 4: Finish with desired wax or topcoat.
A word to the eager…this technique is simple, but involves a LOT of muscle to rub the paint off, so it’s really best for smaller pieces. It also isn’t quite as successful on a huge, flat piece, like a table top. It can be done, but it can look very streaky if not done well. So, just a word of warning for those who are ready to try this finish on a nine piece dining set. (I know you’re out there, eyeing that Ethan Allen set…)

So, there they are – the “recipes” for the techniques we taught in the Advanced Painting Workshop at Haven.


25 Responses
As I told you (and Shaunna) after the conference session – you two really hit it out of the park with this class. That’s what a hands on lesson should be! I have Typewriter at home and still haven’t tried it out. Definitely looking for a small piece to do the second technique with!
Thanks for a great lesson!
-b.
Thanks for sharing Marian! I loved your class! With all the blog talk and heavy note talking all weekend, it was nice to have a couple hours to just play. And thanks for being so patient with all of our picture taking!
Oh my…thanks so much for sharing with us. I can’t wait to try these out…wish me luck:)
Blessings,
Linda
So funny, I was happy to see your recipe techniques today, because I thought they might be helpful with the ETHAN ALLEN DINING SET I just bought on ebay about AN HOUR AGO.
Marian, it was a wonderful class. I so enjoyed meeting you both and can’t wait to do the restoration hardware(ish) finish on my coffee table.
Thanks for sharing with those of us who didn’t make it to Haven.
Oh, this is great! Thank you so much for sharing. I couldn’t make it to Haven this year but this feels like I at least got a little preview and I am excited to try these techniques!
Yeah, this was a super fun class. Thanks for teaching it, and thanks for sharing the recipes again!
How did you KNOW about the Ethan Allen set?! 🙂
More wonderful ideas to try ~ I bought a pretty shabby buffet for five bucks and am wondering what treatment to use on it and here you offer more ideas! How fun. It has a little mirror on the back which is in bad shape (although I LIKE them like that) but thinking about making it a chalkboard, since this is a buffet……like announcing desserts, or wine or something on the back mirror turned chalkboard…..
PS ~ my white wax is coming too 🙂
Hi Marian, this was the BEST class ever. I truly enjoyed it, and thank you for signing my book after class, it was amazing to meet you and Shawna and the class was awesome and I can’t wait to try a couple of techniques out on a few pieces! Thanks for sharing the recipe again!
Wendy
Thanks for sharing these, Marian!
I have quite a few furniture refinishing projects in the wings, so I’ll make sure to try some of these techniques.
Kudos to you MMS for sharing these recipes even if we couldn’t attend Haven! So many times, non-attendees miss out and this is a blessing that you shared these recipes. Just goes to show the depth of your character. And that you’re not afraid someone else might upstage you. Good on you, Girlie. Good on you!
Thank you so much for this tutorial! Very much appreciated 🙂
Thanks for sharing with all of us who were unable to attend! So sad I missed getting to be there in person.
I have been working on an old cabinet all weekend, sanding down the flat white latex that was painted over ivory oil(?) enamel. I actually like the look of the two colors, so similar in color, yet contrasting just enough for great looking texture. Thanks for tips so I can recreate that look in the future. Definitely pinning this!
You are so very generous to share your knowledge with us. Thank you. I can never pronounce Aubusson either! I don’t believe I spelled it properly either! GAH! You can’t take me anywhere!
Hi Marian. Thanks for the detailed explanations. They makes antiquing seem like something which is achievable. Love reading your blog.
Thank you for sharing these techniques Marian! Can’t wait to try them on a small piece of mine!! And hopefully share it if it turns out well! 🙂
On the third finish, I can get that look with a very thin white wash that is wiped on the high spots and then light dry brushing with white. That might save some elbow grease for someone who wants to get the look. Dry brushing always takes me much longer than I think, but it doesn’t damage my joints like sanding. 🙂
Great tutorial. I am excited to try the first finish. I always try to get that look with sanding and it is not usually that great and a lot of work!
Thanks for sharing this info Marian! I need to do something with my kitchen table that I stained last fall and it came out rather ugly. I have a question… If I finish a piece with your wax, how hard is it to remove if I need to redo it? I know that wax is used as a resist so wondering if I can sand off the finishing wax if needed?? Thanks!
Thanks for sharing this wonderful information. I look forward to giving it a try really soon. I have the perfect cabinet to try it on.
Thank you for sharing the formulas. I wish I could have attended your workshop. I have been a follower of both you and Shaunna for some time now – love what you both do!
Thanks for sharing. I couldn’t make HAVEN this year but appreciate your willingness to share and teach. Can’t wait to try these techniques. Thanks again.
Wow, Marian, you said you’d get the “recipes” done and you did! Even with all you’ve got going on, plus vacation! I’m thrilled I was in your Friday class at Haven. Even if you did think I was too “neat” a painter. But I told you the truth — I throw away the grungy smelly paint stiff outfits (especially when the crotch rips out of them). Thanks again for doing this. Now to get my order together!! 🙂