
I’ve lately felt like I needed new creative pursuits. It’s not that I don’t have enough, but I’ve felt the need to try new things, to be a beginner, and to create something without any expectation on the outcome. I’ve just needed creative process. Maybe it’s because of weariness from the pandemic or weariness from writing, styling, and shooting a book, or a combination of everything. As I shared in my post about the pigments from Choosing Keeping last week, something I bought as a “book gift” for myself, this was also an exploration of what big things might come next. It doesn’t mean that mixing my own paints is what’s next, but it’s something I’m curious and drawn to, so I’m allowing myself time to explore it, knowing that one new creative endeavor can lead to another. Knowing that discovery sparks more ideas. And I thought I would share the process with you for others who are curious and drawn. So, today, I’m sharing how I made my own handmade watercolor binder along with the recipes, tools, and materials I used.

Of course, these are the pigments that have been calling my name for a while.
THIS is the original handmade watercolor binder recipe source I started with. Making paint is a bit like baking. It does require precision, but there are substitutions and adjustments that can be made depending on your preferences. That flexibility is nice, but it can be frustrating when you want a tried and true recipe for something! Like baking, though, so many factors come into play from the specific ingredients you’re using to the humidity. It takes practice and patience and then you’ll develop a feel for it. Someone who makes bread enough just knows what a good dough looks and feels like. The same will be true for paint.
I’ll walk you through the ingredients, tools, and steps, but there is a printed recipe below to make things easier if you want to try the recipe.
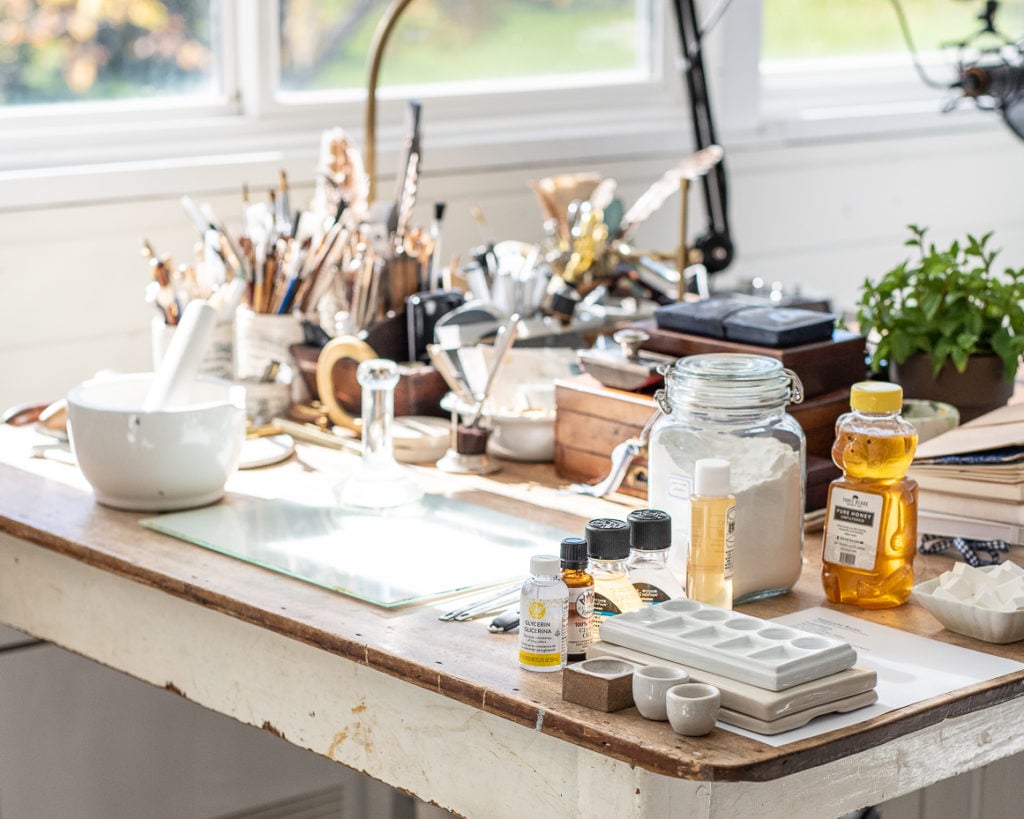
handmade watercolor recipe ingredients
- Pigments – color (I share more about the pigments from Choosing Keeping in THIS post. Also, have a mask to wear that will filter fine particles to wear when working with pigments in powdered form. Not all pigments are toxic, but it’s always best to prevent powders from going into your lungs!)
- (binder)
- Hot, distilled water
- Honey and/or (preservative and binder)
- (preservative)
- (increases flow)


handmade watercolor recipe tools
- Measuring spoons/cups
- Palette knife
- Aluminum paint tubes or empty paint pans, ceramic palettes, or paint pots
I picked some new and vintage options…

- Mortar & pestle
Here are some new & vintage mortar & pestle options…
- whisk
- jar or bowl for mixing (THIS is the one I’m using)


handmade watercolor recipe steps
- Mix together – 1 cup hot distilled water, ½ cup gum Arabic powder, 1/5 cup honey and/or glycerin (I mixed equal parts of box), two drops clove essential oil, two drops ox gall (optional)
- In a separate bowl, mix 1 Tbsp. honey with 9 Tbsp. of the above mixture (1:9)
- Mix watercolor base with pigment starting at a 1:1 ratio. Adjust as needed depending on the color. Mix with a palette knife and then mull. The pigment is bound when color won’t rub off of a painted swatch. Store mixed paint in paint tubes or let dry into cakes or pans. Store watercolor base mixture in the refrigerator for about a week.
On the YouTube video, someone left a comment that says, “So that’s it?” I’m not sure if she’s asking that because it seems so simple or because I didn’t provide enough information! So, let me know if there is something I didn’t cover with enough clarity. Of course, remember that I’m just learning myself! This first batch is based on a reliable recipe, but it’s still going to take some testing with different pigments to really get it right. I can say that my homemade watercolors worked, so we’re off to a solid start.
In my next post in this series, I’ll share all of the details of mixing up a small palette of five colors and what I learned from that process. (You can find that post HERE.)

And, those who get it, get it, but one of the things I enjoyed most was taking video and photos of this process! I find art supplies to be so beautiful and I enjoyed working with them and admiring them in a new way.

I’m also going to share why I selected these colors and how I explored them through creating color wheels.

Whether you like art, sewing, writing, photography, needlework, decorating, or a little bit of everything, I hope you give yourself the time and space to explore things you’re curious about and feel drawn to. It’s not just creative work, but it’s the kind of work that’s good for the soul. It nurtures and there is something therapeutic about it.
And, I think we could all use a little nurturing and therapy now and then.
You can find the post on mixing and swatching the handmade watercolor paints HERE.
Here is the printable recipe…

Handmade Watercolor Binder
Equipment
- pipette
- measuring spoons/cups
- mortar & pestle
- glass palette
- scraper
- palette knife
- whisk
- jar with lid
- muller
- paint pans
- small strainer
- mask for when working with powdered pigments
Ingredients
- artist pigments
- 1 cup hot distilled water
- 1/2 cup gum arabic powder
- 1/5 cup mixed honey and glycerin in equal parts to make 1/5 cup total
- 2 drops clove essential oil
- 2 drops ox gall
Instructions
- Mix together – 1 cup hot distilled water, ½ cup gum Arabic powder, 1/5 cup honey and/or glycerin (I mixed equal parts of box), two drops clove essential oil, two drops ox gall (optional)
- In a separate bowl, mix 1 Tbsp. honey with 9 Tbsp. of the above mixture (1:9)
- Mix watercolor base with pigment starting at a 1:1 ratio. Adjust as needed depending on the color. Mix with a palette knife and then mull. The pigment is bound when color won’t rub off of a painted swatch. Store mixed paint in paint tubes or let dry into cakes or pans. Store watercolor base mixture in the refrigerator for about a week.


24 Responses
You are a wonder, thank you for continuing to learn and grow and inspire us.
Aw, thank you!
Thanks for sharing. Would love to have seen the pigment bring added and creating the finished product.
Yep, that’s coming in the next video! I already posted it to YouTube if you want to check it out, but I will be sharing more details here on the blog, too. I broke it up, so the videos were a little shorter.
I’m a little stunned that someone would say anything so completely inane as “So that’s it?? Seriously!!! Let’s all get together and ignore that comment, shall we??? I have always admired your total generosity, attention to detail in all your tutorials, classes, etc. I know I can go back and use your guides to all the different projects and passions you have created over the years and trust them to be complete. You are an amazing talent, but your generosity over the years has struck me as one of your most amazing qualities. Thank you.
Thank you! I appreciate that. I have learned that you never know the tone of a comment from a stranger online! She may have thought the recipe was so simple or maybe didn’t pay attention to the fact that another video is coming. Either way, I try to see it from different points of view and offer people the grace I would want to be extended.
Now you need little oval MMS logos to put on your tubes!
You never fail to amaze!!!!
Oh!!!! Those vials of colors are glorious!!!!….I would be opening that drawer several times a day….just to gaze!!!
Oh, I do! They are so pretty and inspiring.
I really enjoyed watching you mix the watercolors it’s so interesting. As part of my job at the Los Angeles Opera I had to mix dye powders to create certain colors for fabrics or costumes. I’d like to know if you wore a mask while mixing? It was real important the fine (dye) powders were not inhaled during the mixing process since they are toxic.
Yes, I did wear a mask with working with the powders, but once they were mixed, I removed the mask. And, thank you for mentioning that safety point. I was going to mention that in the next post, but it’s wise to mention it in this one as well.
I love watching this. I am a watercolor artist.
I have to chuckle. You mixed this like a cook. I have a chemistry background. We certainly work differently. But I have not tried this. Can’t wait to see the next video.
I should probably experiment more. You make a great point about experimentation and creativity.
Oh, I’m definitely “cooking” my watercolor! I was hoping for weights in recipes because that is more accurate, but all of the recipes I found used measuring cups and spoons. Anyway, we’ll see how it goes!
Normally artists don’t share their procedures & secrets. I am impressed and grateful you shared the procedure so well.
Will be following your website to learn more & more as learning never ends.
Thank you
So enjoyed the video tutorial. Your instructions are always on point and it just feels like you are visiting with us. Always fun!
Thank you. ?
What fun! I know I will probably never make my own watercolor binder, but how neat to see how it is done, and after seeing you doing it, I have to admit that it gives me the itch. 🙂 I’ve always enjoyed experimenting with different things, and the results often send me in different directions, learning even more. It’s exciting, and keeps life interesting. Thank you for sharing with us. I can’t wait for the next installment.
Super interesting video, and thank you for sharing that. I don’t think you were lacking in clarity, but I confess I was hoping to see some pigments getting mixed in and put into those adorable paint pots!
Yep, that happens in the next video!
This is AMAZING, thank You for the video.
Very interesting. I first became aware of mixing pigment was in a book about Vermeer the Dutch painter. If I remember red was made with gold?
Oh Marian! I see a line of watercolor paints in your future… possibly.
I learned what a watercolor pan looks like, that there is a strainer for powdered sugar!, and I so enjoyed your first mix.
As my husband and I are traveling the country in our van.. he has learned much about you 😉 as I share out loud my astonishment at your creative life..
Weary~ I know most of us understand weary~ thank you for lessening our load on some of those days. I hope it has helped you too.
Be well~
I love the pictures ?.
Those pigments are swoon worthy. Just beautiful. I’m hoping when things slow down some this winter, I can start on your painting classes.
One of your ingredients called for a 5th of a cup. Did you eyeball it and say “good enough”? I’d appreciate a little more “how to ” on this one. TY