

I have received a bunch of questions lately about Furniture Wax and Hemp Oil, the difference between the two and how I choose which one to use, so I thought it was time to write a post about it. Let’s dive right in.
Why I started using it…
I read an article about finishing painted furniture with wax a few years ago, so I went to the hardware store and bought a can of Johnson’s Paste Wax. That was really the only wax I was familiar with, so I started using it on some of my painted and stained pieces. I had a few problems with it. It was very stinky and the consistency made it difficult to move well on a piece of furniture. I also couldn’t get it into fine nooks and crannies of pieces. So, I started looking for other types of wax and found Briwax, Fiddes & Sons, Hannants, Howards and Mylands. Wax was giving me the buttery soft, matte finish I had previously been looking for in all the wrong places (polycrylic, wipe-on poly, etc.) I started using it on all of my furniture pieces and never looked back.
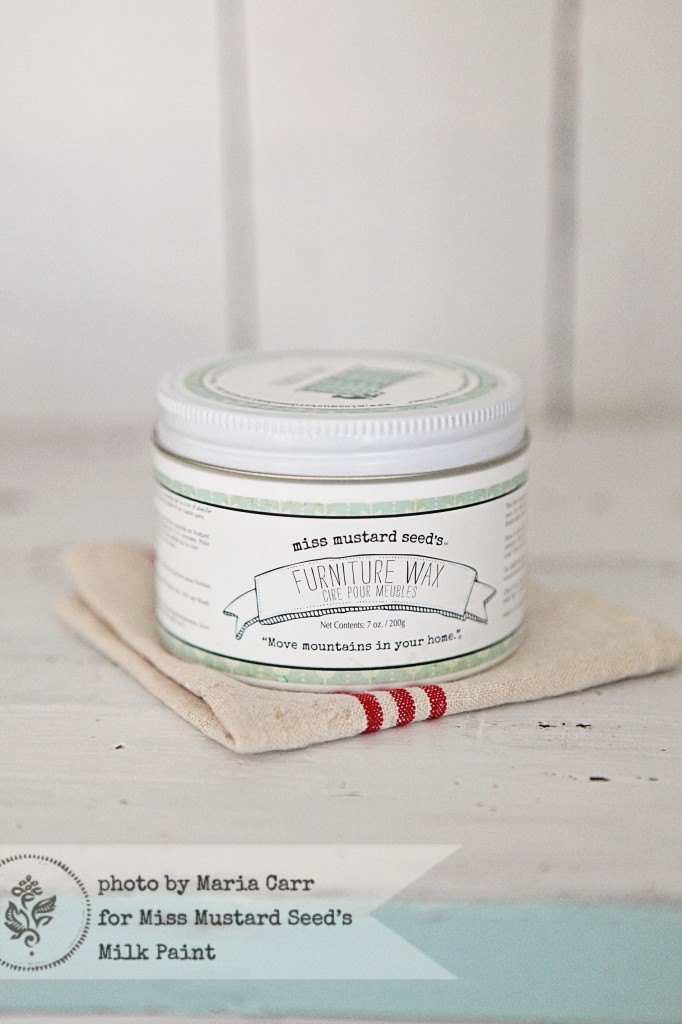
When I came out with my own line of milk paint, I knew I wanted to carry a wax with the line. Fortunately, Homestead House, the Canadian company that manufactures MMSMP, had a relationship with an amazing wax company who now makes the Furniture Wax and other waxes that are sold with my line.
When to use it…
You can use it anytime you want to add a topcoat to a piece with a porous surface. You do not need to use wax over a piece with a satin, semi-gloss, or gloss finish. Those paints can hold up fine on their own and any wax applied will just sit on top of the surface, not really serving a purpose. Applying wax to a porous surface like flat latex, flat acrylic, milk paint, raw wood, stained wood, etc. is key. It is absorbed into the pores of the surface, creating a hard and durable finish.
You can basically use any brand of wax over any brand of paint, so just figure out the combination that you like.
How to apply it…
Wax can be applied with a brush…

…or a cloth.

I know that wax brushes are all the rage (I’m coming out with one of my own in fact), but you don’t have to strictly use a wax brush to apply wax. These brushes are well suited to the task because they have natural bristles and a lot of them! They hold a lot of wax and are ideal for spreading it and getting it into the details of a piece. If you don’t have one of these brushes, though, you can use an old paint brush that has bushy bristles. That will do the trick. For a cloth, make sure it’s a lint-free cotton cloth.
With both types of applications, only apply a very thin layer of wax. I know, especially with the brushes, it’s easy to load the brush with a huge glob of wax, but that’s going to give you headaches. If your wax is smeary, smudgy, sticky to the touch, hazy, etc. you have applied too much. Massage the wax into the surface as you would apply lotion to your hands. This will also give you a nice and even finish.
The more coats of wax you apply and the more you buff it, the shinier it will get.
Drying time, durability & care…
Wax should feel dry to the touch just after it’s applied and rubbed into the surface. It’s okay if it feels slightly waxy or a little cold, but it shouldn’t feel sticky or wet. You can start using the piece right away, but give it a full 30 days to cure. During the cure time, just be gentle with it. For cleaning, I just dry dust it with a cloth or scrub it with a wet cloth for dried on yogurt, oatmeal and the like. The thing I love most about wax is that you can simply reapply it if a piece starts looking tired or gets scratched. Lightly sand it with some steel wool, apply another coat, buff it and you have a new finish in about 15 minutes. You can’t do that with poly!

The downsides to wax…
As I unfortunately learned one year at the Lucketts Antique Market, wax is sensitive to heat. Just like crayons left in a car, a wax finish will melt in intense sun or heat. For that reason, it’s not a good option to use on pieces if you sell them outside or are going to put them on a sun porch, etc. It’ll do fine with some sunshine on it through a window or sitting near a radiator, as long as it doesn’t get too hot. Keep this in mind if the piece will be stored in a truck or storage unit that isn’t climate controlled. This is true of all brands of waxes, by the way.
The other downside is that it does take some muscle to do all of the applying and buffing. I’ve gotten used to it, but it can be a lot on the biceps!
![]()
Why I started using it…
Homestead House introduced this product to me as their favorite finish for milk paint. I had never even heard of Hemp Oil before and it took me a while to really “get it.” I started using it to test it out to see if I wanted to carry it under my brand. I loved the fact that it was easy to apply, virtually odor free and was 100% natural. I knew a finish like that would be important for those who wanted to use milk paint because it’s all natural. Once I decided to make it a part of the line, I felt like I needed to use it, even though I had a preference for wax.

Then, I had the wax-melting experience at the Lucketts Antique Market. Hmmm…time to get to know Hemp Oil a lot better. I used it on all of my painted pieces last year and fell more in love with it. The ease of application, the beautiful finish and the durability sold me on it.

When to use it…
Hemp Oil can be used as a top coat and, like wax, is best on porous surfaces, so it can penetrate the surface instead of just hanging out on top. If you use Hemp Oil as a topcoat, that is all you need. You don’t have to put something else on top of it.
It is also awesome at reviving wood that is dried out, water damaged and has lost its luster. Again, the surface needs to be porous to work. It’s not going to do much for a poly finish that looks tired.

How to apply Hemp Oil…
For a while, I applied it with a cloth, but I have started using a brush in recent months. I feel like it’s a little faster and works the oil in a bit better, but a cloth will certainly do the trick and is probably better for large, flat surfaces. You just wipe it on, let it soak in and then wipe away the excess.
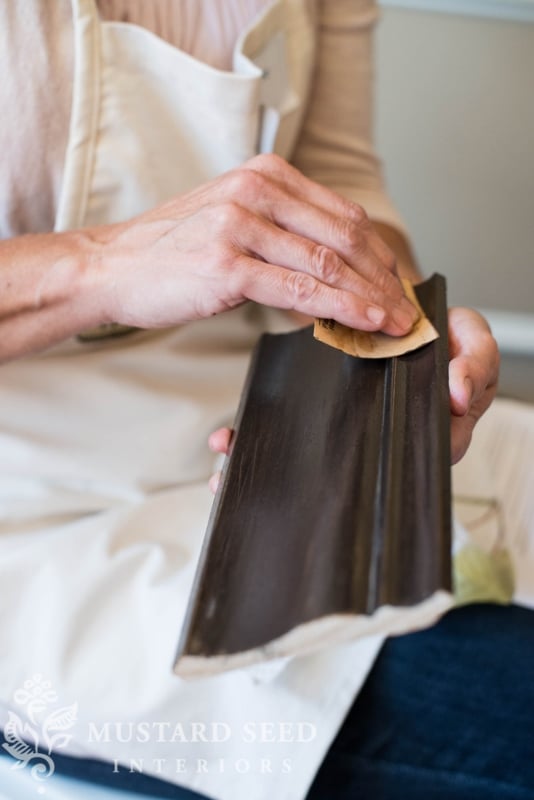
It can also be used to “wet sand” a piece. I just learned this technique at the retailer’s training in Baltimore and it rocked my world. Brush on some oil, then sand with some fine sand paper. Wipe away the excess oil with a cloth. You can either sand to smooth or sand to distress with this technique and the result is a buttery smooth finish.
Hemp Oil provides a matte, almost satin finish, but the level of sheen increases with each coat. I usually just apply one coat on the body of pieces and two coats on the tops for a little added durability. The key with Hemp Oil, though, is to only apply what the surface will absorb. If you apply too many coats, the oil will just sit on top. There’s no harm if that happens, but you have to wipe the excess oil away and it’s a bit of a waste.
Drying Time, Care & Durability…
Hemp oil dries to the touch very quickly, because it’s absorbed into the finish. In other terms, it’s sort of the difference between lotion (Hemp Oil & Wax) and nail polish (latex, acrylic, poly, etc.) While the oil is dry to the touch, it does need about 30 days to fully cure. You can use the piece during this period, but it might feel a little oily to the touch while it’s curing.
I care for it the same way I do the waxed pieces. Just a dry cloth for dusting and a damp cloth if something is being stubborn. If the finish looks tired or is marred, I just rub on another coat of Hemp Oil (and wet sanding would be a great idea here, too.)

The downsides to Hemp Oil…
I haven’t tried painting over a piece that has cured Hemp Oil on it, but I’m guessing that might be a little tricky. Some sanding and a bonding primer may be in order, but I’m not really sure. I’ll have to let you know when I try it or hear from someone who has.
The other downside, if it really is one, is that it doesn’t have anything added to it. It’s just oil, so it doesn’t have the “solids” and other things that make a finish feel hard to the touch. A Hemp Oil finish doesn’t feel as hard as a wax or poly finish, but it is working and is very durable. So, this isn’t really a negative, but something you need to expect and get used to.
So, which is better and which do you use when?
This is totally a preference thing. I use both and love both. I use Hemp Oil when I know a piece will be exposed to heat, so I don’t have to worry about melting. I use wax when I’m just in the mood to use wax! So, you’re really going to have to answer this question for yourself. You may find you prefer one over the other or you like something else entirely!
I hope explaining the differences will help you decide.
![]()
Today after church, we had our fall festival, which involves a chili cook-off, pie bake-off and pumpkin carving. I haven’t really done a lot of pumpkin carving in my life, but I’ll tell you that sticking my hand inside of a pumpkin and pulling out slimy, fibrous innards is not my thing at all! I enjoyed helping my boys with the carving, but the scooping was gag-worthy.

I think I’ll stick with painting pumpkins.
![]()
Disclosure -Some of the wax links are Amazon Affiliate links.


12 Responses
I have a crazy situation for you. I make serving boards with planks that I scorch using a propane torch. After scorching, I wash, dry, and sand the planks to remove most of the char, resulting in a beautiful color enhancement, highlighting the wood grain. Kind of like a stain would do, but without using chemicals that would make food contact less appealing! In an effort to keep things non-toxic for food use, I applied a finish I made with beeswax and food grade mineral oil. Beautiful! Except…no matter how many coats, how much buffing, and more than 30 days of curing, there is a residue from the char that bleeds through. Not a lot, and not noticeable, unless wiping with a white cloth or paper towel…or maybe while wearing your favorite white party shirt or using your Grandma’s handmade heirloom one-of-a-kind lace tablecloth! I recoated with concoctions of carnauba wax, candelilla wax, and walnut oil in an attempt to create a seal that would eliminate the bleed through. Nothing worked. In desperation, I tried a creme wax by DecoArt that is not rated food safe on one of my small boards…worked like a champ! But not food safe, and the company will not give me an ingredients list – I called. I also asked a local Annie Sloan retailer if her wax was a good option for my situation…they didn”t know if it was food safe, but it is recommended for baby furniture (!). So. My two concerns: 1) a finish that if food safe when cured, 2) a finish that will not allow bleed-through! Is that so much to ask?!? And, don’t forget, the wood has already been doused with oil and WAX, so my options for sealants are kind of limited. Does your wax stand a chance of answering my needs? Or do I just start over and Use a tung oil or hemp oil finish…and will that work any better???
Wow. That is a crazy situation, because I’m not sure how the scorching would effect the finish. Unfortunately, once you start piling finish upon finish, you’re also delving into the unknown of how well all of those finishes will work together. I’m afraid I don’t have an answer for you in this case.
Hi! I bought hemp oil and furniture wax for an island im refinishing for my kitchen. On the back of the oil bottle it says you can apply wax over the top to increase durability but I’m not having luck finding how long I need to wait to do that? Any help?! I am LOVING the results I’m getting with your product, I’m a first time user!
Is it insane to apply the wax over a piece with hemp oil? I used your hemp oil to refresh the top of my vanity but want to give it as much protection as possible! I figured wax in a few days could do this but I also don’t know if that could trigger a bag reaction! Thanks!
No, you can definitely apply wax over hemp oil and that’s actually a great technique to combine those two products.
In answer to your question…., “I haven’t tried painting over a piece that has cured Hemp Oil on it, but I’m guessing that might be a little tricky… I’ll have to let you know when I try it or hear from someone who has.” Well, I used your hemp oil on my outside, black, painted door, and on my oxidized, black-rod iron railings/balusters. It made them look brand new! (It did take a few days until small bugs and flying weeds didn’t find themselves attached. However, they wiped away after it thoroughly cured.) 3 years later, I was really tempted to try a fresh coat, but feared a gummed up finish might occur. But, once again, my choices were to use your MMS Hemp Oil or be forced to repaint. I chose to use the oil first. I didn’t sand, prime, or even dust too much! The results were just as beautiful as the first time; no problem with the original coat. Once again, it looks as though I’ve given the door and railings a fresh coat of black paint! It seals up very nicely after those few days. (My door faces eastward. This may keep it from curing as quickly as say a north facing door.) Anyway, I’m thrilled to have found your product! Cheers to you and your product!!!
Now, I have 2 questions for you.
I chalk painted a bookcase and followed instructions by waxing it afterward.
I still have the bookcase’s mate and the shelves to finish.
I’m not liking how uneven the wax spreads or the time it takes to apply and wipe down.
Now that the wax is on the first bookcase, and I have to match the other pieces’ finishes to the completed bookcase… I wonder if:
(1) I could use your Hemp Oil on top of this wax finish or maybe
(2) if I could even add a little Hemp Oil to the wax to make it spread about easier.
Please, what are your thoughts to those questions?
K, I just tried a few things.
The oil alone, as you might suspect, didn’t work, because the chalk paint is too thirsty.
I went over a section of the waxed with the hemp, it reacted like a pretty flow of furniture polish, but I don’t know if that will stay put.
Placed a little in with my wax, for applying over the chalk paint, it’s so much easier and gorgeous!
I wiped some hemp oil on a stripped and sanded table to see how it would look before I did the entire table top. Now I’m not sure I really want to continue. I think I would rather stain the wood. Is it too late? Once hemp oil is put on raw wood is it too late to change my mind? I tried sanding, but the oil is still noticeable.
Hi there 🙂
I’m wondering would you recommend hemp oil over latex satin painted furniture?
Can I use hemp oil over chalk painted kitchen cabinets or is wax better?
Can I use he on oil over chalk paint on kitchen cabinets?