
I get a lot of questions about upholstery, so I thought I would write a post consolidating some of the advice that I’ve shared in various posts and tutorials into one place. Before I share some upholstery tips for beginners, let me share how I started.
My first upholstery job (and I use that phrase loosely) was a ratty hand-me-down sofa that was given to me in college. One of my classmates was moving out of his apartment and offered his sofa to us. It was a small, gold, midcentury loveseat that had probably been passed around from one college apartment to the next for years. It had good bones, but the fabric looked like a sofa that had been passed around from one college apartment to the next for years! So, I bought some lightweight cotton fabric (a blue & green plaid) and tucked it into the seams with a butter knife. I didn’t even remove the old fabric. So professional.
Believe it or not, it worked and the sofa looked half-decent with a throw over most of it! It even lasted for two years until I passed it along to the next college student who needed a couch.
I used this technique on a 1980’s hand-me-down chair a few years later before I actually read a book on upholstery and started working on thrift store and yard sale finds. I learned on every piece I did until I felt confident enough to tackle more challenging pieces and even start to sell them.
Upholstery isn’t my favorite DIY project, but I love the result and the fact that I can change the look of upholstered pieces, which can typically be found at a good price when the upholstery is dated or has cosmetic defects.
So, here are some things I learned along the way…

upholstery tips for beginners | one | the inside matters more than the outside
When you’re looking for a good candidate to upholster, a prime option is one that isn’t pretty to look at! The upholstery might be dated and stained, but the bones and guts are in good condition. Especially if you’re first starting out, you do not want to get into tying springs or cutting foam. That is a recipe for having something languish in your garage for a few years. Sit on the piece, give it a wiggle, and make sure that it’s sturdy, solid, and it feels like everything is in good shape on the inside.
If the foam is hard as a rock, you sink almost to the floor when you sit in it, or it shimmies when you push against the frame, that should be a hard pass on that piece. I would also avoid anything with a strong odor like smoke or pet urine. Those smells are almost impossible to remove from all of the padding.

upholstery tips for beginners | two | choose your fabrics wisely
When you have a good piece selected, it’s just as important to pick the right fabric. Good upholstery fabric can be stretched without tearing and is heavy-duty enough that it’ll stand up for years of rubbing. In my early days of upholstery, I used a lot of thin, cheap fabrics that were not well-suited to upholstery and I bet a lot of those pieces have had to be redone! I know that dropcloths were a popular upholstery fabric for a few years, but it’s really better for slipcovers, since it will tear when you pull too hard on it to lay tight and flat.
I prefer using heavy linens, cotton twill/denim, and heavy hemp fabrics for upholstery.


upholstery tips for beginners | three | start on something cheap/free/small
I know it’s tempting to buy a really cheap chair, but if it’s beyond your abilities, it might turn you off to upholstery for a long time. Do yourself a favor and start with a footstool, simple ottoman, dining chair, or even a headboard. While headboards are large, they are just flat panels that are very easy to upholster.
And, if the piece is free and you use an inexpensive fabric, like cotton twill, it’ll take the pressure off. Any mistakes you made aren’t a big deal and it’s all a part of learning.


upholstery tips for beginners | four| have the right tools
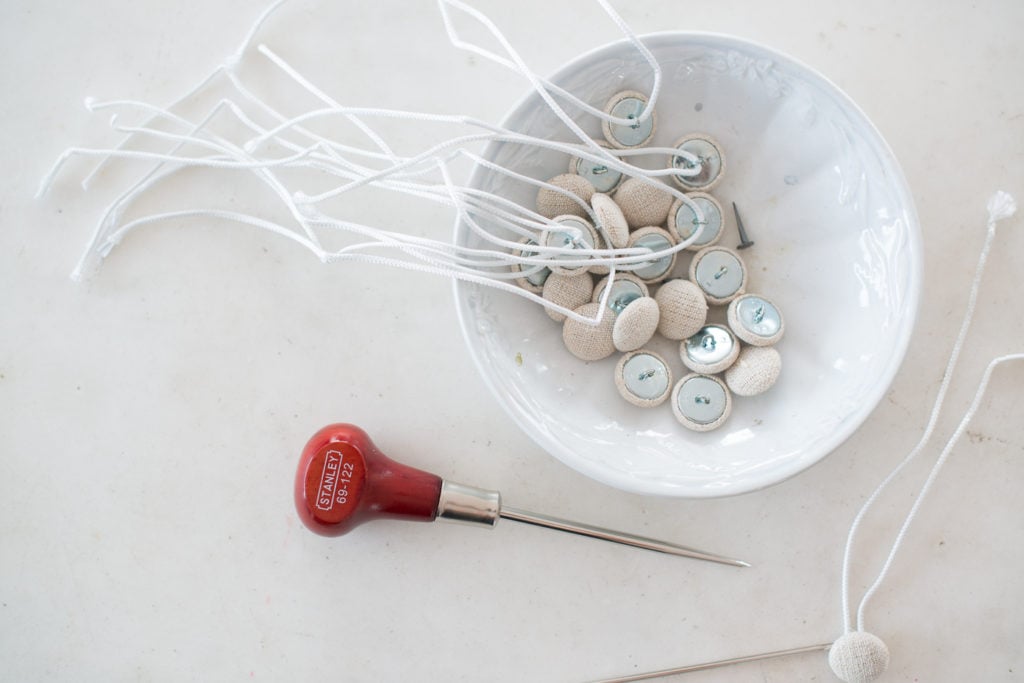
I cannot stress how important it is to have the right tools! I tried to get away with a box electric staple gun that I bought at a yard sale, but it wasn’t powerful enough and it was way too bulky to fit into tight spaces. When I finally bought a pneumatic staple gun that was made for upholstery, it was a game-changer. Everything was easier and my work started looking neater and more professional.
These are the tools I use most when working on upholstery…
- Pneumatic staple gun – This has a longer nose on it, making it easy to fit into nooks and crannies.
- Compressor – Unfortunately, you need one of these to operate the gun, since it’s pneumatic. You can always rent one if space is limited or you just working on one piece.
- Staple remover – I’ve tried a lot of different tools for pulling staples when stripping upholstery and this one is definitely the best.
- Good scissors – I like THESE for getting into tight spaces and THESE for just cutting fabric
- High heat hot glue gun for trim
- Upholstery Sewing Machine – I use a Sailrite Ultrafeed LS-1, but I didn’t make that upgrade until my regular heavy-duty machine couldn’t handle all of the layers. If you work with fabrics on the lighter end, you might be able to get away with a heavy-duty machine. And upholstery machine is worth purchasing if you plan to do a lot of home decor sewing, because it’s great for pillows, slipcovers, curtains, etc.

And, if you’re doing tufting, make sure you get an awl! I tried to work on this tufted sofa without one and it was nearly the death of me. True story.

upholstery tips for beginners | five| you can always do it again…in a few years
Your skills will improve with each piece and you can always reupholster pieces again when you’re better! I have redone several pieces over the years, because I know I can fix my mistakes and make the piece look more professional.
If you acknowledge that the piece can be redone down the road, it might make you more willing to give it a try. It’s not permanent and making cosmetic changes to a piece of upholstery will not ruin it (especially if it’s dated and/or stained.)
So, just relax, and give it a try!


Not only is upholstery a great DIY skill to have in your repertoire, but it’s a skill that’s in high demand. If you end up having a knack for it and really enjoy it, it might be the start of a new business.
You can find all sorts of upholstery and slipcover tutorials and posts HERE if you’d like to get started.
And, if you’re looking for a good book on upholstery, THIS one is my favorite.


29 Responses
I’d add one more. Stay away from stripes or anything with a straight-line pattern. Go with some kind of organic pattern (like a loose floral) that will distract or even hide imperfections. If you are little more confident then pick a solid, but save stripes and lines for when you have more experience.
Yes, that’s great! It took me a long time to become more accurate when it comes to lining up stripes and checks!
Hello, have you done a tutorial on your lattice pies? Did I miss it? They are so pretty! 🙂
I’m sorry, but I’m not sure what lattice piles are! 🙂 Can you ellaborate?
HAHA lattice PIES !
Hi Marian
I also remember reading a post about baking Lattice Pies.
You have done a few posts about baking/cooking/foods but, are they not available in any favourites/reference across the top of your web page.
Could these be added?
Kim
Right now it’s under “slice of life” and then “food & fitness”, but I should just make a category for recipes, so it’s a little easier to find.
I always wondered at the high cost of reupholstery, often exceeding the price of purchasing new. So I took a 6 week upholstery class offered through my county’s adult education program. As a sewer since high school with lots of experience sewing home decor, I thought learning upholstery would be fairly easy. After leaving the class sore and bleeding a couple of times and ending up with less than professional looking results at the end of the class, I concluded that paying for reupholstery was worth every penny!! I still take on small projects like chair seats and footstools, and I occasionally make slipcovers for chairs and sofas, but large or difficult upholstery projects will always be farmed out to a professional.
Ha, yes! Upholstery is a lot of work and I have joked before that a bit of my blood is on every project! 🙂 Certain projects are definitely easier than others and the more you do it, the more you refine your system.
Great post–a person never knows when the practice will come in handy. My first upholstery job was in 1963, after our 3-yr old used a black magic marker on our cream colored swivel rocker—I carefully took off all the upholstery, measured and cut new pieces from new fabric–even made new cording for the trim. It turned out great, and we used it for years. After that, I recovered several more chairs and stools over the years, and was happy to have had the practice after a young nephew threw-up grape juice on our new gold sofa. It ran down between the cushions, staining both sides. so I couldn’t just flip them to hide the stains. The biggest problem I had was sewing the cording and zippers on the seat cushions. I liked the sofa even more in its new green fabric then I did in the original gold! Great memories. Don’t be afraid to tackle upholstery– It can give you a great feeling to accomplish it. Then, there was the time when our two dogs had way too much fun with another sofa when we weren’t home———-
My niece worked at Spruce when they lived in Austin and I was gifted this amazing book.. I always recommended MMS to anyone wanting to try beautiful slip covers, painted furniture .. as a wonderful tutorial resource!!
You always give good advice and lots of encouragement! Thanks!
I only began to upholster (and sew home decor) because of you, Marian, and your tutorials. I liked the idea of doing it myself for only one reason: I could customize the pieces, and therefore, have a more unique and refined (I hope!) look. So thank you!
She probably means your apple pie.
I long for a sofa that folded out flat. Covered in dark purple velvet type fabric I’m thinking from the 30’s? The fabric was so worn and the piece weighed a ton we finally gave up on it on a move over 30 years ago. I would give anything to have it back and give it a new face. Thank you for encouraging us to save the oldies.
I have two (formerly) beautiful channel back armchairs from the 50’s that I tried to sell extra cheap on Craig’s list but had no takers. Thanks for making me realize that this is really NOT a beginner’s project. I am not discouraged, but realistic.
Yes, channel-back chairs are very tough! There is a great tutorial for how to do them in the book Spruce, but they are definitely not a beginner project.
Has anyone watched The Repair Shop on Netflix? It is set in Britain at a living museum. The work is done in a barn with a thatched roof with what looks like a dovecote above the door. Such talented experts in watch and clock repair, leather works, ceramics, woodworking as well as re-upholstery, which is why I’m recommending it. Re-upholstering the nursery chair was quite difficult because it had a metal back. This is the third season and unfortunately, seasons 1 and 2 are no longer available. When I realized this fact, binge-watching was no longer an option. I’m sad to say there is only one left to watch.
I have always wanted to try upholstering. You have inspired me to give it a go in 2021. I have a few pieces that are out in my barn that need some love and attention. Thank you for this post.
My friend and I took an upholstery class at adult ed in our town. We bought two bedroom chairs at a yard sale and off we went. Every week we would carry these small but heavy chairs into the class. The class was 8 or 10 weeks in length…more than enough time to finish…or so we thought. Needless to say, I never finished that chair. We moved a few years later and I stashed the unfinished chair in our barn. A stray cat made it’s catbox out of that chair seat. I still had more fabric and a local miracle worker (upholsterer) actually brought it back to life. The chair stayed with the house when we sold it.
Never take a good upholsterer for granted.
I started with dining chairs, real simple jobs in bright fabrics with foam. Did really well. A few draughtsman’s chairs in leather. Great job.
I got enough confidence to upholster a couple of Louis chairs rather badly. They look okay… but they won’t last…
Then I read a book on real traditional upholstery, ordered materials, and learned to stuff and stitch the old-fashioned way. It took forever, and I can nit-pick that some corners aren’t quite 100%, but I have now done a whole Louis XVI sofa and two matching chairs and I promise, when you do get there, the feeling of satisfaction and pride is well worth it.
That said it’s not for everyone. My big tip? Work on a table or workbench – your back will thank for you it. DAMHIKT!
I’m curious about the book on traditional upholstery techniques.
Title?
I have tried several pieces somewhat successfully (a large queen Anne wingback defeated me though) and I agree the pneumatic staple gun is a game changer. I thank you for the tutorials–about a year ago one of your tutorials about doing a slipcover spoke to me and I pulled out an old twill slipcover from a big sofa and recovered a simple slipper chair. I loved your process and I felt so accomplished!! Looking for a great chair for my new Little Art House!
thank you for sharing them!
I’ve done several small projects, DR chairs and a LR chair, which turned out well. I have a couch that I’ve been debating about taking on for 18 months. After doing the chair including cording and zippers, I’m not afraid of doing the couch, but it has to sit in a sunny spot (I have a living room with no solid walls to work with!) and I’m not sure where to go for 14-18 yards of fabric that will hold up well. I don’t have a family room, so the couch is it!
Any suggestions for good quality fabric that can be ordered online and hold up well for day-to-day wear and eastern sun?
Thanks!
I’ve been wanting to reupholster a couple of old pieces of furniture that I have at home. I love to learn skills and creative ways to decorate my home. I loved your article! I have 6 dinning chairs that I recently painted and they look great. I just needed to get over my fear of ruining the chair because I have not tried this before. Thank you so much for all your valuable tips, and wish me look with my upholstery venture.
Thank you for suggesting the book. I ordered the last one in stock. You so kindly did a tutorial featuring my French chair and I’m still working on it. Your instructions are wonderful.
I have a couch that was shipped from France. It is smiliar to the picture you have posted. 3 legs in front, 3 legs in back. It came as a piece that need to be upholstered. It has horse hair as part of the stuffing. I have never tried to uphostery anything. Are familar with this type of couch with horse hair. Thank you for your reply.
Where is the best place to order upholstery fabric?