
In my last box of goodies that came from across the pond from Julia of , I received several vintage and antique sketchbooks and drawing/oil papers. She’s been on the hunt for those for me, so I could recreate some of the Kitchin sketches on old paper. And I love old art supplies and she loves a challenging shopping list! This particular sketchbook had amazing paper in it – thick with a good texture and slightly off-white with age. It even had slightly uneven edges that added to the charm. The only problem is the book wouldn’t stay open! I mean, there was no way you could actually sketch in it, which is probably why it hadn’t been used. It would just flip shut the moment you weren’t holding both sides open. So, I decided to try my hand at bookbinding to make it useable.
I meant to take a picture of it beforehand, but I was so excited to get started! In the picture below, just imagine a leather cord woven between the punched holes…

My first step was to cut the leather cord. I took a brief pause ahead of time because I know it couldn’t be undone! With the cord cut, there was nowhere to go but onward. I used a paper cutter to cut the punched holes off of the edge…

…giving me a nice, clean, and even edge for bookbinding. I hated to cut off any paper, but I knew I didn’t want large holes in the paper. I was going to be happier with a clean edge.

I watched THIS TUTORIAL on single-page bookbinding and ordered my supplies. I already had some of the supplies I needed, but here is a complete list of the bookbinding tools I used…
- book tape – is the one I used, but is the one I ordered for future projects, so it’s not clear & shiny.
- scissors – these are my favorite forged scissors

I cut a length of tape using an X-acto blade and cutting mat to about an inch smaller than the height of the paper. I had to tape each page to reinforce it so it wouldn’t tear when I tied it on…

I stuck the tape onto the back of one page and set it aside…

I found it was easier to do five of those in a row and then fold the tape over to stick it to the other side.
bookbinding lesson no. 1
There is a wide variety of book tapes available and I didn’t need to order the first clear, shiny book tape I found. Really, this is glorified packing tape. Maybe there is something special about it (acid-free), but it really just looks like packing tape, which I wasn’t super excited about. Had I known about it, I would’ve used linen hinging tape. I also ordered 3″ wide tape and that was way too much. I needed 2″ wide at the most! I ended up putting the excess tape on the back side of the page.

I found a lovely little hitchhiker in my book as I was working through the pages. He came all the way from England to end up in a trashcan in Minnesota.

Once all of the pages were taped, I started to get excited about bookbinding! Isn’t there something so pretty about a stack of paper?

Oooo…and those edges!

bookbinding lesson no. 2
I measured and marked where I wanted the holes on one page (I figured four would be sufficient for a book of this size) and punctured through the marks with an awl. I then used that page as a template to puncture the other pages and cover. I learned when I was about halfway through, though, that if I got ambitious and punctured too many pages at a time, they would shift. I also didn’t use the first page every time for my template, so some of the pages ended up being a little wonky! It didn’t make a huge difference, but I would be more precise next time.

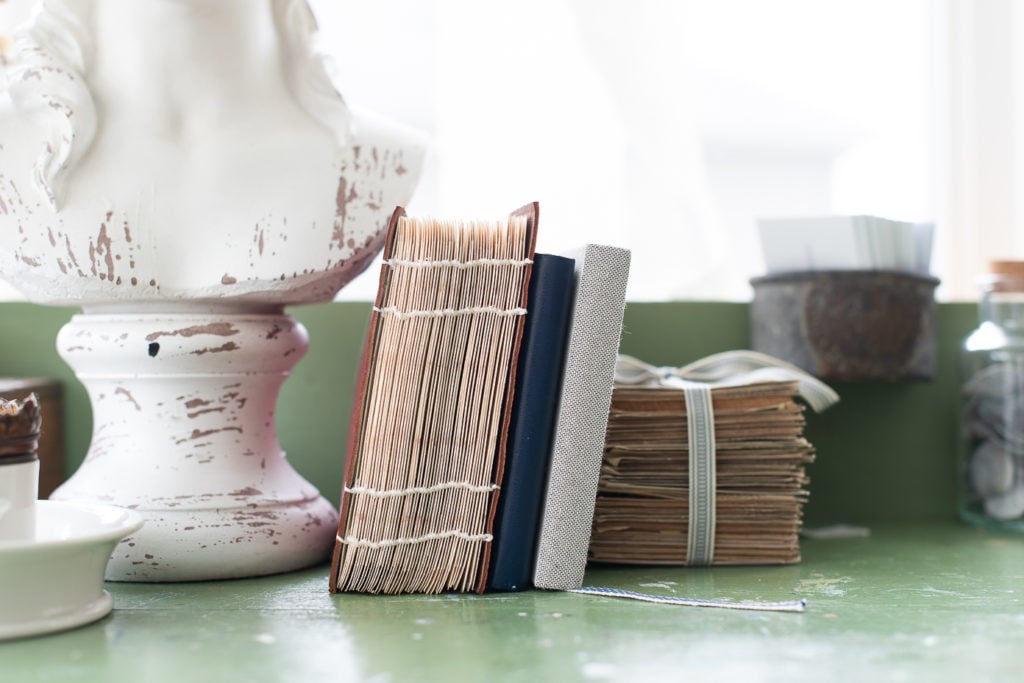
With the pages and cover punctured (I cut the original cover to size to reuse it), the book was ready to be tied.

I used white waxed thread and curved needles (linked above.)

bookbinding lesson no. 3
Tying the pages individually (all 42 of them) didn’t take as long as I expected. I figured I would be tying pages for hours, spreading the task over 2-3 days, but I was able to finish it all in one sitting in a little over an hour. I think this is what sold me on bookbinding! I am so excited at the idea of being able to make sketchbooks out of the exact paper I want to use, the exact size I want, and with custom covers. I’ll still use storebought sketchbooks, but it’s nice to know I can make some custom ones for specific mediums or projects.

bookbinding lesson no. 4
When sewing individual pages, the binding is stable, but a little wobbly. This book would be much sturdier if I had been able to fold the paper into groups (or signatures) and sew them together at the fold. I wasn’t able to do that with this particular paper unless I wanted a tiny book, so it’s just a little wobbly. Had I known that ahead of time, I might’ve made two thinner books instead of one thick book. I love the way to spine looks, though!
And, I love that the pages lay completely flat! I am going to enjoy using this book for sketches and studies. I think it’ll even hold some light washes.

bookbinding lesson no. 5
Cats and bookbinding do not mix well. Well, they do if the point is to entertain the cat, but not if the point is to bind the book. Even as I was threading the needles and getting started, Violet kept grabbing my cut piece of waxed thread and running off with it. It was funny, but I finally had to shut her out of the room so I could get the project done!

bookbinding lesson no. 6
Stitching the book is pretty simple and something that is great to do while you’re watching TV or listening to an audiobook/podcast. The thing that took the most attention was managing the lines of waxed thread so they didn’t get tangled. I ended up letting one hang off the left side of my desk, one to the left of my chair, one to the right of my chair, and one off the right side of my desk. That ended up working well and I didn’t have a problem with the lines tangling.

bookbinding lesson no. 7
I absolutely loved bookbinding! As I said, I would still purchase store-bought sketchbooks, but I am so excited at all of the custom & creative possibilities. I also love the way an exposed hand-bound spine looks. I’m already thinking of antique books that can be made into sketchbooks with my favorite papers, making books with oil paper for oil painting sketches, and even making books out of linen. There are just so many potential projects. And, as you all can clearly see, I need more hobbies and projects. And hobbies and projects that require more supplies. Clearly.

Since it’s sort of hard to explain the bookbinding process in a blog post, here is a video showing the stitch I used and showing how the book works…
And, speaking of trying new things, today I am going to start recording the audiobook for ! I will let you know all about the process and why we’re recording an audiobook for a decorating book with such a big visual component.
Have you tried anything new lately?
You can find more inspiration for Creative Play in THESE POSTS.


9 Responses
When I paged at my local library I learned that buying book tape (and it is expensive) is worth every penny for mending books. It doesn’t peel, yellow, or get brittle with age as ordinary tape does.
Sounds like you managed fine without it for your project. I really like the way you made an unusable sketchbook into something you will use and enjoy.
You helped that book fulfill its destiny!
Your book looks lovely. The book tape is my “learned something new” for today. Never heard of it before but definitely could use a roll.
Next project should be Paper Marbling, a beautiful old book technique.
I took a class in bookbinding and we used the front and back covers off of vintage Reader’s Digest books – they have the prettiest covers once you take the paper dust jacket off – I am addicted now LOL you should look at some online, you’d love the covers for your sketchbooks 🙂
This is something I have always wanted to try. How fun. I will save this post and look forward to any future bookbinding projects you share.
xo,
Karen
Ah, takes me back to all the art/craft lessons I used to devour. Bookbinding was indeed a rewarding craft. I do love your blog and IG posts!
I don’t know how you do it….AND you do it very well!!!! When you were a kid did watch and dream about being the next Martha Stewart? Has she never contacted you?
The books look lovely.
What a great idea to “remake” an old sketchbook. Check out what Ali has on her webpage, vintagepagedesign.com. Her handmade book instructions are fantastic. She does recommend making an odd number of holes for sewing the spine as it makes the book more stable. I am addicted to making handmade books!
one of my favorite things from my ten years working for Paper Source was learning (and teaching) book- and box-making! now you’re making me want to revisit those skills…
oh, and the uneven edge on your paper that you love so much? it’s called a deckle edge and can be created as part of the creation of the individual sheets, or emulated afterwards with a “wet and tear” process on certain papers.
PS (my other favorite thing from my Paper Source days? my collection of gorgeous Japanese papers. who needs a coat closet when you can set up a paper-arts supply closet?)