
I’m going to call myself on this before anyone else does. This idea is in a Pottery Barn catalog and it inspired many bloggers to make a paper wreath of their own. I really liked the look of them and thought it would be a fun project to try. If you’re going to throw up if you see one more blogger make a paper wreath, you may want to scroll down and check out my bathroom makeover instead. (I finally found where I originally saw this wreath. It was at The Shabby Nest. Thanks, Wendy!)




I’m linking this to Kimba’s DIY Day and Bloggeritaville’s Thrifty Thursday.














59 Responses
how I love this! I was thinking that I need to do a 'lovely wreath' link list- if I make one, I will definitely be linking! fabulous!
You crack me up!
I LOVE this wreath! Yours has proportion and the sheet music is beautiful, as well as special.
The sheet music makes a great statement!
Psst! Don't tell anyone, but I like yours better than the one I (and everyone else) made …! 😉
That looks great-I like yours better than the others I've seen!
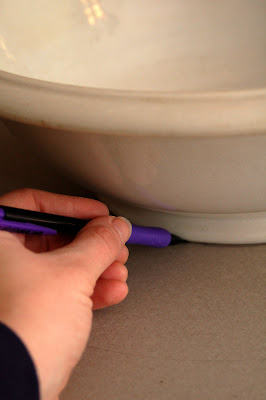
Can I have your template? and by that I mean that ironstone bowl? ;o
Smiles~ Michelle
Well, I, for one, never tire of the things you talented bloggers show us how to do. I THINK I might can do this…I will put it on my list for NEXT Christmas but….don't you think this one will look pretty all year long..not just at Christmas?
xo bj
Beautifully done! It looks so elegant hanging on your mirror. The sheet music has a gorgeous patina.
Amy
I don't care how many of these I see, I think they're absolutely gorgeous. I just love yours!
You are soooo darn talented, and you have time to post such thorough and informative blogs! How do you do it?!?! 🙂
I've been looking for something to put above our very tall piano and this might do the trick, but I also wanted a book one in our "library" but that's right around the corner from the "music room." (In case you couldn't guess – they're all the same room.) Ah, decisions, decisions, decisions. Thanks so much for stopping by my blog and giving me such inspiration!
It looks gorgeous and I love it in that spot. It goes so well with the mirror and the plates nearby.
I love it! very pretty 🙂
What makes yours different, and better I think, is that you actually take the time to teach us how to do this ourselves!
That's why I love ya! 🙂
Anne
A unique art piece, a wreath that can remain after the holidays.
I wanted to share a holiday e-card, really cute. Just click on my name to view.
DecorMadeSimple
Stunning! I agree, the patina from the pages is what makes yours incredibly special!
FWIW, I'm sure I'll be the last one in blogland to try this, so guess what… another one will eventually make it's way out there. 🙂
Loved your easy to follow tutorial.
Donna
Yours is the prettiest I have seen! Must be the special aura given off by the beautiful paper from your grandparents home!
Have a great day!
Love this!
You got me laughing on this one! While I haven't seen too many of the paper wreaths this season I have seen many, many repeats of the same projects. I do an internal groan when I see them.
This turned out really cute! I never thought about stalking Pottery Barn to get ideas on what to make.
Thanks for sharing!
Thank you for such a detailed How-To! I have thought about making this…wanting to use music sheets as well but cannot find an old book of music. I have been stalking the Goodwill…now I can tea stain my own. Thank you for that suggestion!
I've been looking at all these wreaths and loving them. Yours may be my favorite, because I love sheet music and I play the piano…hmmm. Maybe one for over my piano?
xo
Claudia
hmmm…i am going to have to make this today since i have all the ingredients! thanks
Thanks for the tutorial! I've seen them all over, but never seen how they are done!
Soooo pretty! Very creative!
I have all the ingredients, I'm IN! (And I haven't seen it elsewhere… although I've seen a TON of advent calendars!)
Very pretty, thanks for sharing
Love the sheet music wreath! Like others have said, I like yours best!
ooo–I love it. 🙂 I like how you were smart enough to make a template. 🙂 Btw, I mailed your package yesterday! 🙂
I'm visiting from Kimba's party today. 🙂 Hope you'll stop by. Here's my link:
http://serenitynow4amanda.blogspot.com/2009/12/seaweed-is-always-greener.html
LOVE THIS!!
I have spent lots of time web browsing holiday stuff, but missed this wreath so I'm really glad I found your post today. I can see lots of applications for this, using all kinds of paper – with all the scrapbooking paper styles available, wouldn't it be great to make one for a nursery or themed for a powder room? I'll be sure to link to your post soon from my blog because you gave such clear instructions and the photos illustrate it perfectly. Thanks for sharing.
Terrie @ YourDecoratingHotline.com
I love this!! I like yours the best and love the sheet music. So nostalgic and has sentimentality too!!
Sooo pretty!
Lou Cinda 🙂
Your paper wreath looks beautiful. The music makes it so pretty. How fun would this be using old Christmas carol sheet music?
Oh goodness! What a great use for the antique sheet music. Happy Holidays! ~Lisa
Well, that is music to my eyes (er…ears). I have tons of sheet music, so I just might have to make one of those. Linda
I promise- no throwing up. I want to make one out of Wall Street Journals for my husband's office.
It looks beautiful! Ever since I first saw the book page wreaths in blogland, I have been wanting to make one out of sheet music. Thanks for the inspiration.
I think your version with the sheet music is really great! I have seen a few of the wreaths around and I liked them, but I decided to try doing a styrofoam ball, to make a book page ball thingy..I'm actually STILL working on it…it's a little tedious! I can see it from here…hanging on a wire clothes hanger by it's jute string…it's mocking me…I gotta finish it!!
I love it can't wait to try it. GOD BLESS AND MERRY CHRISTMAS.
i'm in love with this! wow!
i did a wreath over a mirror for diy day @ soft place to land. nothing like yours. but i love how hanging wreaths over mirrors create such a bigger impact!
blessings!
kellie
I made one from a paperback book that has been on a lot of blogs, but I like yours much better! Happy Holidays
That is a very unusual wreath but oh so cute!
This turned out so pretty. I love it!
Michelle
http://www.TrashToTreasureDecorating.com
It is SO pretty and I really like it hanging from the mirror. Can't believe I didn't comment on this before. I apologize because it certainly is worth commenting on!
I think I need a custom one – and I will without hesitation leave it up all year round! Truly beautiful!
Bonjour,
Superbe et facile a faire .
Merci pour le tuto.
Bonne journée
pascale
You have great ideas. I love everything you have done.
I saw one like this in the White House Christmas Decorating Special on TV last Christmas, but this is the first tutorial I’ve found. Thanks for not making me muddle my way through it on my own.
Odd , your site turns up with a black hue to it, what color is the primary color on your site?