
Welcome to part three of the video slipcover tutorial series. First, I’m going to share the “after” picture of the wing chair I used as my example in the video. Didn’t it turn out great? It’s currently for sale at the Old Lucketts Store. I forgot to get a picture of the row of ribbon ties down the back. They look so good! Bummer.
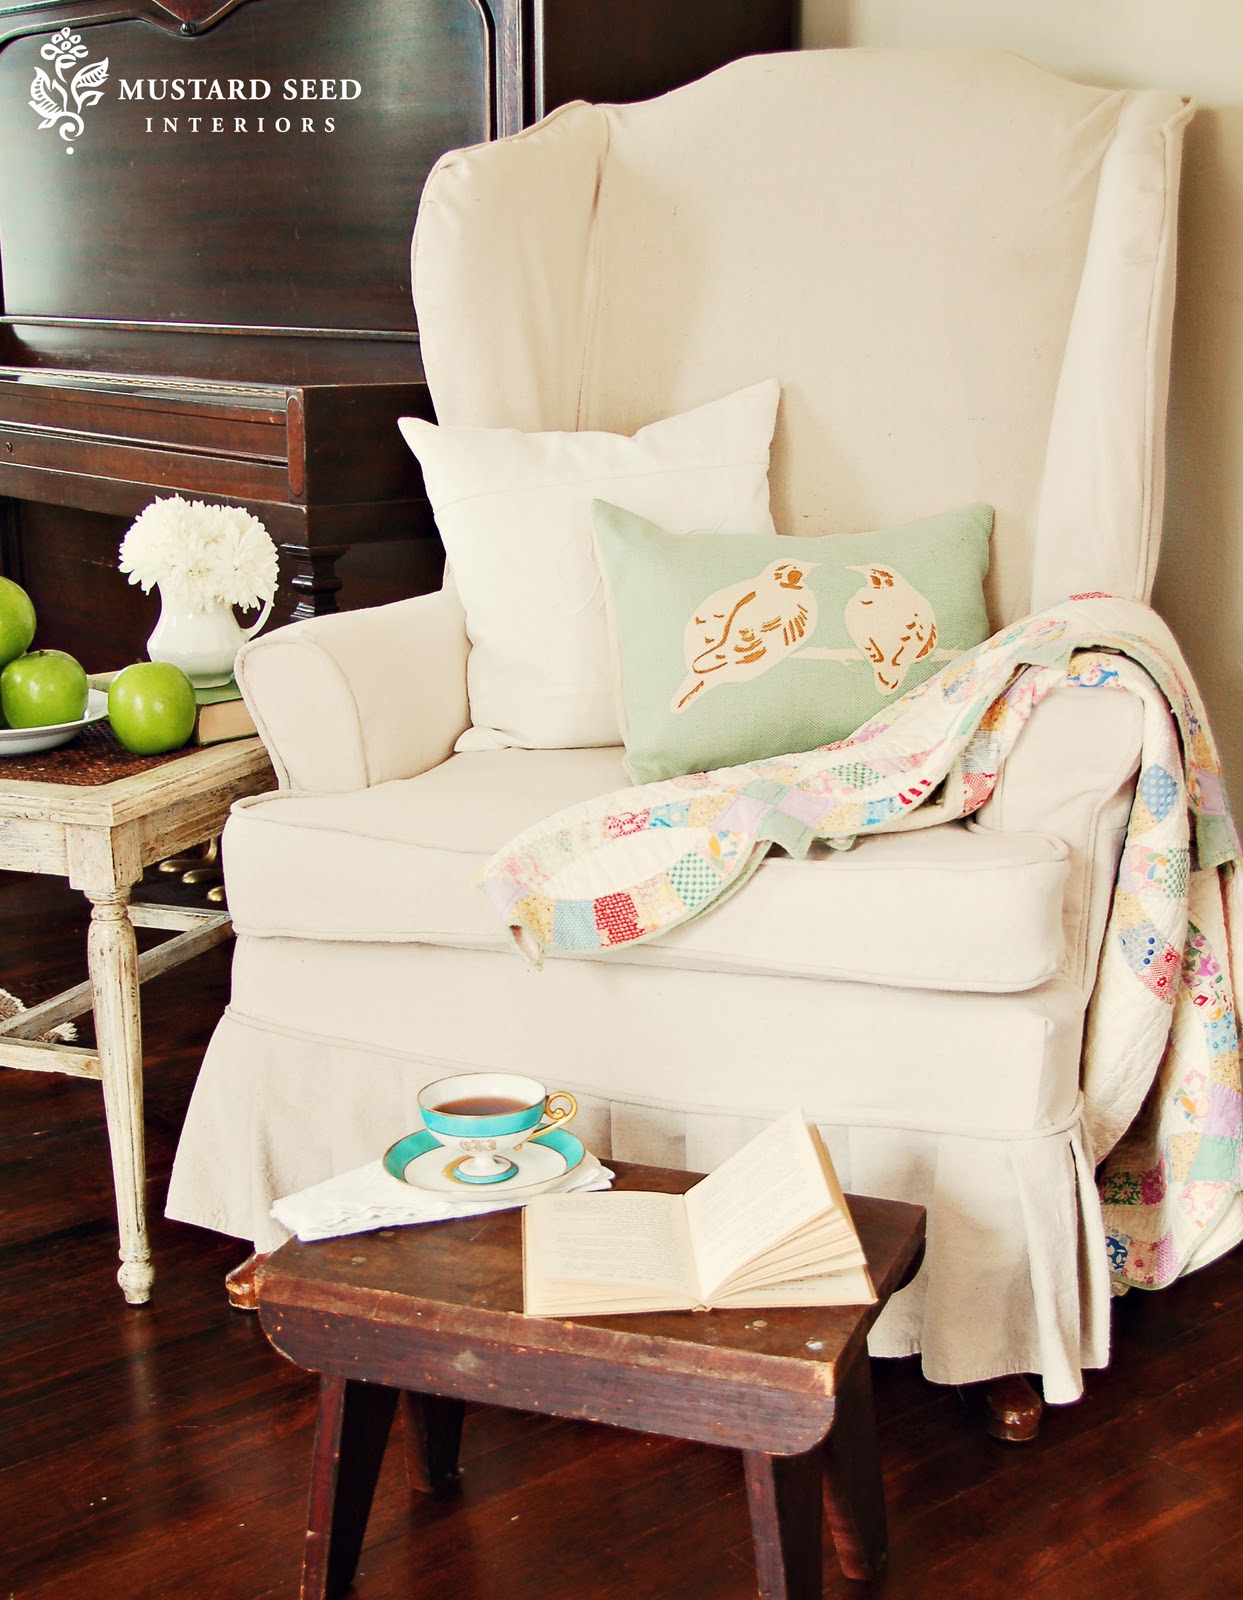
I didn’t take a “before” picture of it, so here’s a still from the video. Everywhere I paused it, I either had my mouth open or a smirk on my face, so I went with the smirk. Lovely.

If you missed the previous videos, you can view them here…
Part three covers how to position the fabric on the chair and pin fit the back. I ramble a bit, mainly because I don’t want to edit the videos too much. I really want you to see how I do something, so it’s easier to replicate.
Here is a full transcript of this video: MMS-Slipcover-Part3
Part four is coming soon!

I also couldn’t resist sharing a sneak peek of something I finished painting today…
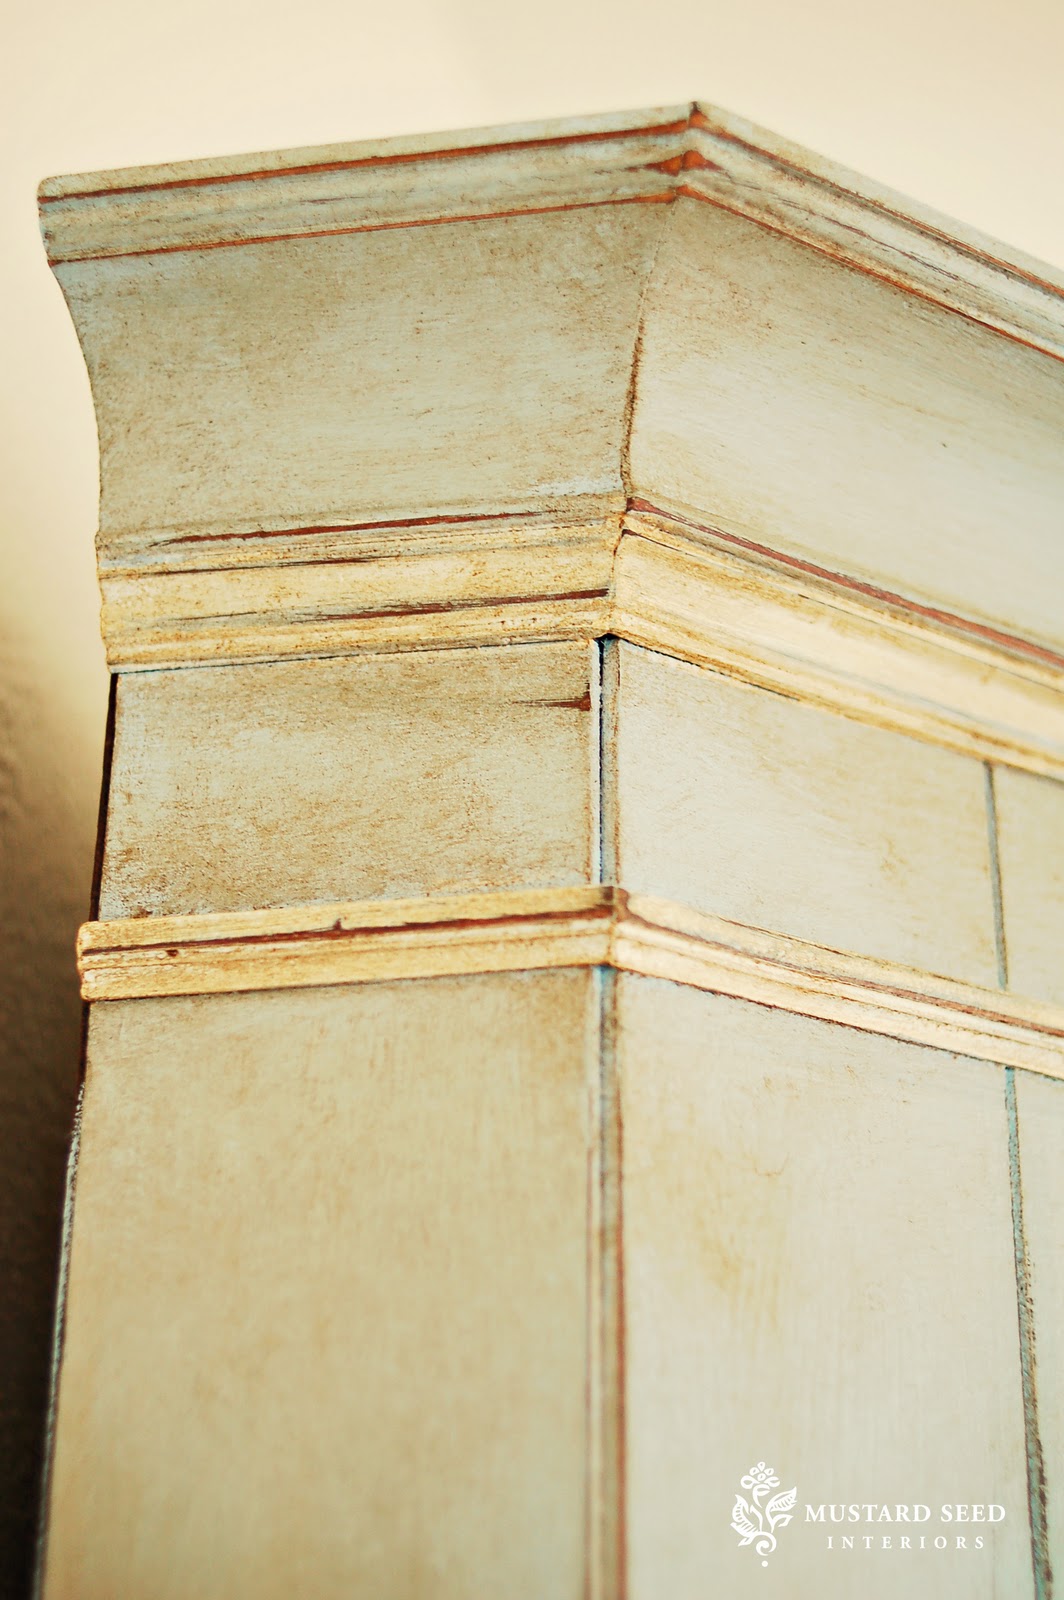
Need a hint?

The devil made me do it.
I’m linking this to TDC’s Before and After Party.


55 Responses
Finally painted those corner cabinets? If so, they'll look great in that space.
I'm guessing the corner cabinets,too…LOVE the detail!
Ohhhh, to have your talent! The slipcover looks fabulous, as does your "tease"! Take care, *Becca*
http://www.adventuresindecorating1.blogspot.com
Oh MY! If it is the corner cabs I can't wait to see them! You should come look at my cabinet with french wallpaper inside…I posted it Monday and I think it is something you would love. Still laughing about the smirk..haha!
Your corner cabinets!
that's pretty!
thanks for sharing!
lovely photos!
take care,
Rosa
Your are the Bomb!…seriously…I can't wait for part 4 so that I can start on my first slipcover. It's because of you that I'm even going to try. You have inspired me, and given me the courage.
Can't wait to see your painted piece, it looks awesome!
Susan : )
http://sanctuaryhomebysusancooke.blogspot.com/
Oh no you didn't! 🙂
Can't wait to see…
OMGosh I think I really want to be you! lol I just picked up 2 orange wing back chairs today & never noticed this whole time that yours is orange also. Can I just buy 2 covers from you & pretend I made em? lol & while I'm buying I'll take 2 of those French chairs too unfinished to make your life easier lol. Will your series also include the making of the cover for the cushion? Do you have a piping foot on your sewing machine or do you use a zipper foot? Last one for today (ha!) what brand is your opaque projector & what type of paper do you use with it? Thanks so much I <3 you!
Thank you for Part 4! It's wonderful to see the step by step – it is SO helpful. I also like when you laugh at kid noises or have to confess to a pin spill…
Marian this is so great the chair the new piece you are painting…very excited to see!!
xoxo
Karena
Art by Karena
You pretty much rock. Love this tutorial!
Whatever it is, I'm sure it's beautiful! Love the colors!
Ditto to what the Susan above said! I am a slipcover coward! You do inspire so much courage in me. Thanks so much!
Love love love it!!! My roommate and I are going to try and salvage a duck-covered wing back chair 🙂 We'll post on my blog Honey & the Moon about it!!
The chair looks great! I'm so envious of your sewing skills!
http://www.thesunshinegirl-create.blogspot.com
Its gorgeous!! Double bummer on forgetting to take a pic of the row of ribbon ties! I would have loved to see those!! I have no idea what your working on…but I love the color & I can't wait to see it!!
Darlin', you're so good! Your chair is lovely and looks like a cabinet! 🙂
Be a sweetie,
Shelia 😉
The tutorial is awsome.. thank you for putting it together.. I have an orange chair.. acutally it started as red in the 80's.. I had planned on making a cover for it.. done one before and had lots of problems.. think this will help a lot!
I am so excited for this tutorial. I have a well constructed sleeper couch that needs a new cover, but I don’t want to spend the money for one that will actually stay on with the kids sitting on it. I hope to recover a chair first to get the confidence and then attack the couch. Now I need to hunt down a wing back chair at one of the thrift stores so I can do a trial run on it (well, actually I need to deliver this baby I have been carrying for the last 8 months and then start on my chair). Thanks so much for sharing with us.
You are the best for baby stepping us all through this.
And you so weren't rambling. Loved your little tips as you were pinning.
I second and triple what others were saying. I think the painted piece is the corner cabinet in your dining room as well. The finish looks great from here.
Right! First, let me say, that without your creativity and kindness to share it… I would not have finally purchased my drop cloths and be waiting for the next installment of your slipcover tutorial!! You have given me the courage AND the confidence boost I have been needing to tackle re-covering a 3 seater sleep sofa and an arm chair! Secondly, I absolutely L-O-V-E that paint colour of your sneak peek (cabinets??) and am hoping you will share this paint recipe with us too! Thanks SO, So much for all you do!! You're the bomb!
I'm anxiously awaiting part 4 in your slipcover series. I'm thinking that just maybe I CAN tackle a slipcover! But only after watching your entire series of videos on how to do it. Thanks for sharing your expertise!
You are such a tease!!! Lovely finish by the way!! And thanks for the tutorial on the slipcovers!! Very cool!
Hugs
SueAnn
Hey Marion,
OK…little by little you are giving me the confidence I need to tackle a slipcover.
Going back to watch for the 11th time ;->
janet xox
I'm getting closer to whipping out the sewing machine. The chair looks fabulous. OH and thanks for the tip to pre-wash the drop cloth.
I recently found your blog and you have totally inspired me in so many ways! I have always wanted to learn how to make a slipcover but didnt think I could ever do it.. .until I found your video tutorials. Im anxiously awaiting the #4 video. I have my drop cloths ready to go. Also, from reading about your story and how you started up your business… you have really got me thinking. I have always dreamed of opening up my own vintage store and after reading your story, I am really thinking more about it. Thank you and please keep inspiring us.
Toni
A Bowl Full of Lemons
I've done slipcovers and you still have given me some helpful tips that I never considered. Thank you! I would love if you came over and linked up on my BRAND NEW linkie party "Whatever Wednesday!!"
Fabulous slipcover; I did one and now I feel I should try again (or send my chair to you).
Everyone is guessing corner cabinets, so I'll say a piano…
Bless you!!! It turned out beautifully and I'm SO happy you put #3 up as I get ready to tackle my sofa. Maybe I'll make a video and send it along for your entertainment. Hehe
Hugs,
Jami
(And YES, sewing without bobbin thread is entirely frustrating!)
It sure looks like a corner cabinet to me. Thanks for tutorials. You are so inspiring. Can't wait for the next installment. I don't even own a sewing machine, but I'm thinking of getting one now. Thanks again.
I second the motion on smelling the furniture. It's embarrassing but worth it. I once bought a small couch from the thrift store and didn't notice that it smelled like URINE (eeeww!) until I brought it home. I tried everything, but there was no way to get that smell out.
I am so inspired, I wish I could sew. I do find myself looking around the house for something to paint…
Oh, my word! I LOVE these videos! I'm such a visual person that now I feel like I can at least think about starting one! I have a wingbacked chair that desperately needs a new look. I can't wait for the next video! It's like a cliffhanger!
Thanks!
Fondly, Tami
I need to take a minute and tell you how much i love that quilt! Gorgeous!
I have been following your blog for several months and just wanted to say what an amazing inspiration you are!
Thanks for all the time you take to provide information and inspiration.
Revenda
http://www.revendabierley.com
You really are a rockstar.
I can't wait to try my hand at a slip cover…thanks so much for your step by step directions.
I am usually of the same mindset about cushions and making them. I just recovered a chair and it was my first time having to make a cushion…I ended up buying some bamboo batting that was on clearance on Joanns and used id just like fabric making a "cushion case" to put around the foam…it made a big difference, it didn't have that weird edges of a handmade cushion. I also used it to make a small cusion for the back, which I just stuffed with batting and case made it soo much better… not lumpy like batting can often look.
Just thought I'd pass it along because I just kind of stumbled on it…love your blog.
Love that you finally painted those twins. Can't wait to see them.
Well, the chair is to die for! I can only imagine that you're painting those twins. Can't wait to see! The color is gorgeous.
xo
Pat
good for you!!! and luckett's is closer to me then wild rose anyways =)
oops wrong post!! so you will get two comments on this one haha
its late.. im tired… but i am still painting!
the sneak peak looks good whatever it will be =)
I LOVE this! Its FAB!!! Come on 'ova and share this at my Linky Par-Tay!
*ENTER LINKY PAR-TAY Here! *
xoxokara
The "hint" has a distinct architectural resemblance to the top of your corner cabinets.
Come on, the suspence is killing me.
Thanks for sharing on the video. I've never done a slip by pinning wrong side out. Now I know the secret to your great looking work. Thanks again!
My goodness, am I the only one who can't see the video?? I will try back on another day. Thanks so much for sharing your know-how.
Awwwwwwwww you did it~!!! I can see they're gonna look fabuloius!! You must be so excited! I sure am! Sheesh Marion I still think my armoire would look amazing with a treatment like this *winks* Vanna
I am eatting this blog up! Can't tell you how excited I was to see your video tutorial on slipcovering this chair. I've recently been given my grandmother's wingback and was wanting to slip it just like this. It's like you read my mind 🙂 Now I want to start up on mine, like yesterday!
Shelley
I REALLY want to do this, I just don't know how to get started!!!!
I can't wait to try this! I'm going to have to schedule some child care in the next week or so so I can finally make some slipcovers for my dining room chairs. Then hit some garage sales and find that wing-back I have been waiting for…
Another great tutorial:) I’ve never tried the piping around the edge like that and i really appreciate the way you showed how to do it. It has always intimidated me! The slip cover projects I have in my to-do pile for customers don’t require piping but eventually I’m sure someone will want it.
You wouldn’t know of a tutorial for reupholstering and using double piping on that would you??
I was in the middle of the tutorial series, and when I click on part 2, your page says “this video does not exist”….is it somewhere else? I’m so excited about making these!
Lesli
Hi! I have watched one of your tutorials previous and made one slip cover but last night I watched the whole series as I have 2 chairs to slipcover. Your tips were awesome about using the hemmed side for the ruffle. I did not put ruffle last time because I thought it might be too hard. The only thing I did not do is the piping but maybe next time I will have the courage to do that too. By the way did I mention I don’t sew? I always wanted to learn but I great up watching my mother, grandmother, and great grandmother sew so I understand the principles of it. I cut it and pin it and have a friend stitch it up for me. I really hate that I did not get to come to Montgomery to the Chapel sale. We were coming and then had to cancel at the last minute. Thanks for sharing your tips and talent.