

Welcome to the workshop series brought to you by Mustard Seed Creations and Funky Junky Interiors! Before we get started, make sure you check out my 1000 Follower Giveaway as well as the So You Think You Can Decorate Competition. For this installment, I have another great guest lined up to share her expertise with you. I “met” Courtney in the blog world a few months ago and I kept going back to her blog to look at her amazing photography. I knew I wanted to bring a professional photographer in to share some tips and there was no doubt who I was going to ask.


Once you glean all of the goodness from Courtney’s tips, make sure you check out Donna’s Workshop this week. She has a guest sharing some simple sewing tips. Great info! Without further delay…here’s Courtney!


I struggle with this one constantly as my house resembles a cave during the daylight hours. It’s very difficult to photograph.
I plan to do a more indepth photo series in my own workshop coming soon, so all these points will be greatly elaborated. However, here are my top basic 5 tips for lighting pictures indoors. I use all of these steps (plus more!) each and every photo shoot I do. It sounds like a lot of work but it becomes second nature pretty fast.
#1. Get extra light into your home.
I use an auto lamp tree. I shine one lamp on the ceiling and one on the floor so the light bounces off each other. NEVER on your subject. This creates deep shadows. Also turn on every light you can (that isn’t IN the picture) and open any door. It all makes a massive difference. The key is to diffuse the light anyway you can.
#2. Get out your camera manual, and learn how to play with the light features.
Cloudy, flourescent, all these settings give different hues to your photos. I have at least 10 options in my point and shoot and they ALL make massive differences in your end result. Learn what they do, play with them and use them. You won’t believe the difference!
#3. Download Picasa (or another online photo enhancing program: they are free!) and enhance each and every photo. Gals, this is a must. I’d never use a photo straight out of my camera. This subject is a post all it’s own and one day I plan to do just that. You’ll thank me later.
#4. Take some subjects outside to photograph if you can.
You won’t believe the difference. Natural light is the very best, but ensure it’s a cloudy day OR a shaded/diffused area. My fav place to photograph is my outdoor patio as the sunlight is diffused by the plastic corrugated roofing. The light is always perfect.
#5. Remember to work down for lighting too.
If you’re taking a full shot of your kitchen table, you’ll get dark shadows underneath. Shine an extra light for that area. It’ll really brighten up the chair seats and show your floor nicely. Lightness is your best friend when shooting indoors.
But honestly? The MOST IMPORTANT feature of all is, no movement.
Get your camera on something solid. I’m married to my tripod, but sometimes it’s not quite right, so I grab a box, can, cup or anything that won’t move. I also lean, clasp my elbows against my body, I do ANYTHING to get that extra support so the camera will not wobble. EXHALE, relax, hold your breath and click.”
Those are some awesome tips, Donna. So, what if you don’t have an awesome camera? That’s ok. I took a series of pictures to show you the different looks I get with two different cameras. One is my Nikon D50 SLR (about $700, with accessories) and the other is a Canon digital point and shoot (about $150 camera.) All of these pictures were taken of the same subject, in the same light, on the same day, in the same location.
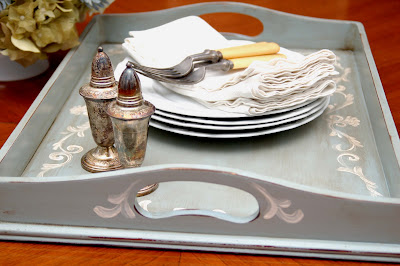
This is how I take almost all of my pictures. I was very anti-flash (and you’ll see why in the pictures below), but then I e-mailed with my brother’s friend, Blake Gardner, who is a professional photographer, and he gave me some tips on using a flash correctly. I use a diffuser and also “bounce” the flash off the ceiling and it creates this great light. (It’s not bad to get photography advice from one of the best head shot photographers in LA, huh?)

I also take a lot of pictures using this method, but the problem is that I have to wait for a sunny day and the right light to get a great photograph. On a gray day like this, the picture looks a little blah.


Just when you thought it couldn’t get worse… So, this just emphasizes that you can take bad pictures with a cheap camera as well as a good one.


Other photography tips
1.) Stage your pictures. Think of having a “photo session” with your craft, furniture piece, or room. Try different arrangements, pull things from other rooms and pick a nice back drop.
2.) Just like Donna said, take your pictures in your brightest room at the best time of day. You’ll want your subject to have lots of indirect sunlight.
3.) Take tight close-ups and get a lot of different angles. Sometimes a piece looks totally different when you look at it sideways or from over head.
Next week, I’m going to introduce my next series – Painting and Refinishing Furniture. I am really hoping the weather starts to improve in my neck of the woods, so I can take you step-by-step through some projects. I’ll take a little break from that subject on March 10th for a guest post from a blogger who has one of the fastest growing blogs I’ve ever seen (and she’s popular for good reason.) You won’t want to miss what she has to share!


23 Responses
Great post!! So many wonderful tips! Thank you for introducing us to Courtney! 🙂
~Jennifer
http://www.studiojru.com
Ah-maz-ing photography and great tips
Thank YOu Marian for having Courtney as a guest on your blog! These are great tips & now I have found another great blog to join! I have been wanting to learn more about photography, Courtney thank you for sharing this very valuable information with us.
Take Care,
Maria
OM goodness–this post is for me, thank you!!
Hello. And Bye.
I loved this POST! Anyone who just skims over it is losing so much good info!! Thaks so much…REALLY :o)
this was really great! i really need to find the manual to my point and shoot so i can better capture my furniture makeovers. they all look so "blah" on film!
Man do I need to step my photos up a notch.
Thanks for including me Miss Mustard Seed 🙂 I seriously love "blogland" so much 🙂 I love hearing from you all!
GREAT post! I knew a few tricks, but just recently, as I want…strive to have nice photos on my blog, I am finding I need to know a lot more about photography! THANKS! I don't know how I never made it over here before…I'm a new follower!
Holly
504 Main
Great information, Thank you for sharing. I have had challenges with my photos and you answered or directed me as to where to find the answers.
Great Information. Love it! Thanks!
Super post!! I loved all the photography tips! My problem is I always get in a hurry instead of slowing down and thinking about my subject and how I want it to look. Thanks for all the tips
Hugs
SueAnn
Thank you ! I need all the tips I can get .
Thank you Donna and Miss Mustard Seed for your great tips. Can I just add that If you do have a DSLR shooting everything in RAW format solves a lot of the lighting problems because you can change the light balance and the exposure afterwards.
Great tips! The heart shaped ponytails put a song in my heart.
Great tips!
Blessings, Grace
I didn't know my camera had a white adjustment. I just took some pictures using it. Thank you so much for the help – better pictures are ahead!
Great advice…no one ever felt they had too many photos….or photos that were too good…..smiles.
This is just what I needed! My indoor pictures can be pretty yucky. I try too hard with lighting. Will use these pointers! Thanks, Sherry
Thanks for writing that up for us! I certainly need it.
-Trish
-this post is for me, thank you!!
work at home in india
Kitchen Cabinets offered by Cabinet Giant, bathroom vanities, wholesale cabinets and factory direct cabinets.Discount cabinets, free cabinetgiant kitchen cabinet design help are available.