
I am finally coming good on my promise to reveal some of my sign-making secrets. Before you get intimidated and think, “I can’t paint. I can’t draw. My lettering always ends up looking all funky and like a second grader made it.” Let me assure you that anyone can make these signs.
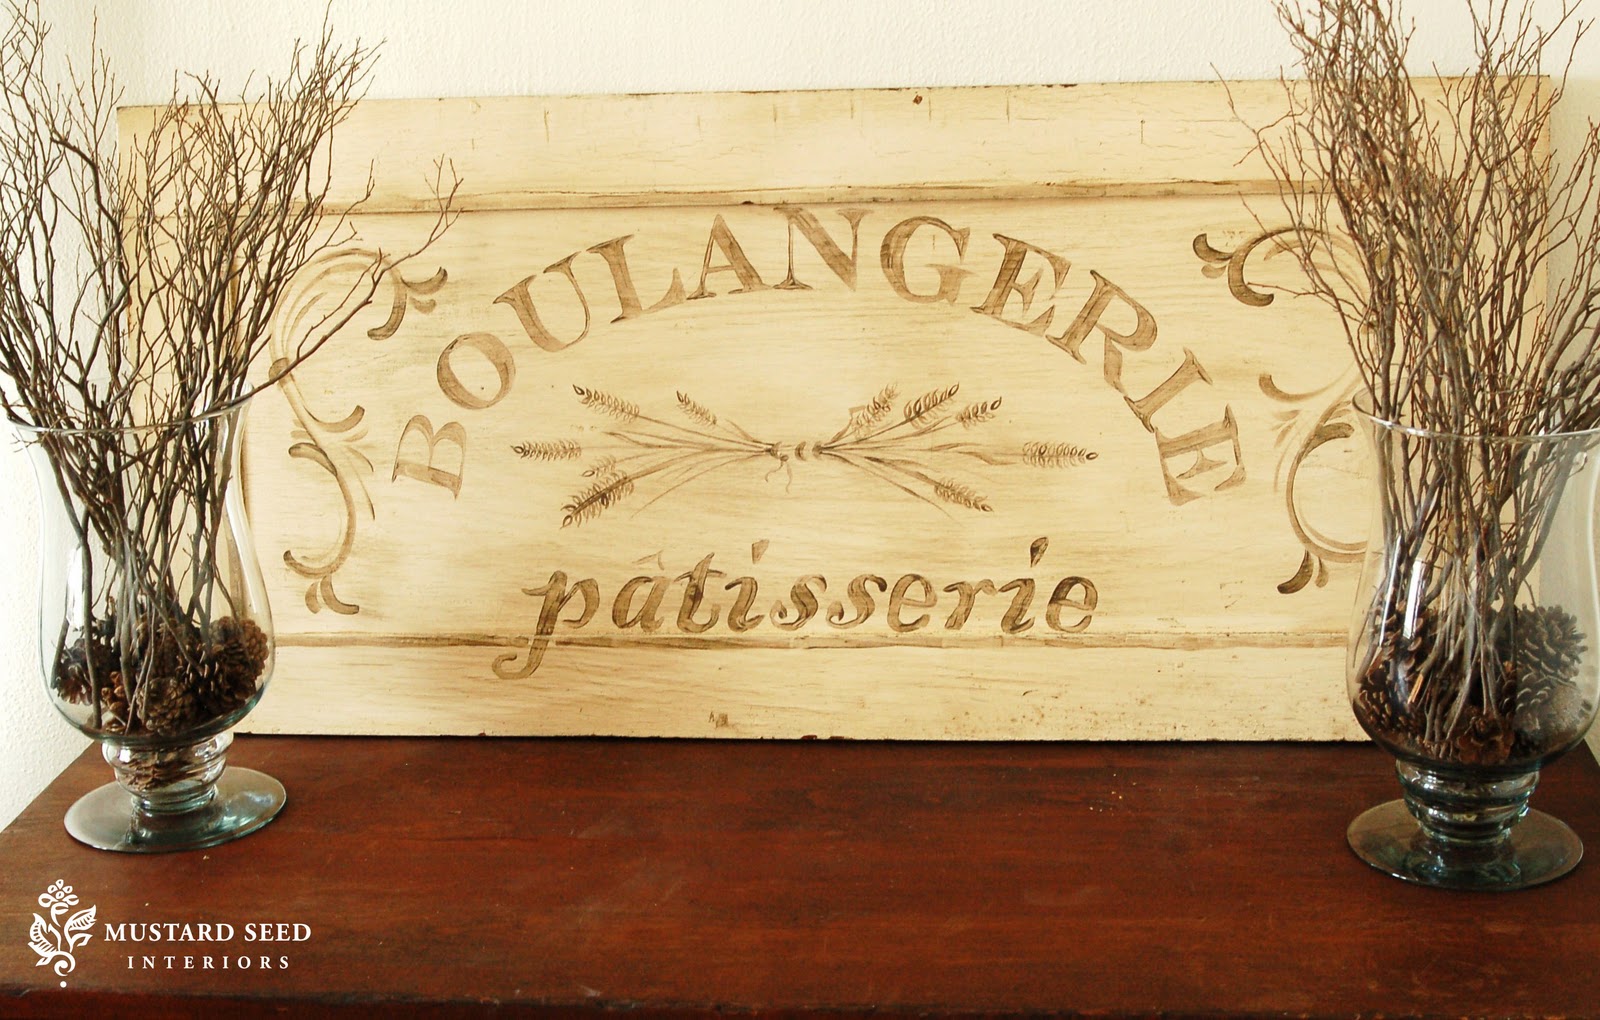
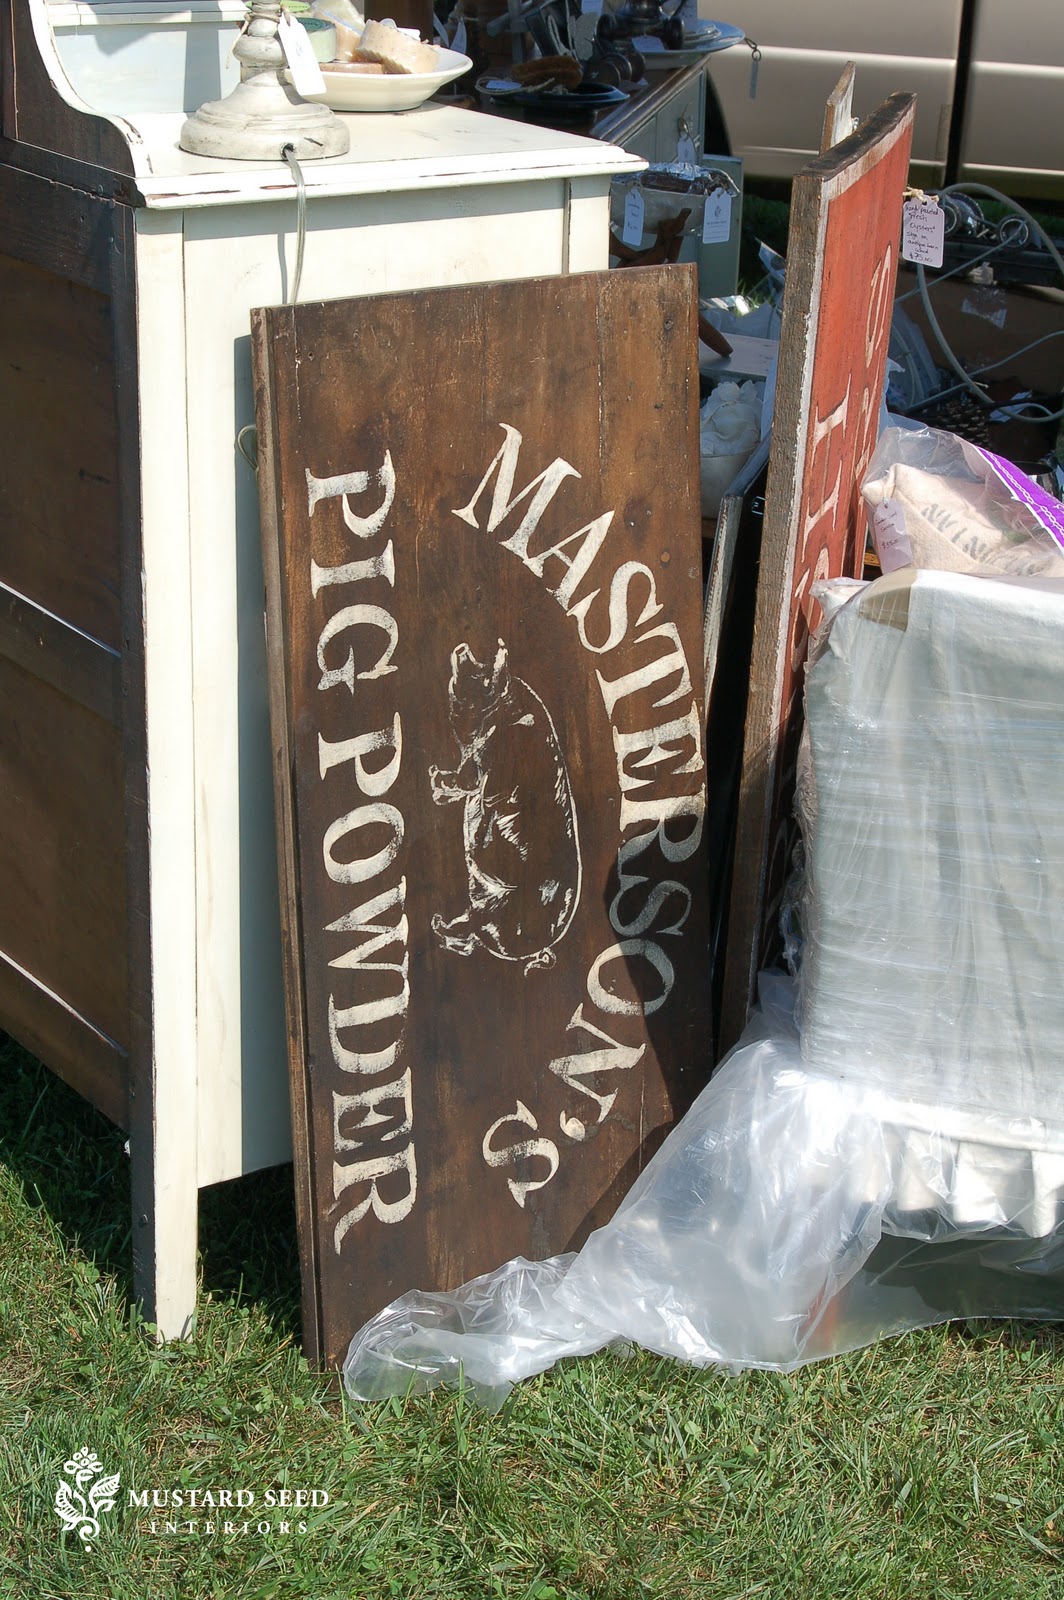
Start off by finding something to paint. I prefer old doors and boards that I find at antique stores, yard sales and flea markets. I like that they have an age to them already, so I don’t have to create that. Try to look at things in new ways. I’ve used sides of an old crate, table leaves, and a dismantled shelf to make signs. If you can’t find old doors or wood, though, don’t despair. Some crackle medium, distressing and glaze can make any piece of wood look old.
The second thing you need to do is create your design. I look for inspiration everywhere and snap pictures if I see old signs or cool designs I like. I don’t copy them, but I use them for inspiration.

I use MS Word to develop layout and select the fonts. I’ll then use a sketch or clip art if I want to add a picture to the sign.

The third step is to transfer your design onto your board/door. I use a projector, which is an awesome tool for this. It’s much more flexible than stencils and is faster than using a transfer method. A projector is about a $100 investment, but it’s well worth it if you’re selling your work or making a lot of signs for you home, friends and family.

If you don’t have a projector or cannot justify buying one, you can use graphite transfer paper. Simply print your image to size and trace over the lettering with the transfer paper between the image and the board. A Cricut or Silhouette is also a handy tool for making your own stencils.

Paint over your traced design using whatever color you want. I use acrylic paints and generally mix them to achieve the desired color.

Once the paint is dry, sand it gently to distress and apply an antique glaze over the entire piece to bring it all together. I generally use dark walnut wood stain on my signs. If there is original paint on the antique door, I’ll sand (wearing a respirator) and seal it with polycrylic before painting the sign. Please read my post on lead paint, if you’re unaware of the dangers.
So, those are the basics for making a good sign, but the one last component is one I can’t teach you. It’s a sense of what is going to look good. I play around a lot with fonts, designs and borders before I get to the painting. I also try to match up the design to the kind of wood or door I am painting on, so the sign looks authentic. This just takes research, practice and developing your gut feel for it.

I hope this gives you some ideas and confidence to go make signs of your own or at least it gave you a point in the right direction!
I also have not forgotten about the video tutorials. I filmed two of them last week, but it sounded like two children (mine) were being tortured in the background, so I need to film them again when I have a quiet house.


77 Responses
Just beautiful! I love your inspiration door, fantastic! Great tutorial here, your tips are outstanding!
Hugs
Kate
Love these signs. You have such talent for making them look so authentic and beautiful!
Very nice of you to share your tips!
So glad you did this post! I love your signs! And I appreciate the tips…. It will make my attempt so much easier.
Thanks for letting us know how you do what you do so well. I have a sign I am making in the near future for my bathroom.
I love your signs. I want to make one but nervous. You just took away some of my butterflys about it.
Great tips – thanks for the advice. I made a sign for my son's room the other day and let's just say I could have done better! Never mind – I'm sure I'll improve with practise and with your tips.
~Sam
Love your signs. Some public libraries have projectors to rent, if your looking for one.
Gotta love an overhead projector don't you? My sister has one and that is exactly how I do it..now can you teach us how to not shake when we are painting..?
🙂
tammy
Fabulous!!!! I love how your signs turn out! Thanks for sharing some of you tricks!
Have a wonderful Sunday!
XO
Thanks for that Marian…interesting that you use a projector, I had wondered if they might be the best tool for these signs, turns out it was a good guess! I haven't got one yet but intend to, as I really want to try some signs…the skill i feel lacking in though is making up some names/slogans and wording for them! I guess something will pop up…the first sign I intend on making is 'Restyled Vintage est. 2010'. I have several vintage bedheads that would be perfect for signs ready and waiting!
xx Karen
Thanks you for this post!
{Rebekah}
Thank you for sharing this idea. I was wondering, can you use plain paper on a projector? If not how do you transfer your design to the transparency? Thanks for all the info, this is something I would like to do, so much better than stenciling!
Thanks so much for the tutorial. I want to make signs for a friend's wedding and I don't have a cricut or a projector. I will check out the graphite paper!
Sarah
Great tips! We're actually going to be doing a giveaway for a projector over at Twice Lovely in the upcoming weeks, so all of you be on the lookout! 🙂
The projector must be the key here.
A note: Now that a lot of schools are moving towards smart boards and document projectors, you can probably find an old overhead for very cheap if not free! I know our school has a pile of them since we switched to document projectors.
Thank you so much for posting this! I absolutely love your signs!!!!
Your signs are great! Thanks so much for sharing the tips and info about how you go about making them.
Thank you so much for sharing how you do this. I may have to get brave enough to try it. I adore your signs!
I would love a projector… they are kinda old school, but so versatile!
Thank you so much for this post. Personally I am most nervous about the actual painting. Would paint pens work? (do paint pens even exist). What kind of brush do you use. Thanks so much. Love, love, love your blog!!!!
An overhead projector! *slap myself in the head* Why didn't I think of that?!! Thank you, you have solved a great mystery!
I have forgotten I have a projector!!!! Hooray! Thanks for all the great tips, what a wealth of information…
lynn
Thank you so much for sharing you tricks on making fabulous signs. I have a projector too and now I can put it to good use. It has just been sitting in a box…unused for years!! Yikes!!
Hugs
SueAnn
I love your beautiful signs !!
You have such a talent for
knowing what fonts
and designs to use ~
xoxo
Lori
Great signs and great tips!
Thanks for sharing! You're so talented.
That's brilliant! I bought my mother a projector for a birthday present a few years back. I might see if I can borrow it back. Thanks for the inspiration.
These signs are great!
Thank you for the tips. I am on the brink of doing this :). I've found it helps to "gag" one's children before the actual torture… (You know I'm just kidding, right!?)
Thanks for the inspiration and tips on making signs. I don't have a projector, but I think I might experiment with using my lightbox and transfer paper to make a sign or two. Designing things like that is such fun!
Dear Miss Mustard Seed,
You have inspired me once again! I just blogged about my fabulous transformation of my china cabinet that I distressed thanks to your tutorial….and….I also blogged about these drawer fronts I'd saved from a broken piece of furniture and I was looking for advice. I received suggestions about painting some words on it and there you are with your perfect timing! Now I just have to figure out what it should say. Thank you Miss Mustard Seed!
Oh, thank you for posting this! I am going to make a sign for our powder room . . .just trying to think of what it should say. 😉
cheryl
I have no idea how I found you, you know how it goes you go from one blog to the other, etc. I am just so glad I did, I have probably been prowling around here for an hour, watching your videos and reading tutorials. I am your newest follower and cannot wait to see what your up to week after week!
Carol
What projector do you use? I can't find anything that resembles yours and thats only $100. Also, where did you buy yours from?
Hi Miss Mustard Seed!
I too had a question about what type of projector you use. I have searched and did not find anything near $100. Thanks for posting this tutorial I have some salvaged wood pieces that I was wanting to make some signs with. Thanks for your daily inspiration.
Kayla
I admit to doing signs the long and hard way. You've given me much food for thought like 'time is money' rather than 'I have more time than money'. Thnks for the ideas!
For those asking about projectors, I got one on eBay for $56.99 and they have others for even less than that. They're called "ArtoGraph Tracer Projectors" and they're perfect for making signs.
I am so in love with your signs…Thank you for sharing so generously your techniques, many wouldn't. I want to make a small one for the entry to my studio retail space…I am going to hunt through the shed tomorrow to find something cool to paint on. You are the best !! I am using my logo, you surely have a great 'gut' feeling as to what will look perfect, so clever.))
What a great idea for personalized signs! Got some ideas brewing already for the kids, or even for gifts! Great stuff!
First, let me say that I love your work! I stumbled across your blog a while back and have been obsessed ever since. I just had a quick question on the antiquing phase of the sign – Do you use both an antiquing glaze and walnut stain, or do you use the walnut stain as your antinquing glaze? Sorry if this is a novice question. I can't wait to make a sign based on my great grandparents' dairy business!
love your signs, adding a link to your post here
http://vintagegypsywagon.blogspot.com/2011/07/sign-boards.html
Can you please post more on what kind of projector you use. Best place to purchase? Love your signs.
forgot my email on the projector question
gigiewbank@gmail.com
Many Thanks
You have a lovely feeling for "Antique" Typography. You make words into pictures that way.
Thanks again for being so generous. Some of us, uh, like me, for instance, need a little guidance to become semi skillful.
Love this! I use a projector with my large works and it is easy and you are so right you get fab results.
Thanks again for your helpful information! Love all your ideas!
I follow your blog closely – you are amazing and inspiring and generously share your knowledge and skills.I love the quality of your signs, could you tell us the name of the font in your ‘ Green Grocer ‘ sign? Thank you, A Grateful Reader, Holley
Sure! It’s ENGRAVERS MT in MS Word.
Thanks for sharing, your signs are amazing!
Hello! I love following your blog and learning new things from you! Thank you for sharing your talent with the world! I wanted to ask what I should look for in an inexpensive projector for sign making. Although I’m really good at research and purchasing things online, I have no clue what I’m looking for in a projector! I’ve come across cheapy cheap projectors and real expensive ones, can you give me a few ideas, or point me in the right direction? God bless you! PS You were great on Nate’s show ; )
This is the projector I have… http://www.kopykake.com/kwik-draw.html. It’s $150 on this site, but I bought mine for around $100. You can find cheaper models, but you lose some of the clarity in the projection. This is a good one that’s not too expensive. (They can get really pricey!)
I’m sorry if you’ve answered this question before, but I was curious if you used the antique glaze AND the walnut stain? And if so, do you do complete coverage of one and then complete coverage of the other?
I can’t wait to watch the video of the Nate show! Love your blog!
no, you really only need to do one or the other. Not both.
Thanks for taking the time to answer my question! I thought they wouldn’t work together, but I was a little confused and wanted to make sure I wasn’t missing out on some awesome technique everyone else knew about! 🙂
Have you ever found old wood that needed to be painted first? If so, what kind of paint do you use for that? I have an old barn down near me but, it’s so old there is no paint left on it and with so much wood I’m sure I’ll want some of them painted. Do you ever add anything to moisturize the wood? Some old finds are really dried out. Thank you in advance for answering.
I was wondering how do you get the image of the clip art (wheat) to look so good and detailed. Also how do you project the image on to cabinet doors/barn wood so level? No one asked so I think am the only who isn’t getting it!
Can you please tell me what brand or kind of projector you use for your signs?
BTW you are the God Mother of Bloggers and are such an inspiration to us all. I don’t know the first thing about blogging but would love if you would recommend some resources for me to learn how to get started.
Thank you kindly,
Deb
I have a question I have a projector but I was wondering what size of font do you use so it won’t come out so huge and not fit on the sign
I love your blog and creative design style. I too have a question about the sign font creation. How do you get the font to come out curved in Microsoft word. I would also like any info you could give on starting a blog, please!!!!
Thanks so much,
Julie
Yes, Please tell us what type of projector. I’m completely in the dark.
I read that you need to use bonding agent before painting a piece that has already been painted. Can you use primer instead then follow with Milk Paint?
Yes, primer will provide a base coat that milk paint will adhere to.
Hello. I was wondering if the fresh oysters sign is available for purchase.
Thanks in advance!
Thanks for the great tips, Marian! Can’t wait to try these.
I’m sorry, but I do not understand at all. How is the image getting onto the wood from the projector? Are you just projecting the image onto the wood and then copying the image by hand?
One can make a projector for phones with a shoebox and a magnifying glass. Instructions are in Internet and Pinterest.