
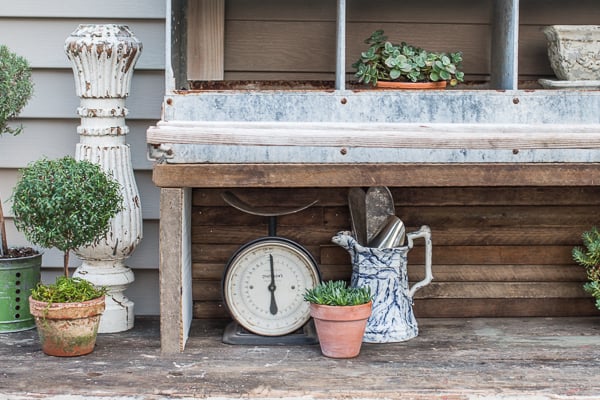
Don’t you love it when projects come together perfectly?
Such is the case with this hodgepodge of a potting bench.
We just finished it today and it looks even better than I imagined. It’s especially exciting, because we already had the workbench in the basement (it was free with the house) and I bought the chicken nesting box without a solid plan on turning it into the top-part of the hutch.
This morning, Jeff bought about $40 of pressure treated wood for this project, a couple of 2 x 12’s and 2 x 4’s. While he was out, I took care of the red overspray marks on the front of the work bench. It wasn’t a big deal, but they just bugged me.

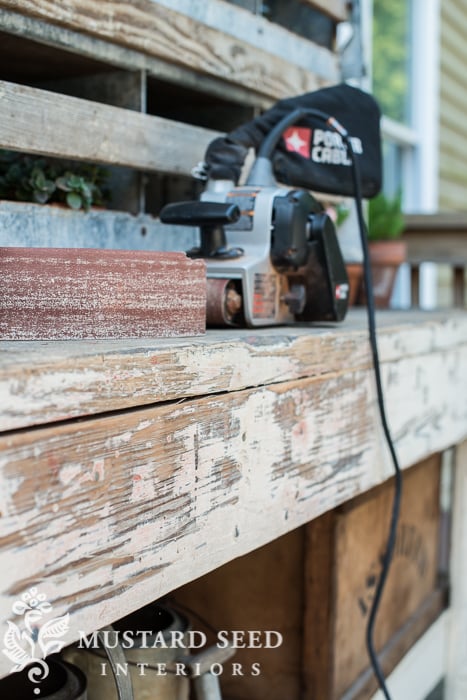
So, I brought out my big-boy sander, the belt sander, and I went to town.
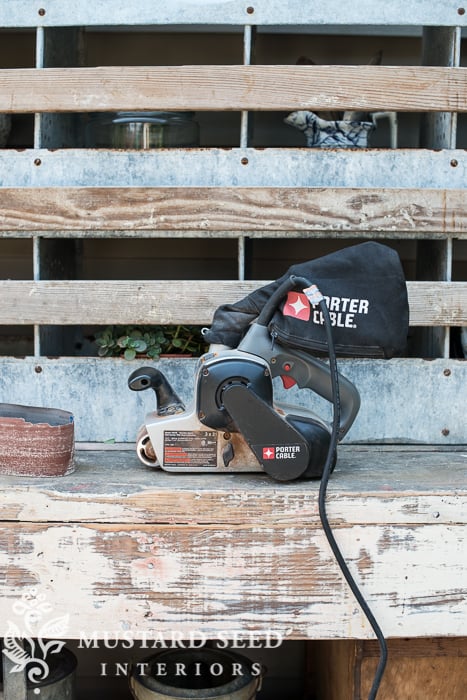
I really love how the paint looks distressed, with some of the wood exposed.

I used 80 grit paper to really pull off the paint. I ran the belt sander over the rest of the painted area, so the finish was consistently inconsistent.
If that makes any sense to anyone else but me.
Trying to figure out how to hang the chicken nesting box like a hutch-top wasn’t very easy. There aren’t many places to affix it to something, it’s not exactly light and it’s front heavy. It wasn’t impossible, though. It was just a puzzle that needed to be solved.
So, we decided to build a box, with an open front and bottom, to set the nesting boxes on. It was just roughly built, screwed together with exposed sides. Jeff then used 2 x 4’s as vertical supports to attach everything to the workbench.

It isn’t pretty, but it’s solid as a rock.

Soooo…I initially thought I would be okay with pressure-treated lumber.

I wasn’t.
But, I had a plan that fell into place.
I decided to paint the sides in MMS Milk Paint Ironstone.

(By the way, I ordered more brushes and they’ll be back in stock soon!)
I had some paint already mixed up for another project, so I just watered it down a bit more and brushed it on like a wash.
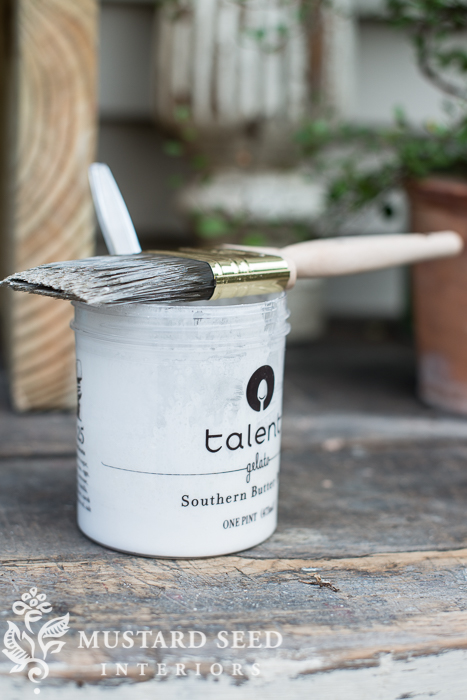
I hadn’t tried painting pressure treated lumber (PTL) before, but it soaked the paint in nicely. Now, you are supposed to wait to paint or stain PTL for several weeks, even months, until it completely dries, but this is just a small project and I’m not going to sweat it if I have to repaint down the road. I really just wanted to knock off the greenish-yellow hue.

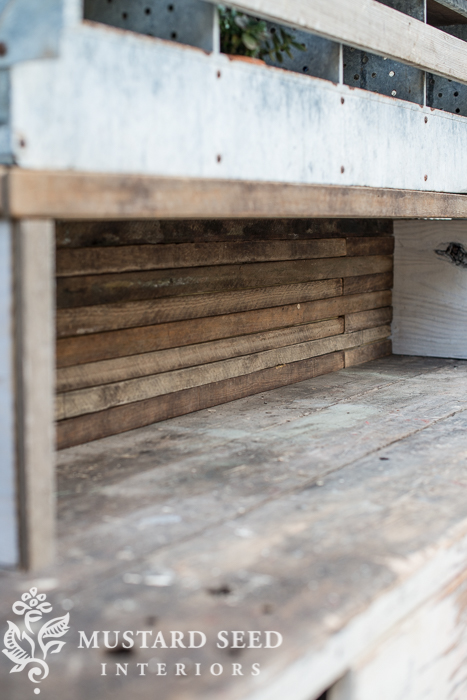
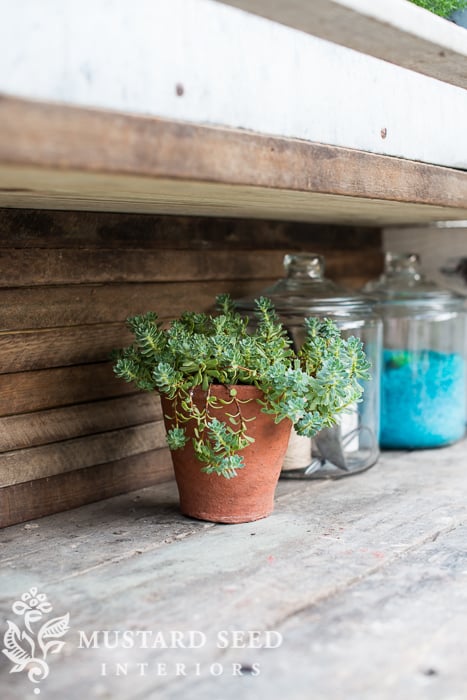
The next part involved some antique wood lath strips I bought a few weeks ago. I have some ideas in mind for how I want to use them, but they’ve been sitting in a bundle on the deck, so I decided to put some of them to good use for this project. They were the perfect size to cover the edges of the PTL.
(Lath is the wood strips that used to be used inside old plaster walls, as an FYI.)
And I decided to take it a step further and plank the back in the lath strips as well.
I cut the pieces of lath to size on a mitre saw…


And tacked them into place with the finishing nailer.


Really cool, right?!
And it only took me about 30 minutes this evening, once it was a little cooler outside, so I wouldn’t spontaneously combust as I ran up and down the steps to use the saw in the basement. (I’m a bit of a wimp when it comes to heat.)
For a project that meandered it’s way to completion, I am pretty impressed with how it turned out.

This thing is a beast and, as Jeff and I were moving it back into place, he stated, “This is going to convey with the house. Just so you know.”
I gasped.
“Oh, no it is not!“
Of course, he said that before I put the lath on it, so that may change his mind about the value of moving with it.
Probably not, since the lath strips most likely made it even heavier.

I’ll share more of the potting bench and how the whole deck is coming together in a few days…


33 Responses
That is one beautiful bench! Thanks for the step by step DIY, I get so many ideas and inspiration from you! jonni
Love all of it. It has been fun to watch you “turn to the dirt side.”
Gardening is therapy for me. And I vote that you definitely take it with you when you move.?
oh so pretty. And of coarse your terra cotta pot is perfectly discolored!!! You really need your own show or magazine. Have a wonderful day!!!!
Nice potting bench! My husband made an outdoor table from a remnant of quartz from when we redid our kitchen and same thing–it is so heavy that it will have to convey with the house. It does weight down the big patio umbrella though!
Is anyone else having problems with your website? For the past week or so, it has been taking a long time to get to your site when I click on it. Sometimes my request is processed so long that I give up. I don’t think it’s my computer; I am not having problems with other blogs. Just wondering.
Yes, I’ve been having the same problem and I let my tech folks know. They’re working on it. 🙂
It’s lovely! I love the strips you added. It really is such a unique piece. We sold our house so quickly that I had to leave behind so much stuff. Dining room furniture, chest of drawers and so forth. But what grabs my heart every time I think about it is the beautifully weathered terra cotta pots, water fountains, antique bricks, handmade window boxes and much more. All of these things were mine. Now they belong to someone else who doesn’t even run the fountains nor use the pots or window boxes. Think twice about what you leave behind. After all, Miss Mustard Seed kind of started right there on that bench and was there all the way through moving your business.
Blessings,
Mary
That is a thing of beauty. You have to find a way to take it with you if you move! The box you built to hold the nesting box hutch and the lath planking really do it for me. It is an excellent piece. Still love that little cow!
I love how the potting bench turned out.
I, too, am having trouble with your website, as Bee mentioned.
Great post. Best part…I too use Talenti ice cream containers – but ONLY so I can “use the containers” for paint, storing nuts, grains…. But never (wink, wink) for the ice cream.
Thats so clever! so much more than up-cycling, just plain making from scratch really.
I haven’t had any problems with getting onto your blog, but I do use bloglovin. Maybe people who are struggling could try using bloglovin to get to your blog??
Hope thats helps
http://www.homemadebyhail.blogspot.com
LOVE LOVE LOVE!!!!! I saw one of these nesting boxes on craigslist and nearly bought it simply because you inspire me so much. Sadly it was gone already- probably some other big fan snapped it up before I could 🙂
You constantly inspire me to get to some of the things that rumble around in my mind. Thanks for always being right on point!
You are amazing!
Love this project! We often buy and sell workbenches and they are beasts to move! Just took one apart in a 100 year old basement and moved up a set of stairs that had 3 turns. We know how to have a good time! Sitting on the patio now awaiting a little oiling – wish I had a chicken box for it!
Perhaps if you tell your husband that this 60ish couple hauled a solid slab maple bench up several flights of stairs he will consider it a challenge – if the old people can do it so can he 😀
Thanks for inspiring me with every post!
Aha, we finally get to see the man of the hour Jeff. He looks like a keeper………..You
make a lovely couple. Mary
Young college boys or hunky firemen who moonlight as movers won’t have any problem moving it. They now male PTL with a “cedar” coating so its not that green/yellow color. Still supposed to wait to paint but not so ugly now.
Gol–eee, that is very cool. Question about the lath. Yours looked as if weathered or recycled. Was it, or did you buy it new? Can you actually buy new lath? No one plasters their walls anymore. What would new lath be used for? I love the look of yours on your potting bench. That part was inspired.
Well, you’ve done yourself up a nifty little bench, girlie! Now you have to get busy and pot, pot, pot!
Big improvement!! I wondered how you were going to get any potting done with that contraption sitting right on the potting bench.
FYI, many plants need sunlight on their tops, where they are coming out of the potting soil. This is especially true with ferns. Otherwise no new growth occurs. I say this because of the plants you have inside the nesting boxes.
The lath is a very interesting aspect.
Thanks! yeah, I just tucked them in there for the pictures. I will eventually fill them with pots, etc., but I don’t have many, yet, so I tucked some plants in to keep it from looking too empty.
Talenti containers are the BEST for mixing milk paint don’t you think? Of course it’s not bad to eat either… I wish I could find a chicken layer thingie for my potting bench! It’s just the perfect thing!
Such a unique piece! You need to take it with you when you move, you’ll never find another just like it!
Just when I thought I was done decorating my balcony garden…the new property owners are re-painting the building exteriors! What used to be a lovely, energetic, garden green will now be either a “dried-blood” red, grayish Union blue, or just gray. (Why do people paint things gray in the already-gray Pacific Northwest?) Will probably have to re-paint my hand-decorated storage chest to coordinate(sigh). Oh, well, it needed another few coats of marine urethane anyway, so may as well totally re-do! Think I will put casters on a large wooden “cache-pot”, too, and make some new pillow covers after I see what color paint my balcony will be. You always inspire me to get busy!
and if we didn’t have lath… yardsticks would be a good substitute for a different look ! But your lath idea really added another layer of deliciousness to an already yummy potting table .
Haha, noticed the Talenti gelato container…they are perfect for a batch of paint…we “force” a pint down every so often just so I can have the containers!!!! Never met a flavor we didn’t like!!!
love this post, I’m inspired to work on my potting bench, it’s old tool chest that I’m trying to convert over. But in regard to the to parties, you might have said previously what they are but I can’t locate anything, what type of trees are they? I love them!
Topiaries…..not parties. Love auto correct.
I love how you finished your project and I had this idea before you started but started with a galvanized two shelf piece we had to customize to fit over our water main piping. My second shelf is small but that’s okay. I’ve got small pots and such. I have rocks as a base so I plan to put a crate or pail or watering can under there. Now I’m excited for I planned to add wood strips to the front edges for character. It will look good as I can see from your bench!! I own a couple hmmm clay finial deals (?) but I’ll set them to the side. I have ideas now!! Mine is to provide interest to that forgotten wall next to the driveway where my electrical, cable and phone hookups, gas meter and sprinkler main are all sitting. Thank you for inspirations. Life gets fun. I dream. You did after me. Yours is done!! Mines in place with the pot awaiting cooler weather for a camellia to be planted. I’m so excited!!! Thanks again for inspiration!!!
Looks great!
Can’t tell you how many times my husband has said, “that will convey, just so you know.” ? But just so YOU know Marian, it never does. ?
Too funny – I brought home a coop from The Country Living fair a few months ago, and a table of sorts a few months before that, and I was just digging through them in the garage today and measuring them to see that they paired up. Now I am deciding if they are going inside or outside! Seeing yours makes me love the idea of pairing them together even more!
I found a “recipe” online somewhere to “age” new wood for projects, but haven’t tried it yet.
According to the instructions, you put a pouf of steel wool into a mason jar, and then fill the jar up with white vinegar; screw on the top and let it sit for at least 24 hours until the steel wool dissolves into the vinegar. Brush this mixture onto unfinished, new wood and let dry completely. If you want it darker/more aged in places, just brush on more of the solution. Like I said, I haven’t tried this yet, but the photos of the furniture they used this technique on looked impressive!
Has anyone tried this?
Looks amazing and preparing your plants on it will be that much more fun! Are you planning to cover it for the harsh winter?
Just got a chance to catch up on this post and…AHHH..it looks soooo good!! you did good!
I love it! I was just catching up and I am so glad you finally finished!! I love the lath stripes those look so cool.
Great work as always!
Lauren Baxter | Lovely Decor
xx
I know this is many years later, but did you know that your post has several pictures of chocolate chip cookies interspersed with the pictures of the potting bench?