

A few weeks ago, I wrote a post about styling for a retail space. In reply to that post, Tanya from Ever After Cottage shared this comment…
“This was a great article! Could you possibly do another article on styling for photos? I’m terrible at it! I have a couple of spots that I love in my home, but when I try to capture them in a photo they turn out looking “off” – either too cluttered or too minimalist or too bland. Part of the problem is that I don’t have a lot of accessories that I truly love, but I’m working on that one. The other part is something I can’t put my finger on, but I’d love some tips to try.”
So, this post is in response to that comment.
I’m going to put it out there right off the bat that I’m not an expert or a professional photographer in the purist sense of the title. I still have a lot to learn when it comes to photography and styling and I’m sure I always will. Also, just like other aspects of art and design, styling is so subjective. What looks interesting to one person, might look off to another. What looks clean and simple to one might look sparse and cold to another or even overdone to someone else. So, you have to allow for creative differences in the world of styling. And you have to find what’s “you.”
That being said, I have a lot of photo shoots under my belt…for this blog, numerous magazines, my book and most recently, a look book for the milk paint line, so I have some credibility. Or at least some experience!
I could go on and on about styling, but I’ll keep it simple and boil my thoughts down into five tips.
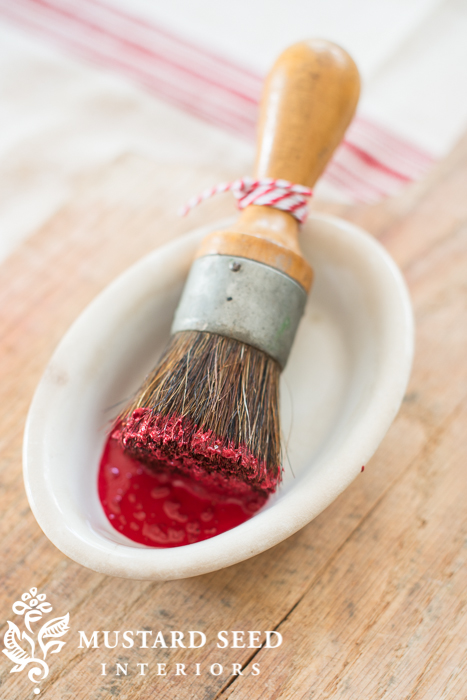
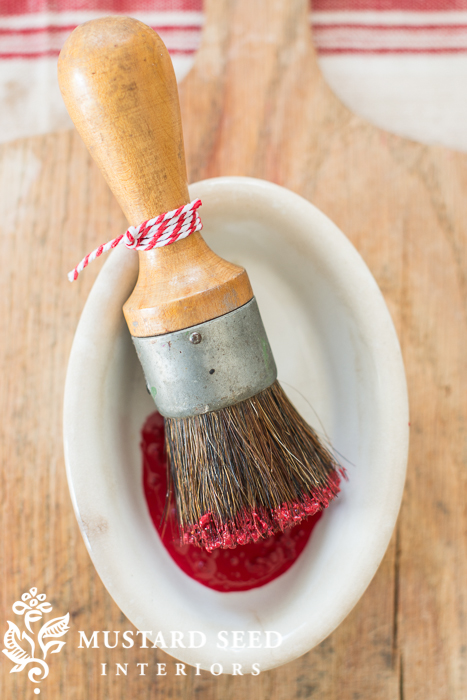
![]()
tip #1 | what looks good in real life doesn’t always look best in a photo
When I was shooting my kitchen recently, I put a pitcher with flowers on the corner of the counter. In person, it looked clean and classic and kept the space uncluttered. I liked it a lot. But, when I looked at it in the picture, it looked a little bland.

So, I beefed it up by adding more color and some height variations. The styling still makes sense for a kitchen and doesn’t look overly done, but it’s far more than I would usually have on the counter. It covers the outlet on the backsplash and made the picture more interesting.

![]()
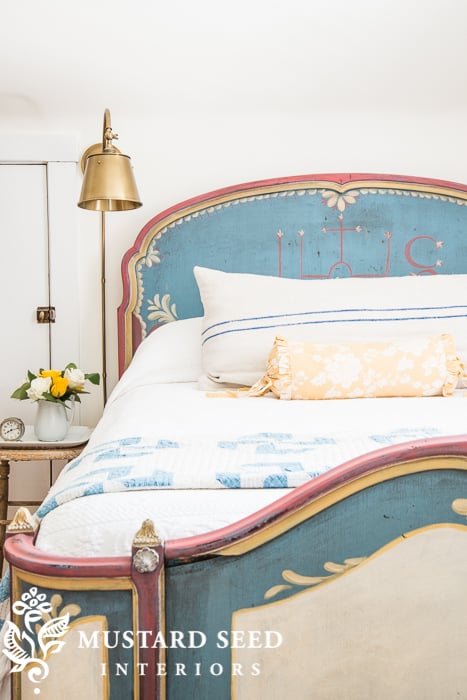
tip #2 | add layers
I wanted to finally do a proper reveal of my hand painted Bavarian guest bed, so I took some pictures one afternoon just as it was. As I was editing the photos, I realized they looked “blah.” I had to crop out the side table, because there wasn’t anything on it and I didn’t like how it looked with the bed. The yellow pillow looked sort of alone. It just wasn’t popping like I knew it could.
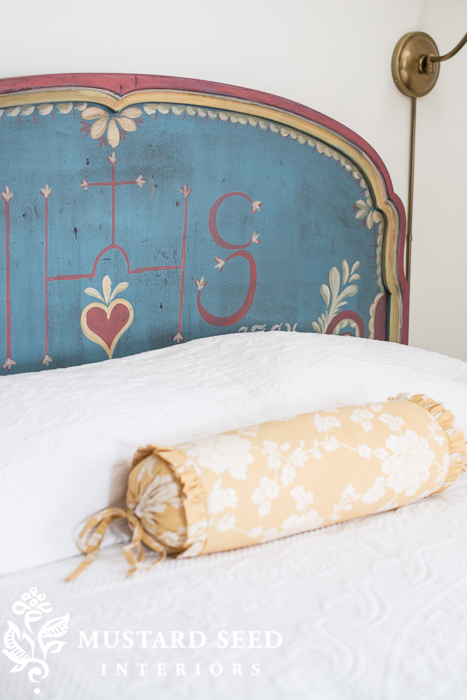
So, I posted about something else that day and reshot the space when I had the time to style it. I added a quilt at the end of the bed and a grain sack bolster pillow behind the yellow neck roll. I also swapped out the dark wood stool for a cream one and topped it with an ironstone platter, vintage alarm clock and a pitcher of flowers. Even though the post was about the bed, not the accessories or the room as a whole, adding those layers made a huge difference in the photo.
![]()
tip #3 | tell a story
The styling in a photo should make some sense and tell the story of the space or piece being photographed. For example, the breadboard is the subject of the photo below, so I’m showcasing it by layering (see tip #2) it over a linen tablecloth, so you can see the shape clearly, and by showing…get this…bread on it. There is no doubt as to what it is. The rest of the accessories are the supporting cast that tell the story. I wrapped the artisan bread in a vintage linen cloth to add some color and make it stand out against the brown of the board, but it also indicates that the bread may be hot from the oven, so it needed to be carried with a cloth. I added the butter next to it, indicating that the bread was going to be cut and buttered, maybe seconds after this picture was taken. I think I would’ve preferred to add some fruit for color, but I had a bowl of nuts, so I added those, a stack of plates and some pretty flatware to indicate that this picture may be showing a part of a buffet or spread.

In this second example, I was photographing a DIY cookbook stand. I paid attention to the recipe I turned to in the book, so it looks like I’m actually making that recipe, which is a pesto. So, you see olive oil, pine nuts, basil and parmesan cheese, supporting that story. If I had shown eggs and rhubarb and spaghetti noodles…that would’ve been a little strange. This way it feels like the photograph is capturing an authentic moment, even though it’s a staged one.
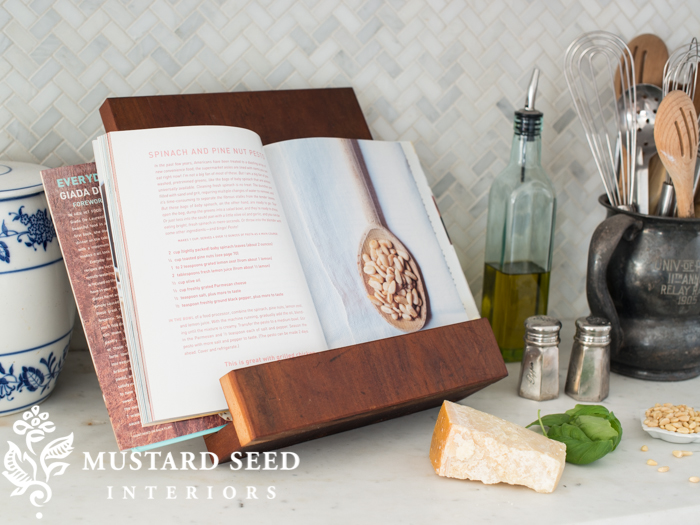
If you’re really observant, you may notice that my counters look like white marble in the picture above and I don’t have white marble counters…they are butcher block. Well, the wood of the cook book stand blended into the wood counters, so I used a piece of marble from a dresser as the counter, so the cook book stand would be showcased.
![]()
tip #4 | angles are important
As we know very well from pictures of ourselves, certain things look best from certain angles. It’s not so much that there is a wrong angle, but certain angles are going to be stronger than others and some will just look off. I’m sometimes surprised by which angles look best. Try taking pictures of a room or a piece from different heights and directions. I almost always take the bulk of my pictures on a tripod first and then I switch and snap some handheld to get some different looks and give myself lots of options when it comes time to edit.
![]()
tip #5 | take your time
When I am shooting for a magazine or a client or something really important, I always plan, buy flowers & props and set aside a full day or two for the shoots. I can’t possibly do that for all of the pictures in every blog post. So, sometimes, as in the case of this desk, I just grab the closest chair and an typewriter and call it a day.

But, I always look back at hurried pictures and wished I had taken just a little more time to try a different chair, make sure all of the handles are down and put some art on the wall or add something to give the shot a wow moment. I know it can’t always happen, but take time to get things so you’re happy with them. Yes, it’s a pain to collect things from around the house and hang a picture on the wall for 10 minutes, but you’ll be glad you did when you’re going back to that photo a year later.

And I always leave things set up while I look at the pictures (if I’m not shooting tethered to the computer), so I know that something isn’t crooked or there isn’t a Lego hiding under the heater. There’s nothing more frustrating than spending a ton of time on a picture, putting everything away and then you realize something is off. I have been known to Photoshop a Goldfish cracker out of pictures before…
![]()
As I said, I’m not an expert, but I hope these tips give you a point in the right direction when it comes to styling photos and, from there, you can develop your own style and discover your personal tastes.
I will leave with one last thing when it comes to blog photography. Yes, good photography and styling are so important when it comes to growing a blog and getting noticed by publishers, editors, etc, so you want to polish up those “beauty shots”, definitely. But, a part of the charm of blogs is that photos are not always magazine-perfect. We get a glimpse into the life that happens between the projects and pretty pictures. And that’s a special thing. So, I would encourage you to let your hair down, photography-speaking, on your blog now and then…


…because life isn’t always styled.


56 Responses
Am I really the first commenter today? 🙂
Marian, some people are just natural talents at certain things. You have many natural talents, two of which are photography and styling. You may not have a degree in interior design or photography, but you don’t need them – you are naturally gifted with a designer’s creativity and eye, which you prove time and again on this blog, your book, and other projects you take on. Your booth at Luckett’s always looks better than most store displays! So I believe you DO have plenty of expertise to go along with your credibilty and experience.
This was a very helpful post. I’m sure many people will appreciate it and learn from it.
Lucky for me my daughter is a photographer and will tell me if something’s off. But she’s also a busy girl who doesn’t have time to check her moms picture taking all the time. This was an excellent read and I will definitely be thinking of what you’ve said and do some practice shoots.
Great tips! I especially liked the photo of the flowers on the counter…it looked so much better when you added more “stuff”. Several years ago, I participated in a tablescape weekly blog party…it would take me 1/2 day to shoot the photos and I learned a lot. I left things set up until I viewed the photos in case something looked “off” or was crooked. I really appreciate your styling tips. I’d love more food styling tips. I enjoy taking pictures of my homemade ice cream or soups or dinners that I create and while the food is excellent, the pictures fall short because there isn’t enough “stuff” in the photos. Styling is a knack and you are really great at that!
Thanks for the tips. I do try to follow them for my blog photo shoots but I am not as talented as you are! On more than one occasion I have mentioned to my readers that I really do try to keep it real. As you so wisely stated, life isn’t always styled.
xo Kathleen
Thanks for the great tips. I would a tutorial on camera settings etc when you take your photos. I just can’t seem to get the “magazine” look and would love some pointers.
Thanks.
Thank you for your styling tips. I don’t often take photos of my vignettes because I don’t have a blog. Yet. I sure do enjoy and learn a lot from others, though! No one has mentioned your art background which I know influences the way you “see” things. You continue to wow us all. Thanks for the lesson.
Reading your blog and looking at your pictures has made me more cognizant of my photos. But I still fail to take time to stage properly when photographing a completed project. For those who are more “content” rather than “aesthetically” minded, just paying attention to the lighting can make a huge difference, as well as shadows. Even the cheapest cameras have different settings that can provide different light affects on the content. And you are right…angel can make all the difference!
You would never know from my pictures that I took a photography class in college and even learned to develop my own pictures. In my defense, that was 28 years ago…I’ve napped since then.
Great tips, in an easy to understand way! Thanks so much!
Deanna
Great tips, Marian! When I started my blog, I just took photos on my phone and didn’t edit etc., etc, last year I started using a DSLR that I got for Christmas and started using a tripod after Haven. A tip from a great blogging friend and it really has made a difference. I still have a long way to go but my photos are better than when I started. I love your photography and it is such an inspiration. Also enjoy seeing the real life photos on your blog too. x
I love the comment “I’ve been known to photoshop a goldfish cracker out of a picture.” — I have totally done this before in order to not have to go back and re-shoot. Nothing is more frustrating.
Loved these tips! I would like to here more about getting good pics with an every day camera, is it possible or do I need to go more high tech? Also, your images are quite large on your site. Mine always look so small, how do I change that?
Hi Diana
Just happened to notice your question. I might be able to help (at least I’m happy to try). Will message you directly through your blog 🙂
Kristine
Love the tips!
Has your beautiful home sold yet?
Wonderful tips! I don’t think you realize that besides telling a story with the picture you are also directing the eye to travel around it as well. And when you are feeling it is not right, you unknowingly add certain “anchor” items or colors to give the eye a place to start and land. Look at your first kitchen counter picture. Although lovely, that is what is missing. The next photo? My eye “landed” on the blue pitcher, travelled up to the cow painting, around the rest and ended back on the pitcher. Great job in all your photos!
Thank you Marian! I struggle with styling often and this was very helpful. And Amen to everything the first commenter said.
Great article and very useful information. I LOVE your photos. They are always so clean and bright. I appreciate the “non-styled” ones, too. Thanks for keeping it real!
Thanks so much!
You have a way of breaking down the information to manageable, practical tasks. Tonight I will practice your advise with some photography “homework”.
I love how your pictures are not only beautiful and pleasing to the eye, but also tell a story. Love that.
Enjoy our day!
Gloria
Hi Marian, Your photos are beautiful! Thanks for the tips… I have a hard time with #5 Take your time. When I finish a project I get so excited and just start shooting away. I’ll be thinking of your tips when shooting my next post.
Sally @cottagefix
The fact that you post the last few “real” pictures is what keeps me coming back. 🙂
Marian, you have really broken everything down to some very clear and useful tips! You’ve also demonstrated that it can take many attempts to get the best shot – often a different angle or background makes all of the difference. These are great tips for online sellers as well – I often employ ‘props’ to help tell a story about an item that I have for sale in my vintage shop on Etsy. It helps a potential customer see how the item could be used in their own home and moves them that much closer to purchase. Thanks for being so generous with your expertise!
Hi Marian, I am currently studying my way through your photo tips in the Building a Creative Business class. My biggest problem is the furniture photos. It always seems that the only places in my house with good light have terrible backgrounds. Do you use lighting or do you just happen to have good lighting? Thanks for this post!
Great post Marian! It’s funny how things in person look so clean and simple and then in pictures they look bland and sparse. I’m constantly learning how to deal with that!
Thanks for the tips!
Leelee @ paperbagstyling
I love that last photo the best of all and the honesty behind it, “life isn’t always styled.” Thank you for your humbleness. Not too many people would have the courage to show and tell areas of their lives that aren’t “totally polished and put together.” How refreshing that you do! God Bless!
Since your selling your home, what have you done about the closet you had hidden behind the dresser/ mirror? Keeping it hidden or showing it for buyers?
This tutorial was so helpful. Now I think I know how to style my occasional tables and console.
Thanks so much.
Marian! I know that having a photo accepted for a magazine cover must mean that your camera is taking totally quality shots! (Not to even mention your styling ~ that’s a GIVEN!) Could you please tell us/me what camera you are using these days?!? I grew up w/a professional photographer Dad, but he is no longer here to advise me, unfortunately … and I want to give my talented and VERY interested hubby a really nice, new camera for his upcoming birthday!
We love all the wonderful information you share! Thanks so much for your generosity!
🙂 great post. I’ve definitely pulled apart my styling only to realize once the photos were big on the computer that they were overexposed. argh!
As a mom of three boys, the Lego pic is a winner. Lots of time, love and attention went into those models. Any magazine worth reading or purchasing should would include it.
This is such a good post. I think the most important one is #5 – taking your time, and NOT putting away anything until you’ve had a chance to review the photos. I’ve learned the hard way – I cannot tell you how many times I’ve reset things just for the photo after reviewing them on the computer. I like your tricks for accessorizing too (#2). Often in our antique booth spaces, we will adjust after I’ve taken photos and review them after styling our spaces for the way accessories need to be. Your tip #’4 on angles – that first photo of the paint says it all – wow! Thanks for the tips.
Rita
What a wonderful post. Although I am photographing jewelry so it is a much smaller focus a lot of what you shared applies. I just love the photos at the end of life happening in your beautiful house. What a wonderful way to show the main point of “homemaking”!
Blessings
Robbie-Lynn
I love that you pointed out the “marble” counter with the wooden recipe book holder. When I read the original post about that (before Luketts), I kept thinking “wait . . . What?!” I knew your counters were butcher block, and it didn’t look like a towel or cloth. I chocked it up to a large stone cutting board. Glad I wasn’t losing it! So creative!
that was awesome (as usual!) – thank you!!!
Great tips! I always learn something here. I have a lot of photos to do and a lot of styling, so I really appreciate your tips.
As an artist, there are rules of design which we follow, but all rules are made to be broken. Arrange things in odd numbers – threes, fives, sevens. Vary the height – high, low, high, medium. No tangents. This is where the outside line of two objects meet. Example, arrange so things are in front of other items so at the angle you are taking the photo, they are staggered, not side by side. Lastly, keep dark on light, and light on dark. Colors look best if opposites on the color wheel or adjacent on the wheel. Opposites are: red, green; blue, orange; yellow, purple. Adjacent is: red, orange, yellow or blue, turquoise, green or purple, magenta, red.
These were great photo tips and I appreciate the post. I often take pictures to show my family in NY my latest find and I’m often looking at the photos and wondering why they are a bit off or the lighting is just not picking up my intent. You have a great talent and especially when it comes to sharing it so all of us can get a little closer to doing things better…Thank you
Great tips, Marian! Thanks so much!
Jeanette
Marian … I re-read my comment above about your “camera taking totally quality shots” & I had to chuckle in embarrassment! I’m sure you must have “laughed out loud,” as well! Please accept my apologies for my silly statement … I remember you mentioned not too long ago about upgrading your camera to a really nice one, but not the details.
I am familiar enough w/DSLR cameras to know that you have very skillfully manipulated functions, settings, angles, and many other facets of the shots you do to achieve the masterful pieces we see! And since I mention that ~ I, too, would love to see more tips on various settings, etc., we should use w/our cameras to achieve certain “style goals.”
Great post Marian and very helpful. Especially the first photo of the flower filled jug on your kitchen counter – I thought the photo looked great until I saw how you added more things into the shot. Got It! Thank you so much for being so willing to share your knowledge with us 🙂
Taking god pictures have been a struggle for me since I opened my shop on Etsy. This article has shed some light on how to be more creative,
Thank you,
Robin
P.S What is the name of the color you used on the grey dresser? Love it!
Such excellent tips. Thank you so much. Your blog is always so beautiful and it inspires me to try harder with my photos. My other point of reference is Country Living Magazine (UK) just for inspiration. I don’t come anywhere near either of you, but I intend to keep trying. Incidentally, I love the photos of ‘real life’ at the end of your blog. They make me very nostalgic for the time when my two were young.
Great tips, very useful, and I love the way you wrapped it up!
Dawn @ We Call It Junkin.com
I create mainly barn board signs made with rusty tools, jewels and “junk” and have a hard time with getting just the right background for pictures. This article helped a great deal as I was always focusing on keeping it very minimalistic with a very light background to show off the darker wood…..have found my large jacuzzi off-white tub a great place to take photos but see I definitely have to add some interest to the photos. I am currently watching you in Jeanne Oliver’s Building A Creatively Made Business and have learnt so much from you.
I have been working hard to polish up my photos and take time to style them.. Your post has been so helpful and I appreciate all the great tips! ! ~The Vintage Songbird
A to the men. Loved seeing your unstyled photos, as I’ve shared unstyled life in your home & it was LOVELY. 🙂
love to you,
shaunna
These tips were really helpful Marian! I know my two biggest hurdles are lack of good natural light in my home (few windows) and the fact that I don’t have a good camera and am currently relying on my cell phone for all my photos. I hate the shadows I get and even with editing the heck out of the pics, can’t really remove the shadows, esp on the walls. Ugh. I have a long way to go… Thanks for pointing me in some good directions though 🙂
Fantastic tips and thank you for showing some real photos! It can be very intimidating when photos are so picture perfect. I know there are a couple of spots in my own home that have exceptional light and others not so much, it does get difficult every now and then, but I will refer back here to refresh my memory on some great pointers! ~Ashley
One of the most helpful posts EVER!!! I am convinced that having the ability to style is absolutely a God-given talent. Having that creative bent is such a blessing. For those of us who must be content with “copy-catting”, your explanation of how and why things should work and sometimes don’t work is really illuminating. Personally, I appreciate this information very much.
I started following your blog, on my daughter’s recommendation, three years ago. I am 63 and still trying to decorate my house the way I like it (it never ends, does it?). Anyway, my family will tell you I agonize over details and still am not satisfied with the result. I’m trying to embrace the motto “Done is better than perfect”, but it’s tough for me. Your Styling Photos post is great, but the best part for me was the “let your hair down…” photos at the end. I actually let my breath out and relaxed when I saw them, knowing that even with the beautiful results you get with your projects, you’re just a woman living her life, like the rest of us. 🙂
Thank you!
Susan Mark
Thank you for that, great tips!
Love, love, love this post. Thanks!
This post has been extremely helpful. Thank you.
Great post and lots of helpful tips! You’ve inspired me to try some new techniques. I also read the styling retail space post and found the idea of using the “smalls” in photo shoots and then selling in the booth to be a great idea. Thanks!
Thank you very much! Terrific post and terrific tips. Setting up photos is always a challenge to me and this will help a lot
David
These are wonderful practical tips!, Thank you
Thank you for this post. I always have a hard time taking photos of the things I make and paint. I can’t seem to find a good spot in our small home that doesn’t have a plug showing on the wall, the side of the fireplace mantle or something else, not to mention poor lighting. I don’t have a good camera, just use my iPhone so I’m sure that doesn’t help, ha-ha! I am seeing that good photos make a big difference so I’m going to work harder using your tips. I also post Instagram photos of my space I have at an antique mall. Those are always a challenge too.
Thank you for your tips! You always have great shots so it’s nice to hear your expertise.
Blessings,
Missy
Great suggestions! I really need some tips on lighting when taking photos of furniture. I don’t have a lot of light in my house due to all my windows being shaded by porches. I’ve tried photographing my painted furniture outside but it just doesn’t look right! Something I’ve noticed when you photograph a close-up is the object is off-center which makes it so much more interesting! I will be trying that!