
It’s time for another upholstery series! If you missed my last one, I showed how to upholster a wood-framed, French-style chair. You can find it HERE. If you’re scared of upholstery, you’re going to like the way I upholster and teach. I’m a DIY, self-taught upholsterer, not a “professional.” I started upholstering dining chair seat cushions and benches with a manual stapler and then graduated to simple slipcovers, such as they were, and finally dove into upholstering an armchair about five years ago.
I took the chair apart and then had a little freakout moment. What in the world have I done to this beautiful chair?! I had read upholstery books, but I really wasn’t sure if I would be able to get it back together. I worked through it step by step, just like putting together a puzzle. It wasn’t perfect, but it actually looked okay! That gave me the confidence to keep at it. I’ve upholstered dozens of chairs, settees and sofas since then and I get better and better each time, but I’m still learning and honing my skills.
I admittedly take some shortcuts to save time and often do things the way they make sense to me, but it might not be “the right way.” I want to get it done well and I want it to look good, but I’m okay if it isn’t perfect. Does that sound doable for you?
So, the style of chair I’m working on is this French wing chair.

It’s sort of a wing chair with “mini wings”, but this can translate to a full wood-framed wing chair.

If you’ve noticed, all of the pieces I upholster have an exposed wood frame. It makes it so much easier, because that style can be upholstered in panels and you don’t have to use tack strips. If I’m dealing with a fully upholstered piece without an exposed wood frame, I opt to slip cover. For now.
Most of this series will be in video format, but I wanted to share how I prep before I start stapling.
Even if it gets a little ripped up in the process, I always keep the old fabric that is stripped off the chair. This gives me a template to work off of, that is especially helpful when pieces need to be sewn together to make a larger panel, like on the back of this chair.
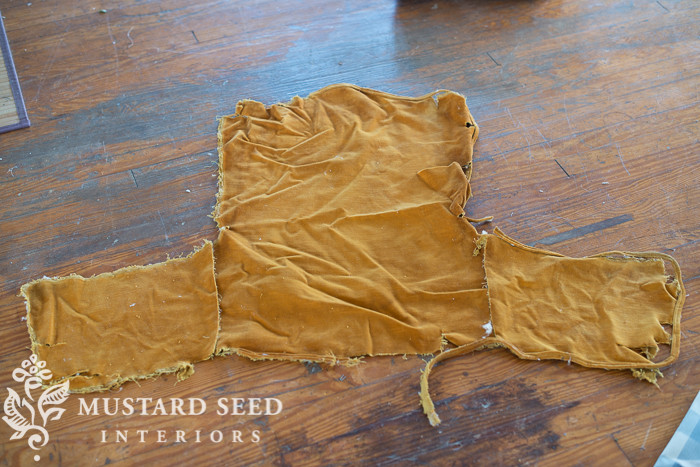
I’ll lay each piece on top of the fabric I’m using to reupholster, pin it to the fabric, and then cut it out, leaving about a 1/2″ allowance on all sides. That allowance is going to give me a little “wiggle room” when I’m upholstering. If you cut it exactly, it might fit, but the new fabric you’re working with might not have the same stretch as the old fabric, so it might not fit as well. You can always cut off fabric, but if you come up short, you have to start over. Not fun.

Once the new fabric is cut, I’ll lay out the new panels and the old together, so I know where the panels need to line up and be sewn together.

I’ll then pin the new panels together and sew along the pin lines. Make sure the right sides of your fabric are facing each other. This check is double-sided, so it didn’t matter which way it was lined up.

Before stapling the newly-made fabric panel on, take a minute to iron the seams open. This helps them lay flat, so it’s a simple, but important step that makes the finished piece look sharper.
The panels that don’t need to be pieced together are just cut and set aside until I’m ready to staple them on.
In the rest of this series, I’m going to show how to upholster the chair and make double-welting…
![]()
Kriste and I just had an amazing few days in Wisconsin and we’re traveling back today. I can’t wait to share all about it.
(And yes, we did eat cheese curds!)


15 Responses
So excited to try this. And, I never thought I would say that!
Cheese curds! They squeak!
I think that you should write a book on upholstery for girls like me who would love to just open it on the floor & follow that thing to a T lol. I’m just saying, I would buy two copies if I could create such beautiful pieces as you do. Thanks for sharing!!!
Hi Marian, the chair is beautiful in your dining room! Is there a picture of your original kitchen scale on your blog? I found one at a yard sale and the color matches the one in your paint line. I wonder if it’s the same kind as yours.
Thank you
Paige
You are so talented! I adore these chairs!
Do you worry about the gold velvety fabric not being flat? It looks sort of “bunched up” in the picture making me think you will be short on the new fabric. You do an amazing job! Thanks for all of your guidance. Just curious about the “bunchiness.”
No, that’s why I leave a little extra allowance around the edges.
I’m so glad you’re doing this tutorial. I have an old settee sitting in my basement waiting for me to have the courage to reupholster it.
Hi Marian,
I love the finished chairs. You do a beautiful job, especially being self-taught. I would like to offer couple of tips for you…
1. If you pin the fabric with the pins facing horizontally from your stitches rather than vertical to them, you can sew right over the pins. It keeps your fabric from moving as you sew.
2. Pressing the removed pieces (pattern piece) before cutting the new pieces will help ensure it is the right size. This helps from having to re-cut a piece that doesn’t fit exactly.
I am also a self-taught upholsterer. I can’t wait to see how to make double welting! I have always wanted to use this but didn’t know where to begin!
Karen
Terrific tips! I have always pinned in a vertical line and then I sew across the pin line, removing the pins as I go. That’s just how I’ve always done it, but I know you can keep the pins in and sew over them if you pin vertically.
Thanks so much for the tutorial series! I can’t wait to learn about double-welting 🙂
I’m wondering if you will discuss how to decide how much fabric to buy. I am a sewist, so I understand about allowing extra for matching patterns, etc. But fabric selection, and quantity to purchase, would be a great help to those of us getting ready to take the upholstery plunge!! Thanks!
Marian,
I know you will be able to do a fully upholstered chair because that is what I started on just by watching youtube videos. This is the guy I watched and found to be the most helpful. He has a lot of videos and you can follow him easily. He is under diyupholsterysupply and is a great teacher. If you buy some plygrip or curve-ease as it’s called, you will be amazed at how easy it is to do curves or hard to upholster spots. I have even used it in place of tack strips when doing the outside back of chairs. I always try to just reuse whatever is already on the chair, but if it gets too beat up when I am stripping the chair, plygrip does the job. I also have bought a roll of the cardboard tack strip to help keep the lines straight when upholstering a long piece of fabric. So the supplies I use to do a fully upholstered chair include: pneumatic staple gun, plygrip, cardboard strips, cotton batting, and Dacron (which covers the cotton and makes everything smooth for the fabric to sit on). That is all you need to do a full chair or couch. Also, there are sites on the web where you can estimate the amount of yardage you will need for a project. Just search for “yardage fabric guide for furniture” or something to that effect. Sometimes I look up the manufacturer of the chair and they can tell you how many yards of fabric you will need to recover it. I have even called furniture stores and they have given me the exact yardage I needed.
YAY! I’m so glad your doing this upholstery series! I just bought a wood framed chair (with some tufting) and I think I’m ready to tackle it!
I began sewing as a very young girl. I had the guts to sew beautiful dresses with expensive fabrics but didn’t have the moxie to do much of anything in home decor. I don’t know why. I tried a few things with minimal success but only began doing slipcovers and upholstery once I began watching your tutorials. I have to say I had to watch them over and over before I had the confidence to get started. One thing I liked right away was how you used the pins to guide your sew line. I always pinned the other way. Now, with more confidence, I can pin or cut more precisely. But having that choice made getting started in upholstery easier.
Also, in reference to all those estimation charts? I always find the yardage suggested never includes enough for the welting too. Am I doing something wrong?
Lastly, will we be seeing more of this chair? I am waiting on pins and needles! No pressure!
Julia