

I’m sharing everything in reverse when it comes to the office makeover, but that’s just how it goes sometimes! I usually write about what is most “at my fingertips” and sharing progress on the room was a lot more fun than talking about ripping out carpet. But, it’s an important bit that some of you might want to know more about, so I’m circling back to share the details on removing carpet.
Here is a before picture of the room, so you can appreciate how far it’s come…

…and how it’s looking today…

(Yes, I’ll work on the cord situation, but curtains will help a lot with hiding those!)
Obviously, the first step is to take out the carpet and padding, which is surprisingly easy, although it does take some muscle! Just pull up a corner and, in most cases, it comes right up. Jeff did this before I even got into the room to take pictures!

We did end up cutting the rug into strips, so it we could roll it up for easy disposal. We cut off some small pieces to keep in the garage and the company installing our hardwood floors removed the rest.
The only thing that can be a hangup at this stage, is if the padding is deteriorating or it was glued down. Both cases mean removing it will take a lot more time, unfortunately! Ours was just stapled down and it was in good condition, so it pulled right up.
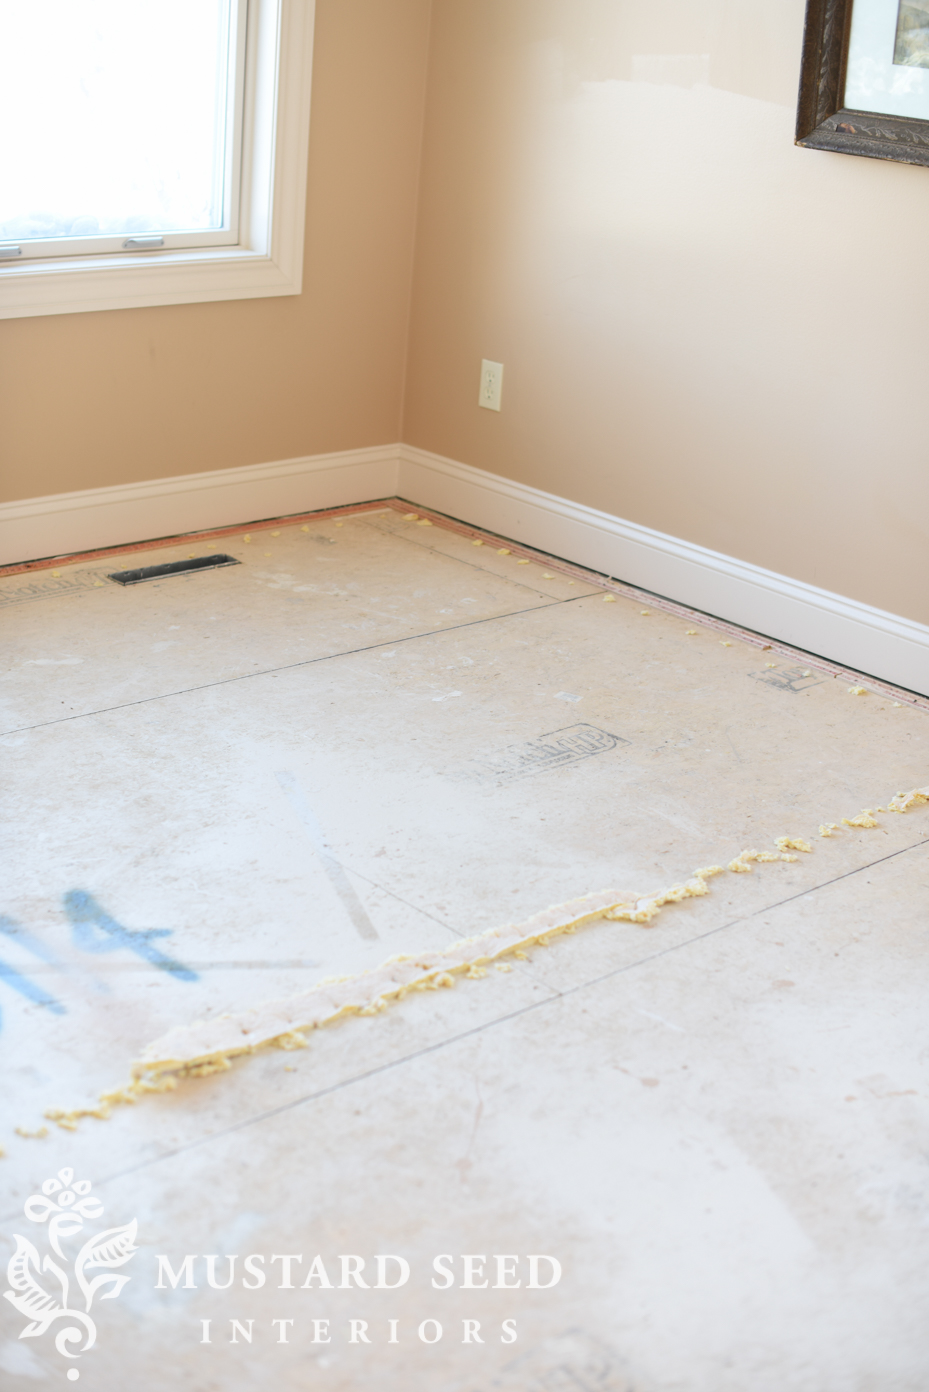
Once the subfloor is exposed, it’s a great time to give it a once-over. Check for soft spots, signs of moisture damage, pet damage, rot, pests, etc. In our last house, we removed the carpet in the family room and discovered the early signs of water damage along one of the exterior doors. It wasn’t bad enough to replace that part of the subfloor, but we let that corner dry out (it was slightly damp) and laid down a moisture barrier to protect it before we installed the new floor.
Do not rush ahead and install new flooring on a rotted subfloor! I know it’s a pain to deal with, but it’s worth dealing with it before the problem gets worse under your nice, new floors. Again, in the case of our two rooms in this house, everything was in tip-top shape.
Now, we had to remove the carpet tack strips and staples that held the pad in place.

I know this might be obvious, but wear thick-soled shoes for this! Both Jeff and I stepped on tacks and staples while working.
Jeff worked on removing the tack strips. Those come up pretty easily with a pry-bar and a hammer. Make sure to wear ear protection while doing this. You wouldn’t think it would be that loud, but when a metal hammer strikes a metal pry-bar in an empty room, it echos and it’s loud!


While Jeff worked on the tack strips, I worked on the staples. I have a variety of staple-pullers and removers that I use for upholstery, so I tried a few different things. The one that worked the best, though, was this one…

It was flat enough to get under the staple and, when I rocked the handle, it just popped right out.

I thought it would take a long time to get all of the staples and tack strips out, but we were done in about 15 minutes.
If you are hiring out wood floor installation, as we did, removing the carpet yourself is a small way you can save some money on labor costs.
Swapping the carpet for hardwoods gave both rooms a more refined look and I’m so glad we did it!


27 Responses
I absolutely love the wood flooring!
Hi, I would also recommend a tetanus shot if you are removing old tacks. Amazing Mustard seed transformation.
Ha, I have definitely had that with all of the work I do with rusty old things! 🙂
Beautiful! May I ask what kind of hardwoods these are? It looks very similar to our hickory we installed last year. I love how the lighter tones brighten everything up! Aslo makes all that pretty furniture pop! 🙂
They are birch.
Oh the memories of removing an entire basement’s carpet with pads GLUED to asbestos flooring!!! Those tack strips I refer to as the “Jaws of Death.” Step on one of those once, and you will NOT forget it. So how did I get all the glued-on carpet pad off the flooring? I refused to use anything toxic, which would have been faster probably, but no thanks. Instead I used wet paper towels laid over the glue, then used a clothes iron (got one cheap at WalMart) to iron over the paper towels and heat up and soften the glue underneath. Then I was able to scrape the glue off the floor with a bent metal scraper. This took weeks, but it was sort of meditative, and the end result was all the glue was gone!!! Then since we could not remove the asbestos flooring, I painted it instead. It was fantastic and held up over time! We don’t live in that house anymore, but I imagine the new owners were more pleased with what they inherited than what we did. I put this out there for others who might want to save themselves from chemical fumes and have some time on their hands………water and heat and good old elbow grease.
Oh man, I think I would’ve thrown in the towel! I don’t have patience for projects like that. Good for you for seeing it through!
When we decided to remove our carpets to install hardwood looking tile ourselves, we realized they had carpeted over vinyl tiles. The ENTIRE house. It wound up taking about a day per room just to pull up carpeting and each tile. Whew! But it looks so good now! Otherwise removing carpet alone would have been a breeze!
Your new office looks fantastic. What a transformation! We have those same beige colored walls in our current rental. When we moved in my kids were horrified that most of the walls were “pink.” I’d love it if they were white, but I’m not going to do it unless the owners spring for the paint. I just can’t believe anyone ever thought that color was a good idea. It’s so hard to decorate around and has a depressing effect. I’m trying to hide as much of it as I can with tall bookcases and furniture.
When we removed the carpeting from our living room in our old house, it was a royal pain. We had no idea how old the avocado green carpeting was, but judging from the color and style and general yuckiness, it was old. And the room was big (20 x 20). Underneath the green carpeting was a thin brown carpet. Underneath that, the padding had turned to dust in most places so we used shovels, brooms, and a shop vac to remove it all. Then crawling around removing all the staples was tiresome and and it took days to do (since they were old, they were rusty and broke easily requiring pliers to remove the broken stubs). The whole process made me hate carpeting even more.
Is it possible to see a picture of the transition from the tile to wood? I’m thinking of doing this now but have travertine in the entry and want to have wood in the office/LR/DR (all surrounding the entry). Not sure how that would work/look.
To remove staples we use an ice scraper, works like a charm. The kind of scraper you would use on a sidewalk, not the car windshield. The hardwood looks so much better. Love it all.
What a pretty Office. Nice job on carpet removal and on sharing tips. I like the office windows the way they are now , with no curtains.
Marion – everything looks lovely! What color paint did you use in office?
Looks fantastic!! Such a difference.
cool walls; warm floors! what a combination!—-enjoy
Marian, I’m trying to pick out a gray for a bedroom . Did you use Stonington Gray and cut it down 50% the way you did downstairs? Just regular white and and the stonington ?
Beautiful and long lasting!
Beautiful flooring.
Wow, the room looks beautiful but then again so does everything you touch. Keep up the great work & thanks for sharing.
I love the color of your flooring! Reminds of me of my childhood home with the small slats & light wood. I made a big mistake with our remodeled bathroom by putting in a dark floor that now shows every little speck of dust. You made a wise choice!!
Be careful working around tack strips and carpet staples, they can be deadly. My brother-in-law was a professional carpet installer and got one of those rusty tacks in his knee. He went to the Dr. but the infection was pretty deep. One day he called my sister for help getting out of bed (they were no longer living together by this time) and she said what is that smell. So she took him to the Dr. and he ended up having surgery to remove part of his kneecap, bone and muscle and tissue and he had to go into the OR every day for about a week for more deep cleaning of the wound, finally was stapled and sent home in a brace only an octopus could handle on its own. A few days later someone mentioned to my sister they had not seen him in several days and was he sick again. She found him, he had thrown a blood clot through the heart lungs proving to be instantly fatal. At least it was some consolation knowing it was instant, but I always felt the Dr was negligent having known about a previous blood clot and not giving medication to prevent another clot. So always wear protective gear and keep your tetanus boosters up-to-date. We don’t always think a DIY home project can be harmful, and keep children and pets away from the project until all the mess is completely cleaned up to prevent any unnecessary injuries or an ingestion by your beloved pets.
Enquiring minds want to know……..the color of the walls……beautiful.!!!!!! I, too, am wondering if it is Stonington Gray. Also, did you do 1/2 strength stonington in your bedroom?
ALL the carpet has been removed in my house years ago. Never again!!
Your house looks so pretty now… Moving right along!
Love it. We pulled all the carpet out of this house when we bought it 20 years ago and installed a good laminate pine look flooring. It has lasted until a flood when some pipes broke while we were away. No one carries the color anymore so we need to replace it all. I was thinking of going a bit darker but seeing your floors reaffirms that I prefer lighter. It keeps the room brighter which is something I love.
We will never have carpeting again.
Hi Marian, I also had messycords, but solved the problem by screwing cuphooks into the back of my buffet, and tying the cords with zip ties and then looping them on the cup hooks.
Worked for me!
I love all the light you get in your house, and your new floor is beautiful. We bought our current house nine years ago and it’s hardwoods throughout – I’m so thankful. You and your husband can really get some work done fast with fabulous results!
Very nice. Was this a bedroom that you turned into an office ?