
I’ve been planning on writing this post for a while and I kept forgetting about it in favor of sharing a furniture makeover or some progress we’re making in the studio, but I was reminded of it as I was shooting pictures of a home for Cottages & Bungalows last Thursday. I’ve had “real camera crews” come shoot rooms in my house before, so I felt a little unimpressive showing up at Heather’s door step without a ton of fancy gear, scrims, umbrellas and suitcases full of flashes and lenses. I had one camera bag, one circular reflector/scrim that was $11 off Amazon and a couple of lights we use for videos. We didn’t look fancy, but we got the job done!
So, while I was shooting, Heather noticed that I was zooming in on each picture on my laptop and she asked why I was doing that. I went on to explain this…
There are a lot of components to a great picture like lighting, composition, subject and even just good timing. There are also a lot of intangibles like mood and capturing an emotion or something that evokes an emotion. But one thing that I’ve found to be very important when shooting interiors is focus. I’ve become very picky about focus and it’s how I quickly weed out the good photos from the duds. I’m not looking for everything to be in focus just the subject of the photo to be in focus.
In this case, it’s the front side of the milk crate. I shot this picture at a 2.8 aperture, which means the depth of field, or what is in focus, is not very deep, so the focusing needed to be precise.

The advantage to shooting tethered or connected to my laptop, is that I can check the focus immediately. I zoom in on what I want to be in focus and check it out. In this case, the milk crate is crystal clear. You can even see the splinters on the wood.
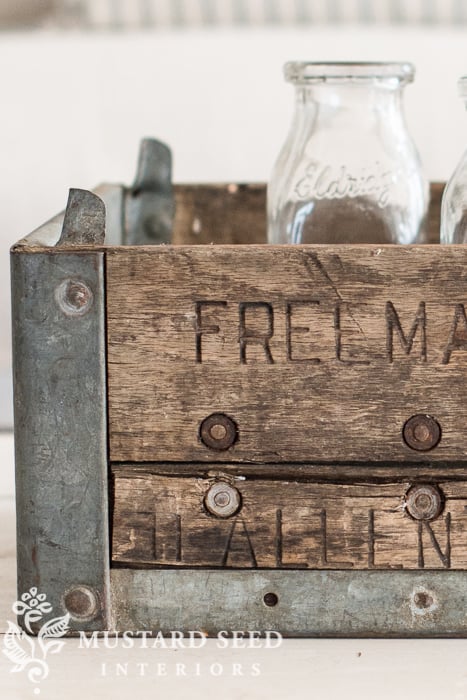
…and I can zoom in even more and it still looks sharp.

In the case of the picture below, my focus was a bit too far back and it was on one of the milk bottles instead of the front of the crate…

…and I think it makes this overall picture not as strong as the first shot where the focus was bang on…

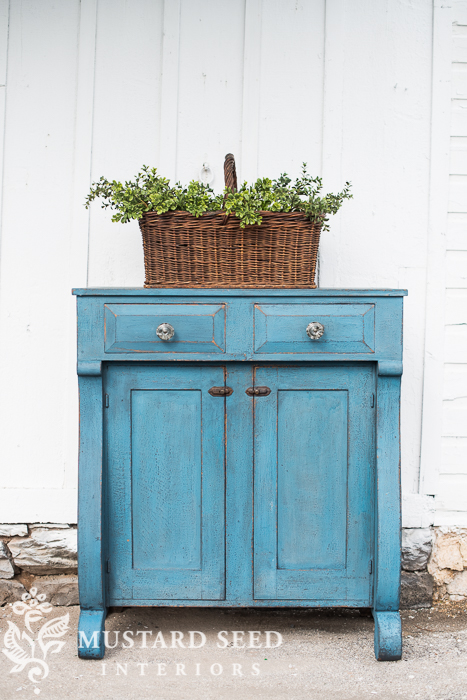
I work in Lightroom, so I just check the focus by pulling up the picture in the “Develop” setting…

…and click on the part of the photo I want to be in focus and the software zooms in. In this case, I’m checking out the front of the dresser, which is nice and crisp…

The good news about focusing on your focus (yuck-yuck), is you can do it no matter what equipment your using and what your skill level is. It’s something you can start doing right away! Yay! So, here are a few tips to improve your focus…
1.) Use a tripod. When you’re shooting interiors, light (or lack there of) is usually an issue, so you have to slow down the shutter speed in order to capture enough light to properly expose the picture. You can get around this by bumping up the ISO, but then your picture gets grainy, which isn’t good if you’re planning to print or enlarge the photo. If your shutter speed is slow, you can’t hold the camera steady enough for the picture to be clear. Put it on a tripod, so it can stay perfectly still as the shutter opens and closes.
2.) Use a shutter remote (or shoot tethered). Believe it or not, even pressing the shutter button can cause the camera to shake enough to make a picture look a little blurred. You can get wireless remotes or corded shutter buttons for a pretty small investment ($20-30 or so) that can make a huge difference in the quality of your pictures. If you have a camera cord and want to try out Lightroom (you can download a 30 day free trial from Adobe), you can shoot with the camera hooked up to your computer and control your shutter from the program. (Do you want me to post a tutorial on that?)
3.) Pay attention to the focus points on your camera. Most cameras (dare I say all?) have focus points that show on the display or through the viewfinder when you’re taking a picture. These little squares show you what the camera is focusing on. Read the manual and get to know how your camera focus points work and what the different auto and manual focusing options are.
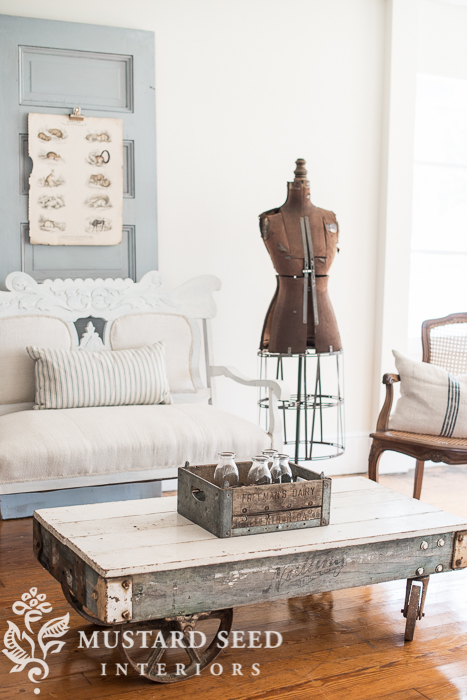
4.) Check your aperture setting. Where your aperture (or f-stop) is set makes a big difference in how much of the picture will be in focus. I quickly snapped the picture below before I left the studio one day. I didn’t have time to set up a tethered shoot, so I kept the aperture set at f2.8 and kept the focus on the milk crate, which is what I was going to post about. You can see that the milk crate is in focus, but the dress form, door, settee and chair sort of fall away and blur a little…
I took the following picture on a tripod the next morning and bumped the aperture up to f16, so everything was in focus. The milk crate wasn’t the only subject in this picture, so I wanted more to be in focus.
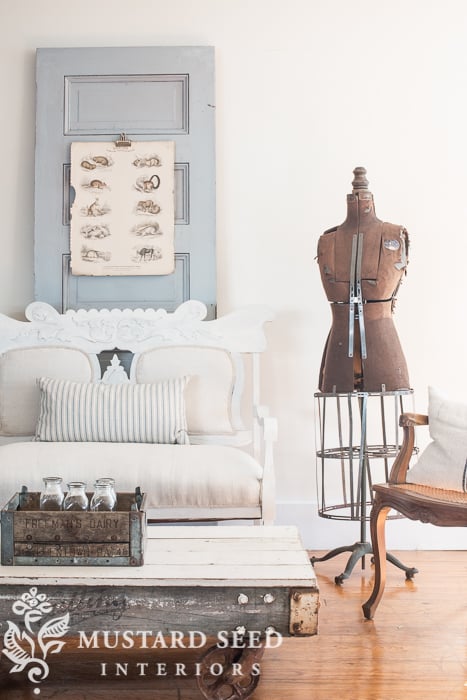
I think it’s tempting for a lot of budding photographers to always shoot at low apertures to let in a lot of light and to get that beautiful background blur (bokeh). I’ve fallen into that before! But, it’s just not right for every picture and you’ll learn that when you’re trying to shoot a room and only one thing ends up being in focus.
I hope these tips help and you see sharper images coming from your camera!


30 Responses
Great tips and overall simplified education! Thanks. I needed this.
Judypimperl.blogspot.com
Thank you so much for these tips – they’re excellent. I will happily read any more tips/tutorials that you care to post. Especially on shooting with a tripod. I just cannot get the hang of it, even though I know my photos would be so much sharper if I did.
Why am I so scared to use the tripod? I know I need to, but there is this fear…crazy! Thank you for all your tips. Lightroom is definitely on the list of purchases to make…..along with a few different lenses. ~Michelle
Marian, thank you for posting this. Re item #2, I would love it if you would write a post about shooting tethered! I hope others will want you to as well. I know I’ve said this before, but all of your photos are just gorgeous. I know that it’s not just a matter of equipment though because your photos have been lovely the entire time you have been blogging. They are just continuing to get better and better!
Kaille
Thank you so much for this post! It’s nice to hear everything put in terms I understand, and it’s always fun to hear about other peoples process.
Thank you for inspiring me to explore my camera a little more, and yes, please do a post on shooting tethered 🙂
Have a great week!
Liz
Your photos and tutorials excite and inspire me. I am actually considering purchasing a camera and trying my hand at photos. I am an interior designer and artist so have some ideas about composition and focus but photography is quite intimidating. I may be too far behind to catch up. Please send all the tutorials you can.
Marian,
Thank you so much for this post (and your previous photography posts). Your tutorials are greatly appreciated. Improving our finished product photos is one of my key goals this year and your are helping me get there:) Your photos are beautiful!
Have a great day,
Jen
Keep it coming!
I have antique booths and I struggle with the light and I can’t possibly take everything outside.
I appreciate your advice and that it is easy to follow for photography newbie’s like me.
Great advise, one little tip or trick if you don’t have the shutter remote or misplaced it, use the self timer, shutter will click 10 seconds after shutter is pressed (I can change mine to 2 sec.) I like my 50mm f1.5 lense but I might look into a 35mm my space is limited for the 50mm inside. I rely on the cell phone pics to much for booth shots. Thanks for inspiring us!
I like your photography posts, Marian, even though I’m still an ameteur. I have no idea what you were talking about in the prior post about your lenses and the differences among the 24, 35, etc, but perhaps I’ll search your blog to see if you’ve written about it. Your skills are ones to follow, and I really like the way you teach. Thank you.
This is awesome thanks for the tips. I have a question, in LR shooting tethered do you see the pic as you focus before you click or is this after you have taken the pic???
You see it after you take the pic, although, I saw one photographer who had a live feed from his camera. I’m not sure if that was the camera or the software, so I’ll have to experiment with that.
Oh, thank you!!!! Will check out Lightroom and also study your tutorial again. Shoot with the cam connected to laptop – neat!!! I thought I was going to organize the pantry, today . . but it looks like a day for experimenting with aperture (for the first time.) uh oh . . Manual.
Unzipping case to tripod!!!
Thanks for taking the time to share your process with us – and yes please I would love to know how to shoot and see the pictures in Lightroom.
Ok, so love your site, and everything you do, literally everything. You have become my muse I guess. Would love a tutorial on controlling the camera through lightroom. One thing and I can’t figure out if it is my monitor, (all of them) or what you go for, but many of your pictures are too light for me. They are beautiful, don’t get me wrong, but it seems like the light is bouncing off your white walls, and then you have a lot of white painted stuff. Just wondering on this, not a critic. Thanks for all your information and inspiration. I tell EVERYONE about you. Got my first set of French cane chairs this weekend, so totally excited. All the way home I kept saying to myself (no one else listens anyway), now I can do the Miss Mustard Seed thing. Thanks bunches, you really don’t know how much you inspire.
I think it does have to do with the monitor, because I started getting comments on that when I switched to my mac computer, which has a retina display. I think that it has better clarity, so I can make the pictures lighter and still see the detail, but on a monitor that isn’t as clear, it looks washed out. If you have an iPad or iPhone with retina display, try looking at the pictures on that and you’ll get a better idea of what I’m seeing.
Hi. Great post. I would definitely like a tutorial on tethered capture. Love Lightroom. But admit to being a total novice. And, dare I say it, am too lazy to read all the online help! Your pictures are beautiful. And so inspiring. Both for home decoration and for photography!
On my mac screen your photos often times have a beautiful lightness that I imagined to be your style – sort of a bright, dreamy quality (for lack of better description ; ) Overall, love your style, photography, tips and your new studio – which seems to be just what you needed. Working at home can make it hard to get away from “work” and relax. I hope you have time to write a “camera hooked up to your computer” tutorial. Your sharing is such a blessing! Thank you.
These tips are always so helpful! Keep them coming! I always love your pictures and aspire to someday shoot like you do. My problem is always lighting in our home and we are coming into the darker months so it always makes me nervous.
Well put and nicely explained. I like how you made the point about amateur photographers try to bump up the apenture (or low number) to focus in on all subjects. I tend to do that often, however, I don’t take many photos of a full set up, usually a piece at a time, because I lack the ability. Of course my camera only goes to 4.5 auto and 3.9 f stop auto. So unfortunately there’s only so much focus/unfocusing I can do. Oh and thank you for the tip about the focus area, I feel like I should say duh to myself…but better late than never doing it.
Add me to the list of people who would love a tutorial on how to shoot tethered with Lightroom. I purchased Lightroom a couple of years ago, but have never used it. I feel like all of my needs are met with Photoshop Elements. I would love to learn how to shoot tethered though!
What a timely post! And, yes, tutorials welcome – of course when you have time.
In the last few days I’ve struggled with some camera learning as I create jewelry and have an opportunity to submit images to a publisher who wants them 3×3 inches, 300 dpi. After much frustration, reading my manual, etc., I will use PicMonkey and hope they are acceptable. Camera jargon and equipment can be so confusing!!
I will also be doing a kitchen redo, so your info and tips will be useful when I get to non-macro photo taking.
Thank you – and beautiful photos explaining what you do.
Loved this post and all of your others, especially when you share your photo tips. Would love to see one on your Lightroom/Tethered Workflow. You have a knack for making the complicated simple. Thanks for sharing!
Fabulous post, I am still getting to grips with my Nikon D7100, what lens did you use to shoot the last two images with Marian? I would love you to do the tutorial on the tethered shooting. I went into an appliance shop in Auckland a few weeks ago and asked about tethered shooting, however although they sold cameras he hadn’t a clue what I was talking about. What do I need to ask for when it comes to a lead that will allow me to connect my Nikon to my computer and use light room? Probably I should go back to where I bought my camera.
Also how did you purchase lightroom as I used the free 30 days some time ago and it has run out.
Thank you for this great post.
So, so helpful!! Thank you! Just wondering what kind of camera you have?
Thank you so much for these great photography tips. As much as I dislike using a tripod, mine is being dusted off for my next project shoot. Count me in for a Lightroom tutorial post!
Thank you for all tips you share with us, it is clear and simple.
And YESS I would love to have a tutorial on how you can shoot with the camera hooked up to your computer and control your shutter from the program.
Thank you again !
I always love the photos on your blog and am thrilled when you post about photography. I’d love to hear more about how to tether!
Such a great post, thank you! I too would love to see a post on tethering to a computer. I’m definitely a novice but your easy to understand explanations and gorgeous photos are inspiring!
What kind of tripod do you use? I have one that someone gave me and I (strongly dislike) it therefore I rarely use it. I know it would help my photography to use one. Any tripod selection advice would be helpful!