
I remember seeing one of these 3d stars made years ago by Wendy Addison and I’ve always wanted to make one! This year was finally the year that I cut up a cardboard cereal box, folded the 3d star, and finished it off with some German glass glitter. Here is how to make this 3d cardboard & glitter star…

3d cardboard & glitter star | Materials & Tools
- Thin cardboard (cereal, cracker, or other dry goods box)
- pencil ( is my favorite)
- ruler or straight edge
- aluminum baking dish
- plastic spoon
3d cardboard & glitter star | video tutorial
3d cardboard & glitter star | steps
THIS is the star template I used. The shape felt like a good vintage-style star and there was no need to reinvent the wheel. I did enlarge it to about 180% to make the start as large as I could fit on a standard piece of printer paper.
Step One – Cut out the temple and use it to trace two stars onto thin but sturdy cardboard. A cereal or cracker box will be perfect. Cut out the star shape with sharp scissors. Use a ruler or straight edge to draw a line from the point of each star to the adjacent indent.
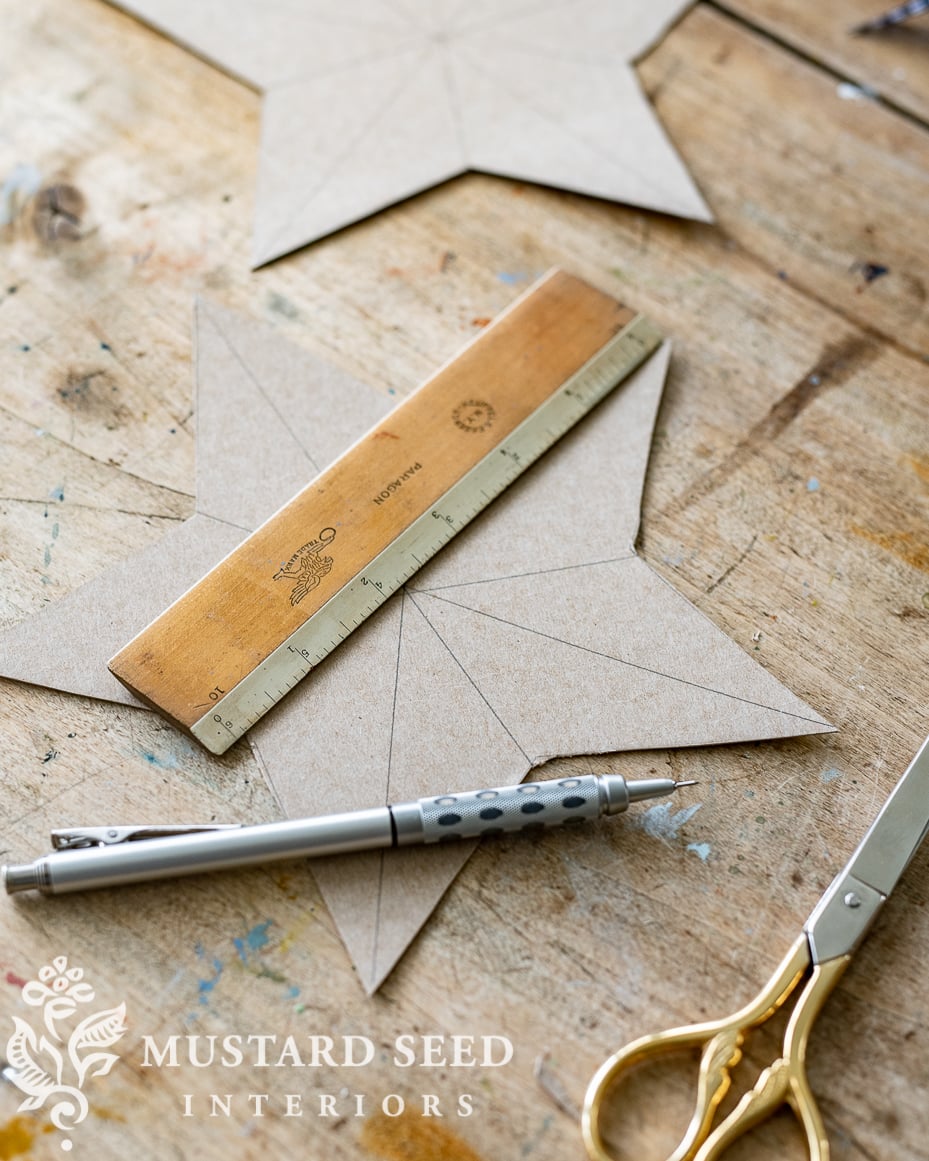
Step Two – Use a bone-folding tool (or a wooden ruler) to score along the pencil lines.

Step Three – Use the bone folder to create a fold along each scored line. Repeat steps two and three on the second star.

Step Four – Hot glue the stars together, leaving one side of the star unglued. This will provide a place to hold while applying the glue and glitter, but will also be a place to insert the star onto the top of a Christmas tree. If you want to hang this 3d cardboard & glitter star as an ornament, glue all of the sides, but insert a piece of ribbon or twine into one of the points and glue it in place.
Step Five – Brush all-purpose school glue onto the star in sections and sprinkle on the using a spoon. Catch excess glitter in a container. I use an aluminum baking dish for craft projects like this.

When the star is completely coated in glue and glitter, allow it to dry completely. If I’m not working on anything else, I’ll just leave it in the baking dish to dry.

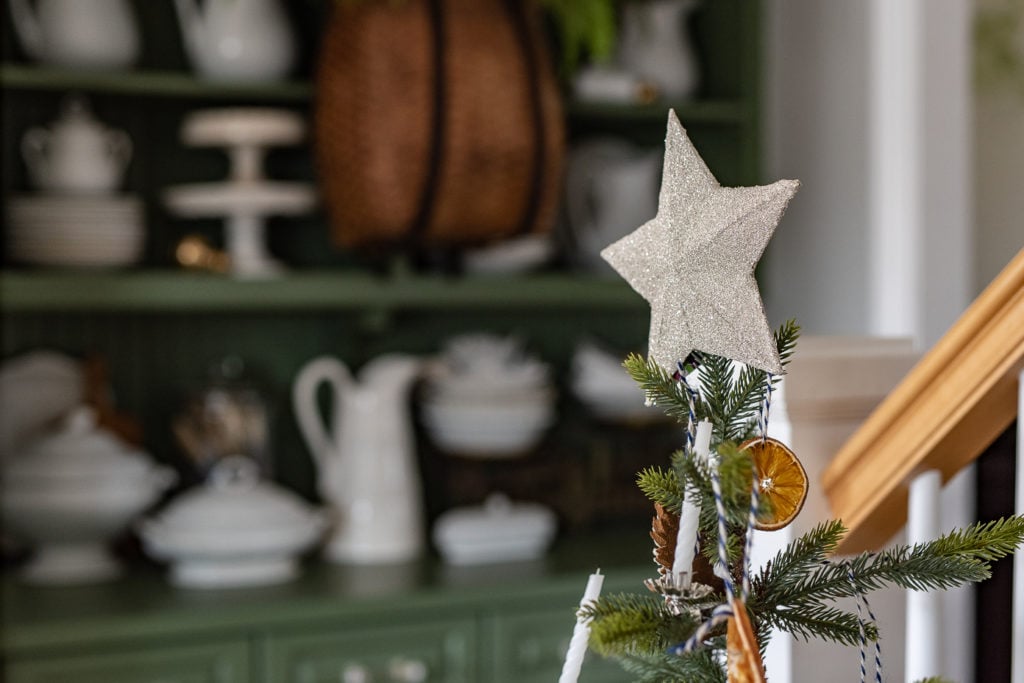
Put the star on the tree by inserting the tree top into the unglued side. A star of this size is just perfect for the little tabletop tree by our kitchen steps.

And, I’ve learned that when I have the glitter out, I should glitter anything else that might look good glittered! I bought this crown ornament last year (from Target, I think) with the intention of adding German glass glitter to it and I didn’t get around to doing it.
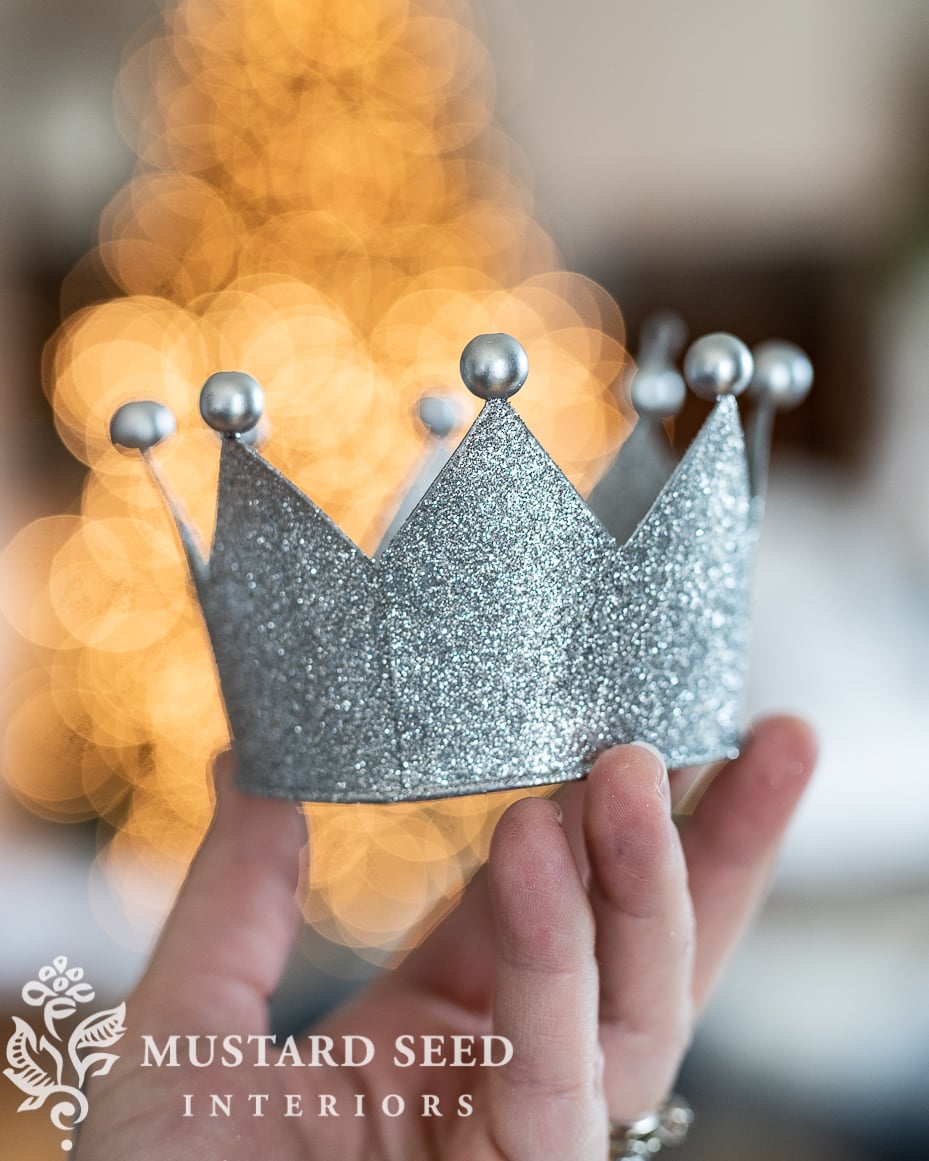
Yes, the crown is already glittered, but will take it to the next level…

For this 3d cardboard & glitter star project, you could use regular glitter, but the has a beautiful sparkle and really elevates a basic cardboard craft. The glitter is more expensive, but worth it, in my opinion. The heavier grit of the glitter also hides all of the clumsy cardboard creases and glue globs. The glitter is made of crushed glass, so it isn’t good for small kids to work with. The silver glitter will also tarnish over time, so store it in an airtight bag or container when it’s not in use. That will keep it shiny for many years.
You can find more German glass glitter projects HERE and more Christmas/holiday projects & decorating ideas HERE.


7 Responses
Hi Marian!
The first time I ever bought glitter it was from YOU! It does shine so beautifully, and I love the addition to the your crown. Maybe I will go out after all 🙂
Stay well~ Cynthia
Marian, just love all your ideas ! I am not a gitter person do not like the mess but it is all so glitzy ! I make up for not using glitter with lights esp LEDs which last so much longer.
I haven’t ever considered doing a project using glitter but I can see how great your star and crown look so I may go look for some. The star looks so pretty and the German glitter glass does look extra special on the crown compared to the original glitter on it! Thanks!
You have such a lovely voice. I enjoyed both the project AND your narration ! Blessings to you and your family.
Aside from the fact that the German Glass Glitter really is prettier than the cheaper version glitter made from plastic, it is more environmentally friendly than the plastic. If it gets into landfill or water, it will breakdown and decompose, whereas the plastic glitter does not. I’m adding a link to a short article which details the dangers of plastic glitter for those who are interested. As for me, I’ll use the German Glass Glitter any time. https://www.sciencealert.com/environmental-impact-plastic-based-glitter-biodegradable-alternatives-christmas
Hi, Marian. I was just at Wendy’s shop in Port Costa, CA last Friday. She still makes the 3-D stars, of which I have several that have tarnished nicely over the years. I bought a glitter crown just like the one you show in your post, as well as other glittery and gold Dresden decorations. Her shop is so magical, especially during the Christmas season
Oh, it’s Christmas Day afternoon and I just made a star. It looks I had too much nog in my eggnog, so uneven!! Obviously, I need a Cricut Maker 3 this year. Merry Christmas season to us all!!