
If you’ve been working on improving your photography skills, you may have picked up on the fact that lighting is the key. It’s not just about adding more light, but controlling the light you have. I was shocked when I watched the first professional photographer who worked at shooting my house. For one shot, the room was almost completely dark. Why? He was controlling the light. Light that was coming in through my windows was casting strange, harsh shadows on the subject. Sometimes that can look cool, but generally soft, even light looks better when shooting interiors.
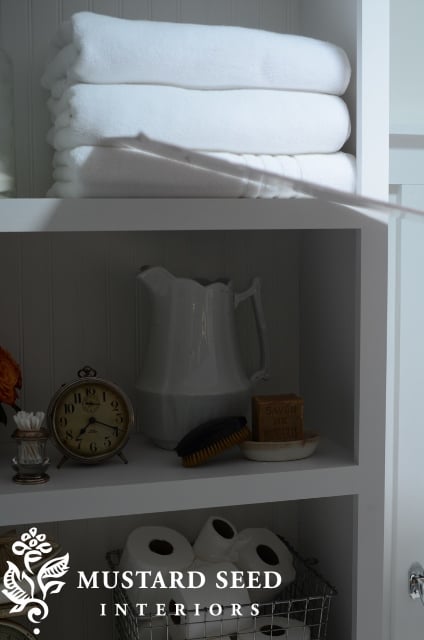
I was so excited about installing a skylight tube in my master bathroom, which is an interior room that had no natural light. It brought in that beautiful light I was craving, but it did cause a slight problem. The light was all coming from the ceiling, so the shadows made taking pictures tricky.

See how harsh it is? Now, I could correct that to a point in Lightroom, but it’s better if I can correct the lighting in the room first. I don’t have all of the fancy scrims and reflectors that the pros have, but I do have a few sheets of cheap white foam core board and I use them often as backdrops, reflectors and to diffuse or block light.
In the bathroom, I held a piece of foam board between the light and the subject.
As you can see, it casts a shadow over the space I’m shooting, diffusing the light, making it even. Since it casts a shadow and makes the entire shot darker, I then have to decrease my shutter speed to allow more light into the lens.
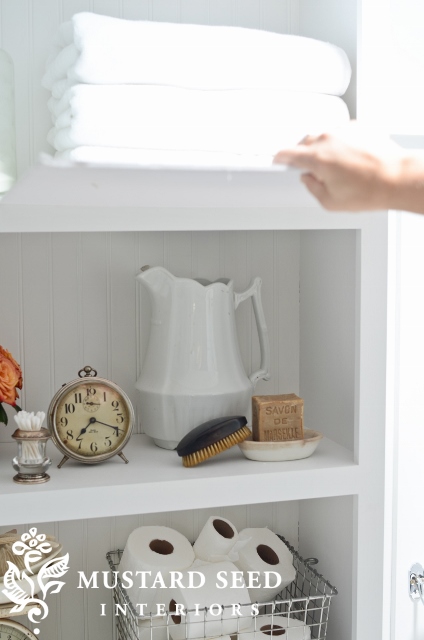
Now the light is soft and pretty, but it still looks bright, even though the subject is in shadow.

Here’s another example of a picture without the foam core…

…and with…

Huge difference, right? It’s so exciting to discover something so cheap and easy that immediately makes your pictures look better.
High five!


44 Responses
Do you use a tripod? And how do you go about decreasing your shutter speed? I am trying to figure these things out with my camera because I sincerely want to become a better photographer (I LOVE photography!) but am a visual learner… (reading the directions leaves me rather confused and the older I get the worse it gets.) I really appreciate any advice you can offer!! Thank you!
Yes, I do use a tripod and that makes a big difference in crisp pictures. I hold the camera if the shutter speed is fast (like in a bright room or outside.
When I’m shooting in manual mode, I can adjust three things – the aperture (how wide the camera lens is open), the shutter speed (how long the camera is “open” and the film speed. Usually I set the aperture first. This dictates how shallow the depth of field is (and how you get wide clear shots or blurry backgrounds.) I then set the film speed, which is usually at 100 for interior photography on a tripod, but can be as high as 400 if the light isn’t as good. Once those two things are set, I adjust the shutter speed to let in the appropriate amount of light, so the picture is exposed properly.
If this is all French to you, you should take a photography class! 🙂
Thanks for this! I’m a total newbie at shooting my housewares, so this is huge. It sure is a pain to look at what we’ve created, be so proud of it, and then not be able to convey that to our customers. Will continue to learn the lens!
Your photos are always so beautiful and inspirational! Thank you so much for sharing your tricks for taking these beautiful pictures. I can’t wait to try this one out!
I will have to go out and get me some foam core board, I love all the little tips about photography, thanks for sharing….come on over for a visit and have some watermelon…Phyllis
Thanks so much for the tip Marion! I will try this!
All your photos look great! I’ve been practicing with my dsl camera but haven’t got the hang of all of it yet. I’m finding the lightening indoors to be difficult. I have wrap around covered porches around my whole house. I need to keep playing around to find the right spot so I can upload all my MMS painted furniture to Facebook!! 🙂 I’ve thought of just moving stuff outdoors, I got a “are you serious” look from the hubs for saying that!! Lol
Great tips! I was just thinking the other day about how fantastic your photos always look, and I know you’ve said you are self-taught. It does bring me some hope. 🙂
Question: Do you hold the foam core with one hand and the camera with the other, or do you somehow secure the foam core without having to hold it?
Thanks for sharing your photography tips! So helpful.
I put the camera on a tripod and use a shutter cord or my laptop (when tethered) to take the picture. I hold the foam core with my hand, but could use an “assistant” or clamp if I needed to. My bathroom is really small, so I could just reach.
Wow! Huge difference. Thanks for the tips, Marian!
Thank you for this post! I have a DSLR but still only use it in auto mode. (I bought the ShootFlyShoot course but haven’t had a chance to use it yet!) I’m thrilled to know this simple tip!
Hi Marian. Such simple things that yield great results. I always love your photography blogposts. They really help…Thanks!
Linda
Great tip!!! Thanks. My blog partner/daughter enjoyed meeting you at Haven. Thanks for being so nice to us.
WOW. Great tip, thank you. I am forever fighting to take photos.
Don’t you love how simple things can make such a big difference? I’m still learning my way around my camera, but I’ve been shooting in fully manual mode for a while and it really does help me learn what a difference I can make with a setting change.
I don’t have a nice flash yet, and I really don’t like the glare that comes from using the built-in flash, but sometimes I just need to use it. So I diffuse it a bit by either holding a tissue in front of the flash or using an index card to deflect it. Simple and inexpensive!
One of my best friends is a pro photographer. Bless her heart, she has tried to teach me a few tricks! I’m finding that I am a better photographer with my iphone than my dslr! Love the idea of using some white board to erase the shadows!
Thanks for the great tip! I’m learning as I go with photographing my subjects. It is a lot to learn, but so hopeful to know some quick fixes like this! BTW my blog will be up this Friday 🙂 🙂 🙂 and I will do an official “launch party” with a giveaway the first week or two of September. Just want to have a chance to build up some posts before I send the official invite for everyone to take a peak!
Great tip~ I too, love photography and have yet to take a class, but it is on my never ending list of things to do! Thank you!!
Thank you so much for sharing this. This is extremely helpful to us newbie bloggers 🙂
I love your tips, Marian! I have some foam board for this exact purpose and yet somehow always forget to use it! 😉 Thanks for the reminder!
Hmmmm. . . this sounds VERY similar to a conversation we had a couple of weeks ago. . .
I decided to just go for it – I took the best pictures I could manage – hand held even – but I’m about to sign up for Shoot Fly Shoot and I may go back and retake the same pics and see how much I can improve them. I’m thinking of submitting that bathroom makeover to . . . not sure where yet.
-b.
Thank you Marian! Your posts are so helpful! I am thinking about starting a blog for our business with all of the projects we work on.
Great tutorial!! I’d love I know more
About your skylight tube though… I have 3 walls in my kitchen and the nearest natural light is coming from 20 feet away. (Terrible for all the photos i take of my kids in the kitchen!!)I have been looking into doing this, but we have a tile roof. Did you DIY? What brand did you use and how much light has it added? I’d love to hear any advice you have to give about that.
We did do it ourselves and wrote a tutorial that will be available on HGTV.com soon. WE used the OLD 14 tubular skylight from Home Depot. The instructions that came with it were very good, though, and it did address how to deal with a tile roof installation.
Marian,
Thank you , thank you , thank you for this fabulous tip. I have two foam boards in my home office closet. I am taking them out now. Your photos are always so beautiful!
Rita
Love your photography tips. I need to take an online class, any you can recommend?
Your photography is so perfect!
Thank you so much for the time to post this lesson. Photography is next…I am still learning about blogging. One foriegn language at a time! Love your site and advice!
I love reading your blog and I really appreciated this post! I am just learning how to take good pictures of my furniture for my Etsy shop. I can’t wait to try out your tips when I finish my nxst piece. Your photos are always so beautiful…not only the lighting, but the composition too.
And guess what…I haven’t tried milk paint yet!! I did murals, high end faux finishes, and some furniture for years, but never with milk paint. I am diving in this week and will be ordering my first batch. Problem is which color to choose…such a great pallet. Wish me luck!
Thank you! I never could figure out the whole shutter speed high ISO thing! This is a great tip! Thank you so much for sharing!
I struggle with lighting while taking photos, especially indoors. Thanks for the great info AND presenting it in a way that is so easy to understand!
Who was it? Mom. 🙂
Thanks for the great tips Marion. I look forward to playing around with my camera a little more. On a totally separate note, had a close friend in town today, a ministry worker whom we support, who happens to be a coworker with your mom . . . small world!
a quick, easy fix is to rubber band a legal size envelope to the back of the flash…it throws the light onto what you’re photographing. the envelope drinks some of the light and makes the residue a bit softer.
Who knew??? The best level I’ve ever reached is a point and shoot.
Using the foam board also helps the depth of field – at least as far as I can see.
Beautiful any way YOU do it!
You’re a gem!
The pictures that you took with the changes you made to the lighting are beautiful and I know that This may sound a little strange but the first photo that you took in the before shots are so lovely, it brings out this sence of longing of when I was a child. Like a déjà vu experience. May mean nothing to you or you readers but so wonderful to me….thank you.
Marian, I’m so glad you shared this! I actually just shot some things in our guest bath (that is windowless) and I had a lot of trouble with the light. We hung some crown moulding and I have my vintage makeup compact collection running on the crown moulding around the perimeter of the room. Some of the shots turned out ok, but the areas right under the lights don’t look as good. Because it was up so high I couldn’t use my tripod to shoot, but if I would have had a second pair of hands, the diffuser trick would have been great! I’ve used a foam board in other scenarios, but to block harsh light, while still diffusing…that’s genius! You can see the post here: http://www.themakerista.com/2013/08/making-home-unique-way-to-display.html Thanks for passing on the knowledge, Marian!
wow! thank you SO much. I struggle constantly with photography and this post just totally opened up my eyes. I was always trying to bring in more light which, inevitably, just brought more shadows. This is awesome! Thank you!
David
LOVE this tip! I am learning as I go…so, posts like this are super helpful to me 🙂 Life to the full! Melissa
Great tip Marian thank you!
Love this photography tip, Marian…thanks so much for sharing it!
Thanks for the tips. I have been wanting to improve the quality of my photos. I like that you showed a before and after, giving a good example of how to control the light. I need to get some foam core to use. 🙂
What a great tip Marian…I will be sure to use that the next time!!! Thanks so much!..
Genius! Thank you for this, Marian. I’ve always wondered if you used pro studio equipment, light umbrellas, etc. for you pictures. This is brilliant & encouraging!