

This is possibly one of the longest chair makeovers ever.
I’m working on it in 10-15 minutes increments as time allows, which is not my usual style. One reason I am so productive is that I knock things out pretty quickly and all in one shot. The season of cranking pieces out one after the other will come again, but it’s just not right now.
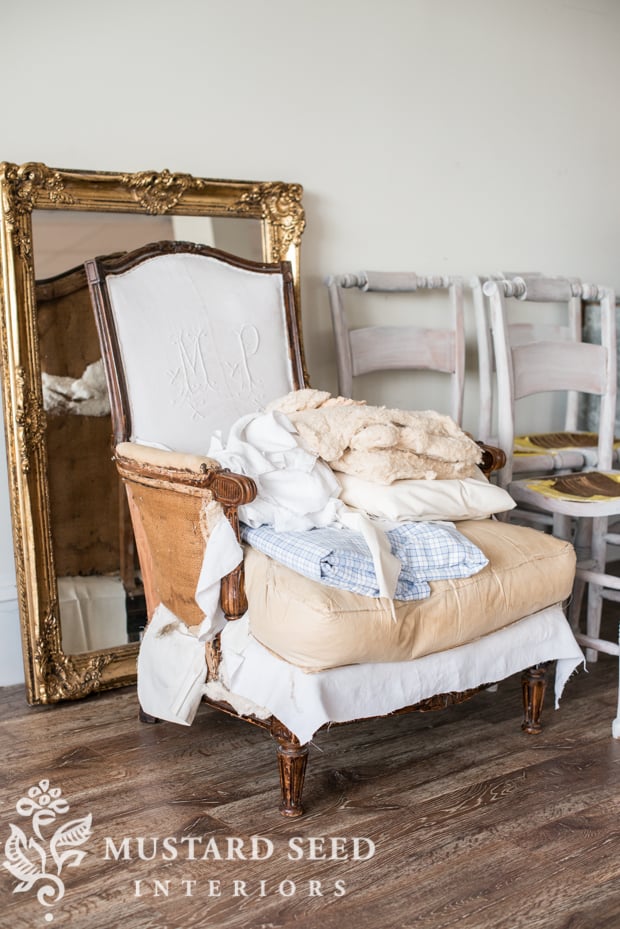
So, this is where the “deconstructed chair” (that is no longer going to be a deconstructed chair) looked like the last time I shared it with you…
Last week, I took some time to staple on the decking (the piece of fabric under the seat cushion) and then the bottom of the back and sides.

Those steps really fixed some of the pulling issues and wonkiness, but there is still a little slack on the left side, but I have now learned that lightweight antique linen layered over cotton twill is not the easiest fabric combo to work with when upholstering.

It does look so pretty, though, and that little bit of wrinkling doesn’t change that for me. I see that white-on-white monogram against the pretty wood frame and I can’t help but love it.

I added the batting on the back and now I’m a little stuck with how to handle the sides, so that the staples don’t show. I think I’m going to have to use…. a tack strip.
Dun-dun-dunnnn!

I don’t know why I’m such a weenie when it comes to things like tack strips, zippers, etc. I know they aren’t hard, but they feel complicated to me and I want to avoid them when I can. I don’t think I can avoid the tack strip on this project, though.
It’s going to take me a little time to muster up the courage…


29 Responses
I’m pretty sure this is a totally bizarre thought and may not work here but you might use bias tape. Staple one side of the bias tape on first, staple the fabric on next, and then fold over the bias tape – secure with hand slip stitches, decorative embroidery “tack” stitches, or fabric glue. I think adding interfacing to the fabric may have helped prevent the “pulled look” near the monograms. I think when you’re done it’ll look amazing.
I avoid zippers like the plague! I haven’t had the pleasure of working with tack strips… yet! Lack of courage also makes my projects take so much longer. I look forward to seeing the chair though. Good luck! It is lovely so far! I love the initials!
Have you ever tried shrinking wrinkles out of fabric that has been stapled in place? Wonder if you lightly sprayed the antique linen with a fine mist . . . or use a steam iron (or the fancy steam wand) would it tighten up and remove the wrinkles? Just a thought.
Thanks for this post, Chicagogirl. I too was wondering if possibly steaming the linen would make it contract and unwrinkle/shrink into place?
If Marian doesn’t want to try that, or does try it and it doesn’t work, I think a pretty pillow or throw strategically place would hide the wrinkling if she is inclined to hide it. Though really, keeping the wrinkling I think makes it look hand-constructed and antique, or as if the wrinkling occurred from the chair being well-used and well-loved over many years. Regardless, it’s a beautiful chair and I adore the MP monogram, so perfect!
They scare me too!!! Go boldly forth and conquer “our” fears ?
Uuggghh… tack strips were invented to cause extreme frustration in the user… Boo–
But the chair is looking FANTASTIC!!!
Have you used that narrow strip of cardboard to staple Into? You would take your fabric wrong side up over the arm and snug that cardboard strip up tight against the fabric and top of side. Staple through cardboard and fabric across your top section of the side. Then drop the fabric down covering the strip and staples. Your side pieces would have to folded in and blind stitched or glued. You could use your trim over them if you thought the sides needed it. The bottom edge usually can brought under the chair and stapled tightly.Then that can be covered with a dust cover. Not sure if my directions make sense, but it is how I have handled sides without tack straps. It’s looking great.
Yes! I’m cool with those, but they won’t work in this case, because both sides of the fabric need to be tacked into a hidden seam. I could maybe use it for one side, but it’s one piece of fabric that covers the back, so that might be tricky, too.
Hmmmm, tricky. I probably would treat the back and two sides as three pieces to cope with the problem, but I am no expert. You will figure it out and it will be beautiful.
I had to google “tack strips for upholstery” to get a visual. ?. Yep. Scary. ?. I’m positive that you can handle it and it will look fabulous!! You should definitely make a video tutorial though because it looks intimidating in pictures.
It’s looking great and whatever you decide it will end up looking gorgeous!!
I absolutely adore it thus far! I have faith and know you can do it! Carry on and tack strip!!
Hi Marian,
Your chair is beautiful, and I am wondering where you find these orphaned pieces of furniture. Regarding your previous post on silver, I usually just place my tarnished pieces in a disposable aluminum container, or a large piece of Pyrex bakeware lined with aluminum foil, sprinkle some baking soda on top, and pour boiling water over it. The tarnish almost instantly disappears.
Lisa
Love the chair so far and can just imagine the years of use it will give you/yours! As for zippers, my attitude has always been…no, never! However, I have a zipper tutorial bookmarked and I am waiting for the perfect day to give it a try! As for your chair, I have no doubt that you will work around that trouble area and it will be outstanding!
Those wrinkles would bother me, but I’m sort of crazy about things like that. I had the same thought as a poster above: try spraying the wrinkles and maybe when the area dries it’ll shrink up a little. Either that, or try to stretch the other side so that side has a little more play too. Im sure when the chair is done and relaxes like an old pair of jeans it’ll all look well loved just as it is! Besides when your sitting in it you won’t be seeing the imperfections and while a chair should look good in the room, its real purpose (and what makes us love it completely!) is how comfy it is!
I have faith that you can master the tack strips. I have used them and they do take some practice. I like the ones that have some padding on the non-tack side if that makes any sense. I LOVE the monogram on the chair. Good luck!
You could always take an upholstery class to give you some professional hints on how to deal with the problem areas. With good advice before you start, you may not have problems.
I keep thinking “glue it, glue it–can’t you somehow glue it and avoid those tack strips?” I don’t know the first thing about reupholstery, so don’t listen to me!
The monogram is really beautiful and I know you’ll figure out how to do the sides. Maybe you could look it up on-line and get a solution. There must be upholstery “books” on-line. The chair is such a great design and when done will be a treasure. Where will you use it? You can’t sell it with the monogram, right? Right!
Can’t wait to see it finished!
Your blog inspired me to try re-upholstering our camel-back sofa – not a good project for a beginner, but I figured our frayed sofa couldn’t get any worse, so it gave me the courage to try it. I encountered tack strip on the sides and back of our sofa and while it might look scary, I have to say that it was not hard at all. If you can make slipcovers, you can handle tack strip!
I admire your taste and bravery ! You are such an inspiring person !
Hey, how about stapling it as usual and covering all the staples with Soutache trim glued on, you buy at a fabric store? I don’t re-upholster, but that thought occurred to me. Love the chair.
I have two lovely chairs like this waiting for me to tackle them. I just don’t have the motivation. I have upholstered many times, my grandmother taught me, she loved to take an old piece of furniture with great bones (as she called it) and bring it back to life. Everytime you come back to this chair it renews the desire to start on my Victorian wing back chairs.
Hand sew the seam closed. When putting the outer back on, leave a little extra that can be folded under and then sew it closed with a round needle. Or, as you have done before, glue a decorative braid over that section.
With the slack on the left you could try misting lightly it with a water spray. I have done this in the past when doing upholstery and it does most times remedy the creases etc. Another hint with a water mister is using it to spray creases on doona covers once they are on the bed give a light spray and pull the cover tight creases gone. Saves ironing.
Love you blog Marion.
Cheers Jackie Bisbane Australia
Marion as always you are an inspiration! I can’t wait to see the chair finished….all in good time!
I have question about wax and couldn’t figure out how to use your contact system…..so forgive me for hijacking this post.
My daughter purchased a dining room set that we are hoping to redo. The top of table will be stripped and stained. The chair seats are upholstered and will be updated. The rest will be done in chalk paint and wax. Her dining room is very sunny. It has windows on 3 sides, windows down to about 2′ from floor. Should we worry about sunshine keeping the wax sticky? Any suggestions would be helpful. Thank you.
I am a seamstress, raised by a seamstress, and yet there are things I put off because I feel uncomfortable, unsure of…so I TOTALLY UNDERSTAND THIS! And the chair, I absolutely love everything about it….can’t wait to see finished!
Could you not just handsew with a blind stitch rather than use a tack strip on an antique chair? Look forward to seeing the end result!
This looks like a fun project. Just yesterday I saw 2 different chairs at GW that were candidates for reupholstering. I have programmed a little voice in my head to say “you don’t need another Project”. If I find one I can’t live without, then maybe but it would have to be for my own house. I have a couple piles of tables & chairs waiting for me to transform them with milk paint right now?
Oh my goodness… love the monogrammed white fabric against the dark wood. This is going to be so great when it’s done…