
One of the reasons I love milk paint is because it can chip and flake in a way that makes a freshly painted finish look authentically old. This chipping can be a bit random, though.
I’ve tested out a lot of different products and techniques to consistently force chipping to happen and, while I’ve achieved some great finishes, the consistent, authentic-looking chipping has been illusive.
Until now.

Last week, I had several of my milk paint retailers in the studio for some refresher training and we played with some products and techniques to see what we came up with. On of the favorite teachniques was painting a coat of milk paint, followed by some 100% Beeswax Finish in select places, then another coat of paint, another coat of Beeswax Finish, and so on. I think I did five coats altogether, using a heat gun to help dry time. The result was a really chippy, crusty finish that looked a lot like an antique painted counter in my studio.

I sealed it with Tough Coat and then added a little Antiquing Wax to fill in the texture.
Now, that is a pretty specific finish that would have to be used on the right piece in just the right way, but I was excited about the potential and tried some other variations on a few more sample boards.
On Thursday, Kriste and I decided to test it out on a table. It was already painted when we bought it, but I liked the tongue and groove top and the shape of the legs.

While I worked on the ticking stool slipcover, Kriste painted on a coat of Lucketts Green (without the Bonding Agent added.)
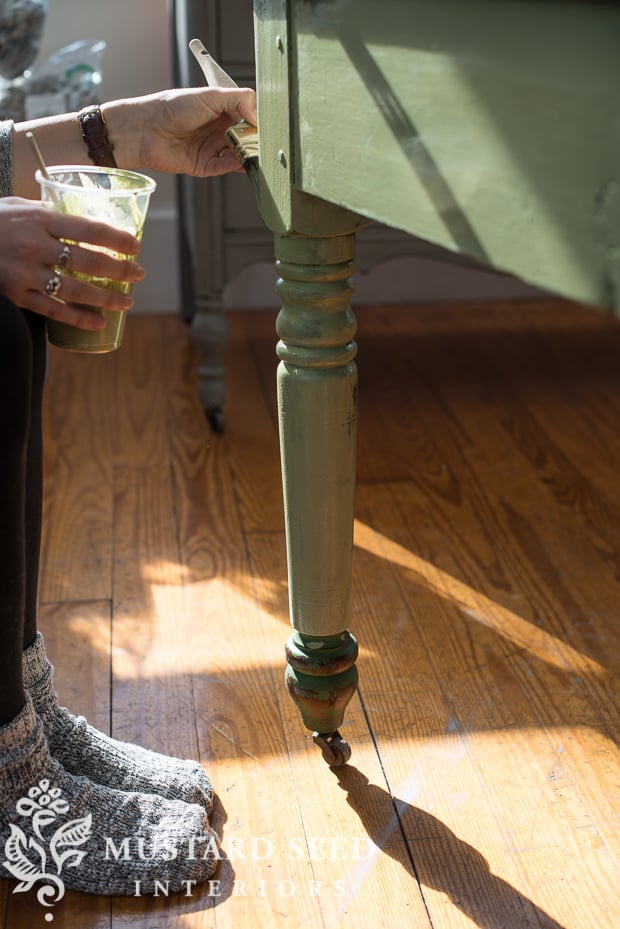
Once the first coat was dry, Kriste brushed some Beeswax Finish here and there on the table base.

The paint will chip wherever the wax is applied.

Kriste immediately applied a coat of Farmhouse White over the wet wax.
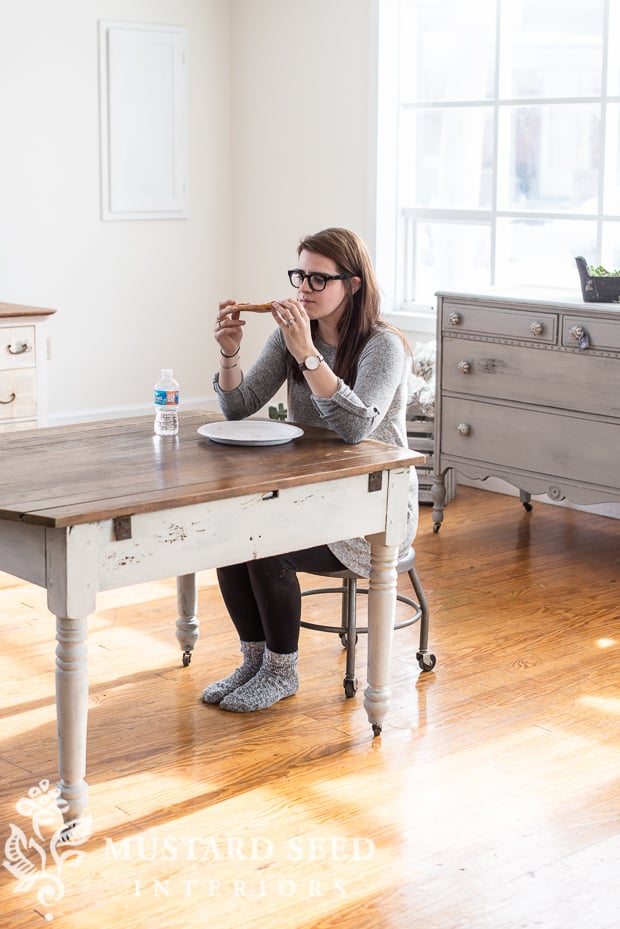
And we waited.

Sometimes watching paint dry is actually fun.

And why not eat lunch on the table you’re working on?
We both worked to sand the green paint off the edges of the table top. I didn’t mind a few little remnants of paint hanging on, but I didn’t like the entire edge painted in the green. We also lightly rubbed the painted surface with a fine sanding sponge to remove the loose paint.

Kriste finished the top and painted base with Hemp Oil and a little bit of Antiquing Wax on the areas where crackling occurred to bring that texture out.
We sighed and fawned over the finish, pointed out our favorite spots.
And here is the result…


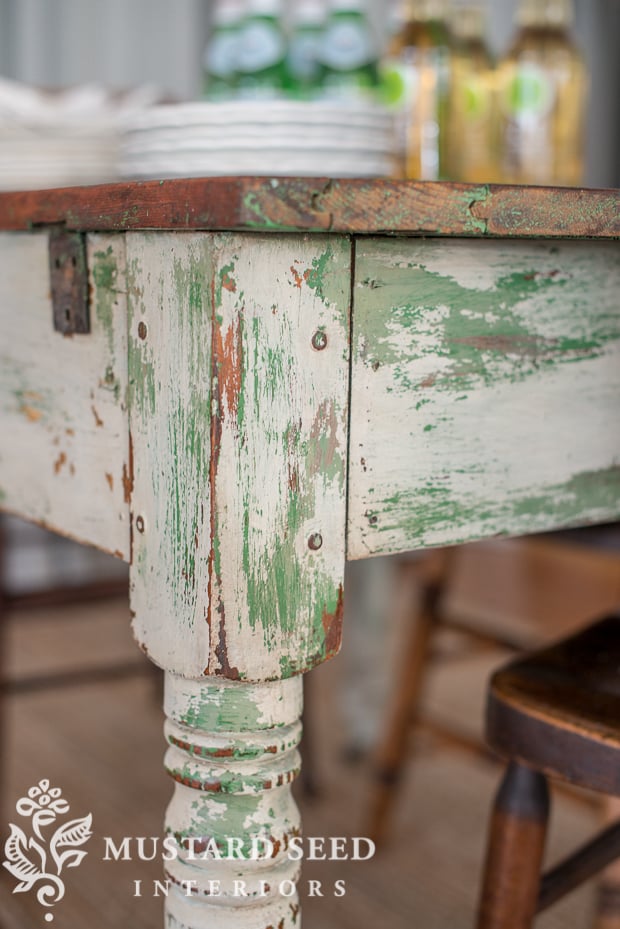

It has that look of a piece that has been painted a few times and each layer has been worn from the bumps and dings of family life as it was gathered around this table.

And the Hemp Oil brought back the warmth and patina of the wood top.
If the chippy look is not really your thing, just wait until I show how buttery smooth the finish is on the piece I painted for my mom’s bedroom makeover…


32 Responses
I have to laugh at Kriste….unfortunately I don’t have a “shop” but I have no problem tooling around in my wool socks in my garage or outside! They are thick and warm and cozy…although they don’t protect my feet from screws or nails…so I sweep often…lol! This is exactly why my kids buy me wool socks every year for Christmas!!! BTW, love the table. I did a similar finish on an old green “shop cart”….was “John Deere” green so I painted it off white (chalk paint, not milk paint….still want to try it!) and then distressed…left the top the “patina” green on natural wood and used oil so it could be used as a butcher block island. Beautiful combination!
It is just perfect. My sweet local retailer, Jill, was at that workshop and I can’t wait to chat with her about this!
I want, no, NEED this table!! Absolutely beautiful. Would this technique work with your regular furniture wax too?
My preference would be for the white to be chippy, showing the green in areas. Don’t like the brown spots. If a bonding agent was used with the green but not with the white, would that yield the results I describe?
I agree, I’m not a fan of more than two colors. Great technique and it seems like there is no end to the tricks you can do with these products!
I love it. I’m sure it’s not for everyone though. I’m picturing it in a sunny back porch of an old farmhouse set with vintage dishes and glassware ready for breakfast.
If everyone loved it as much as I did, I’d do this on every piece I put in my shop! :0)
Nice spread in Country Living!!! Congrats!
Is the beeswax you used in this project a new product? It’s not the same thing as the regular wax is it? I have the beeswax puck and like working with it but would really like something a bit more easy to apply.
Yes, it is a brand new product. The wax puck is good for hitting the edges of a piece to make distressing easier, but it doesn’t make the paint “chippy.” Our Furniture Wax has has inconsistent results for me (most of the time the paint doesn’t chip), but some of our retailers use it in this same way. I’ve had consistent results so far with the Beeswax Finish. It’s softer than the puck and the paint will chip over it wet or dry.
I am convinced that I have to order some MMS paint and order some today! I have been around primitive painted furniture since before you were born and have usually been able to tell an original from a copy. Your results are simply amazing! Thank you for sharing your beautiful piece!
JP
Oh Marian !! Just received the latest issue of Country Living ans was delighted to see your sweet house (and family!). The minute I opened the issue to the contents page and saw your sofa and beautiful pillows, I smiled and thought “I know that room”! Lovely photo shoot – everything looks just wonderful. Congratulations on a beautiful story. Country Living captured you and your home perfectly!
Chipalicious! !!!!
I will have to admit that the table looks like it has seen it’s fair share of usefulness . From ktchen to perhaps grandpa’s workshop. It looks devine.
Hello Marian, I love the table. Excited to try the beeswax! Love all that you do!
Love the chippiness! (spell check says that is not word…LOL) I can’t wait to start a big project using beeswax, Farmhouse white and this technique.
Marian,
Congratulations of your house being featured in the March issue of Country Living. As soon as I opened my issue up and saw the contests page picture I knew right away whose house was being featured.
Your house looked beautiful and I know how tickled the boys were to see their pictures in a magazine. Cant wait to hear the details of the shoot in a future post. Did you have any input as to what photos were selected? Just wondering.
How much fun you and Kriste must have trying colors and experimenting new techniques! You guys did a beautiful job on this table. It came out gorgeous! I love the color combination and the beautiful wood top!
Oh! and I cannot wait to receive my March Country Living to see your home featured on it!! Congratulations!
Hmmmn. Can’t decide if I like it or not. I do, but it would have to be combined with other decor that complimented it. Not too much more chippiness, I think. I don’t really know. I can see it in a kitchen like you talked about a while back that doesn’t have built-in cupboards, but just shelves and a Hoosier cabinet, maybe an old pantry cupboard, things like that. Then it would look perfect. I do really like that original shade of green showing through.
I did appreciate learning about the process used to get that degree of chippiness, tho’.
PERFECT in showing us all the techniques you can use to get this look or the in between or the more ‘way out there’ chippiness, thanks for showing all of us all the possibilities with it !!!! You’re a goooooooooooooooood teacher. THANKYOUU 🙂
I can imagine that look used in SO MANY SETTINGS! LOVE IT
I’m trying to store all this knowledge so that it’s at my disposal to put to good use when the time comes!
LOVING this table! Well done! Also loving that Kriste is working in her socks – they look so cosy!
Luckett’s Green! Farmhouse White! My faves! That decides it for my kitchen — bottom cabs will be L green, top ones F white. TSP or Liquid Sander or both, prior. Chippiness may occur naturally! HA.
Thank you, Marian, for this table. I LOVE IT. Wood top, the paint, it’s perfect. :-))
Oooh I’m going to try this on my kitchen table. Sometimes the thought of doing four coats (or more) is really daunting but if the final result is like this, I’m all in!
I wish I had something to try this technique on…..right now !!! I love the character and warmth and suggestion of generations of memories around that table. And I want a screened porch to put it in….!
Love this and love that you found a way to “create” chippiness”!
I like it, It has a distinct look that’s for sure. It reminds me of the piece I painted in my house that is now a coffee station 🙂
Lauren | Lovely Decor
xx
I love everything about this!! So beautiful.
I loved this table so much I decided to copy it. Here is my Chippy Table. I hope you like!…
Please see website listed below for pictures of my “look-a-like” table.
Thank you,
Tracey
Tracey Nelson, I don’t see a way to find your page ??
My husband just built me a bench for our entry way and this is the exact look I’ve been picturing. I’ve finished/refinished lots of furniture but this will be my first attempt at milk paint. Thanks for the tutorial!
Do you think using a hair dryer (heat) made a difference in how the paint chipped? Have you tried it without that step with the same results? Just curious as I’m preparing to try for this look for the first time. Thank you!