

We are finally at our final installment of this video tutorial series on reupholstering a French style chair. It’s time to frame out those upholstered panels and cover the staples with some gimp trim.

In case you missed the first five parts, or need to reference them, here are the links…
Part 3 – distressing & waxing the frames
Part 4 – selecting & cutting the fabric
Part 5 – reupholstering the chair
I often get asked what the “trick” is to applying trim. Honestly, there is no trick. It’s just hot-glued on! Really. At first I thought I might be taking a short cut, but I’ve taken apart dozens and dozens of chairs and settees and almost all of them have been glued. One or two of them were just tacked into place, but I’ve seen enough gluing to be confident in saying it’s “the proper way” to do it.
In this video, I share some tips on gluing the trim in place and getting the ends to meet “seamlessly” for a professional look.
For my trim, I used French gimp trim in off white, but you can use any color or style of trim you want. For a chair like this, you need approximately 5 yards of trim. You can even make your own double-welting trim, which I’ll make a tutorial for one of these days.
I absolutely love how these chairs turned out.
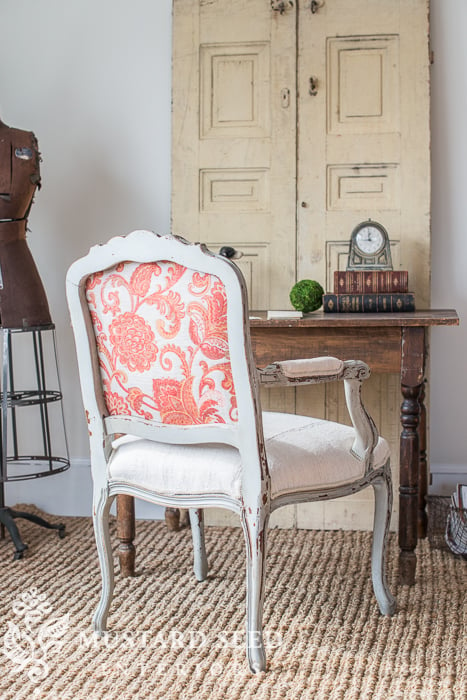

The frames were painted in MMSMP Mora and finished in Antiquing Wax. They were upholstered in antique European hemp sheets and some home decorator fabric remnants for the back. (Sorry, I don’t know the name of the pattern.)
We still need to finish the seat on the second one, but this pair is for sale for $450/both (and I’ll include the extra remnant fabric for pillows, etc.) I believe they are made by Ethan Allen, but I’m not sure. They are super solid, though, and in great condition. Just send me an e-mail if you’re interested in more information or purchasing them! (marian@missmustardseed.com)


22 Responses
Marian, thanks so much for doing this upholstery series. It has been super helpful. I recently got two great upholstered chairs from an elderly woman and I need to redo them. I bought a great book on reupholstery, called Spruce by Amanda Brown, but it helps so much to see a video. Could you post a close up pic of the section where the gimp met up? Thanks.
The Other Marian
the chair turned out fabulously. Well done! Would you be able to give us a close up shot of the seam. I think I understand what you are saying but would love to see it up close. Thanks.
I actually have 10 yards of the same fabric you have on the back of your chair in blue! I can look up the name of it if you need it…It is written on the side on the fabric panel I believe 🙂
Marian, these really came out gorgeous! I am seriously thinking of attempting this! Thanks so much for the videos!
XO
These are beautiful!
Hot glue gunned trim…I’m on it.
Great tutorial, thank you.
This is so beautiful! I love the delicate trim and pop of color in the back fabric. What a great choice! Thanks for this great tutorial- it makes a seemingly daunting task seem less scary!
Thank you for taking the time to produce this tutorial.
I recently paid big bucks to take a two week (8 hours per day for 10 days) class to learn to upholster a chair and it wasn’t half as detailed as your tutorial. One instructor, 40 students and no refunds. Needless to say, my chair is still waiting for her complete make over.
Please, please, please produce a tutorial on how to make double welted seam covering. That too, was to be taught in the class but the instructor ran out of time.
Thank you again for sharing your knowledge with us.
Vanessa
Just a tip. If you have “hairs” created by a glue gun just run a hair dryer over it and they
will away pulling gently. I hate to see crafts that have wayward glue strands.
I think it would be helpful to see this whole tutorial in zoom mode so we just see your hands and the trim most of the time. It is hard to see what you are doing with your full shot–especially on the last bit where you are finishing off the trim. I like the shot in the very last part of your tutorial at 8:44. If you filmed your whole tutorial at this zoom, it would be so much easier to see. Just my opinion–thank you for doing these.
I think you have made the chair look much better than it was.
I buy these from France for my business, I paint them then recover or
they may need me to upholster them.
Your chairs looked amazing at the Ardingly Show Jacqui
So the chairs look fabulous, of course. But you know what else looks pretty good? You- your hair is looking great, you’ve lost quite a bit of weight, and your complexion looks like a twenty somethings. Keep up the good work Marian! You are such an inspiration!
double welt, or a welt made with bias fabric, finished with upholstery nails.spaced apart, and frayed edges are much more today than gimp…and gimp can be improved greatly with brass, or aged tacks spaced about 11/2 inches apart…if using gimp, it’s really important to adhere perfectly to the shape of the frame…pushing it well into and following the curves of the frame perfectly…fabric glue is a better choice, because it gives you time to perfect the application…a tack can be used and later removed to allow for this…also there are many wonderful designer gimps available if you decide to go that route. right now, I’m loving a hemp gimp with natural linen fabrics, otherwise there are exciting choices.for patterned fabrics….This is of course a personal choice, but can make a huge difference in the quality of the finished reupholstery project…say instead of $400 some odd dollars a pair to $800+, which is much closer to the truevalue….
These are beautiful. Thank you for your kind generous spirit in sharing all your knowledge and tips with us. You are beautiful!
These were really helpful tutorials and I will be using them when I come to recover two vintage chairs i recently purchased with horrid stripy chenille. The only thing I would say is that I think I like the tapestry fabric as well as the plain and would have picked a colour out of that fabric like the pale blue or the black to paint the chair and left the tapestry unless of course it was damaged, but of course its everyone’s personal preference…thank you
They look fabulous!!!! I love them, thanks for sharing this tutorial! I cant wait for more 🙂
Lauren | LB Designs
xx
Finally got some time to watch the last part of this tutorial. Thanks for taking the “scary” out of applying trim, Marian! Now I have more confidence to tackle a project similar to your French chairs.
I am new to Miss Mustard Seed. I’m hooked! I love the fabrics you use for your projects. I can’t find anywhere reasonable to buy these type fabrics. The Calico Corner which was in my area is now closed. Don’t often see much at Joans In the patterns and colors you use. Suggestions please…thanks.
Diane, I’ve found that a great place to find all kinds of fabrics is on Ebay. I’ve found gorgeous antique toiles, vintage French ticking, etc.
First time on your site, magnifique!! I’m finishing up a 1909 rocker I found in the trash. Thank you for
your helpful tutorials. Thank you for keeping it real!!!
This may be a stupid question, but it appears there are folds or seams on both the seat and back of the chair. As though the fabric was pieced. Is that just my computer screen, or is this the case? What fabric is this? I know you said an antique sheet was used?
I have two french chairs and now feel confident to tackle them. I had previously begun painting the fabric with the plan to later wax it, but a coated leather looking fabric is just not authentic to the chair. I am thinking natural with the back “window” in a navy and natural toile. Thanks for all you do. You are my idol/hero!
Hi
Being new on your blog, I watched how to upholstery a french chair, I was completely mesmerized.
I have two that I am going to try do thanks to you.