
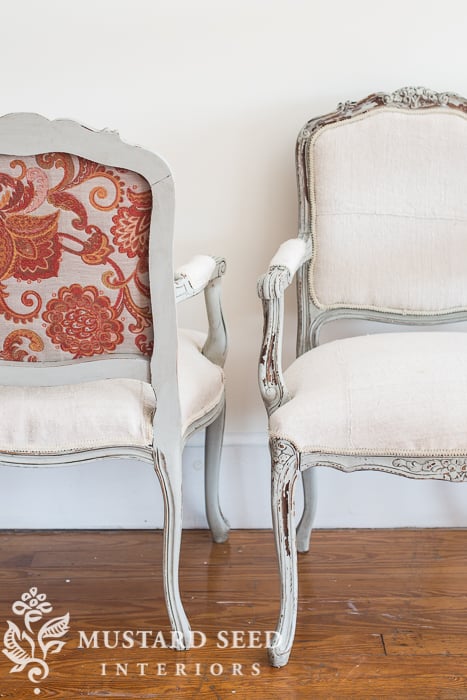
This reveal is a little anticlimactic, since you’ve already seen what one finished chair looks like and they are twins, so the other one looks pretty much the same. As with all identical twins, though, there are some subtle differences, so I thought it was worth giving them both a proper introduction.
I’m going to totally brag on my student Kriste and say that she did 99% of the upholstery work on one of these. Can you tell which one?

She did an amazing job and you can’t tell which one was done by the experienced upholsterer and which one was done by the rookie. She did the one of the left, if you’re curious.

We have a lot of chairs in the hopper to work on for Lucketts, so I’m glad to have her on my team!
Here is how the chairs started. They weren’t bad at all, but just felt a little too busy and fussy for my taste.

We painted the chair frames in MMSMP Mora, finished in Antiquing Wax to soften the transition from the exposed stained wood and the paint. The chairs are upholstered in one antique hemp sheet, which we cut strategically to work with the seams.
And we added a little surprise to the back with some remnant fabric from my stash. It complimented the paint perfectly and made them more interesting.
If you missed it, we caught it all on video and turned it into a 6 part video tutorial series on upholstering this style of chair. The chairs have sold and will be heading to their new home on Friday.
Through the video tutorials and workshops, I’ve learned something about myself. I have discovered that I really enjoy teaching. It’s exciting to me to share with others what I’ve learned and what’s worked for me. It doesn’t drain me, like some aspects of my business can. It fills me up. That means, I should to do more of it and I’m excited about doing more of it!
On my list are a new slipcover series. My wing chairs could really use new slips, so I’m going to take you through that process…

I reupholstered the bergere chairs below a few years ago and I have learned a lot since then. I took a few short cuts that were fine, but I’d really like to fix them now. I fixed one, but I still need to make a new seat cushion. I plan to fix the other one and show you how to dissect and upholster that style of chair…
There’s another bench/ottoman waiting in my stash…

…and many of you have asked how to make a skirted tie-on slip, like the ones on my dining chairs, so I’ll make a video tutorial for those, too.

And lots more. I have an antique chair frame that has already been stripped and I’ll show you how I put it back together, reinforcing the back and seat. Maybe we’ll get really brave and upholster a wing chair or something.
Basically, we’re going to have the camera rolling in the studio a lot more!


29 Responses
Wow, Kriste, beautiful job! I love the contrasting fabric on the back. I hope this doesn’t come out the wrong way, but Kriste, I think your chair shows more attention to detail. With my being a little OCD, I think the chair on the right (with the seam that doesn’t go straight across the front of the chair back) would drive me mad, especially if I had paid a pro to do the job. Nice work. I’m looking forward to seeing more of this series! 🙂
I had to laugh at this comment! In my defense, I was upholstering while teaching on camera!! 🙂
Ooops!!! Marian, I’m so sorry! Obviously, I didn’t watch the video or I would have know that you upholstered the other chair and I would have cut my comment off after the second sentence. It really is a beautiful transformation of those chairs. I hope you will accept my apology for my insensitive remark. *slinking off with tail planted firmly between legs*
LOL…oh, Kallie. I really was laughing at it and wasn’t offended. My seam is crooked and hers is straight. I’m so proud of the job she did and your comment really didn’t bother me. Some ladies saw them in person and they said Kriste’s chair was better as well. 🙂
Im so glad your enjoying your new adventure in teaching! I, most definitely, will become an avid student in the MMS Upholstery Teachings! Lol! This is without a doubt my short-coming:)
Why didn’t you use fabric without all those seams?
I had to say that I love the backs of these! The unexpected color and print is so great with the monochrome fronts. Well done you and the student!!
xo Ashley
pennypickedrevival.com
I love both of them! Having been lucky to see them in person while in process, I can really appreciate the craftsmanship – and I seriously love the fabric choices. I am super excited that you are going to be doing a wing back chair slip tutorial! I just bought a beautifully shaped one for just a few dollars with not-so-nice fabric. I’ll be following right along!
Love these chairs, especially the surprise fabric on back – just enough!
Love the final reveal of the twins. My favorite part of the chair is the unexpected fabric on the the chair back. Looking forward to more of your video series especially the slip covering of the wingback chair as well as the slip for the dining chairs. I am a visual learner and your tutorials are always great.
I am so excited about this series because I have a barrel chair that is in shreds covered with a coverlet and a huge Duncan Phyfe chair we inherited from a great aunt that are in serious need of attention.
You have opened my eyes to painting furniture. Coming from a family where my dad thinks everything beautiful is darkly stained wood. I’ll have to do it gradually though so I don’t give him a heart attack.
Definitely think I need to go to one of your workshops!:)
I am so glad you are going to a tutorial on slip covering the wing chair I have one similar that was my grandfathers and it really needs a new fitted slip cover. Thank you
I’m interested in this tutorial also!
To get a taste of Marian’s slip cover tutorial she has a six part series which I followed to the letter a year ago and it is still holding up quite well. Can’t tell you how many trips to the computer to see what was up next or figure out what I was doing. My only difference was that I did bias cording. I don’t think a wing back chair would be a big departure but the key will be the wings………
What a difference! The chairs are now so French – ooh la la! I can’t wait for the wing back chair tutorial since I have 4 chairs I would love to slip cover. You do have a knack for teaching, Marian and I’m learning a lot thru your blog. Enjoy this beautiful PA day!
Please do a video series on slip covering soon! I have several chairs and a sofa that I want to cover.
The twins look very unique. Sort of like more casual and homey than before the make-over. They seem like they will blend very well with numerous decors. I do have a question about those seams, tho’! I haven’t watched all the tutorials on the re-upholstering, so you may have already answered this question. But, I’ll ask anyway: Did you intentionally include the seams or were they necessary in order to be able to cover the seats and backs with the fabric you were using? I’m not sure how I feel about them–do they add character or do they detract from the design of the chairs?
BTW, I was just looking at the photos of your kitchen, which I’d not seen as the work was done before I found Miss Mustard Seed. I really love the look of it. The one question I have is what are the counter tops made of? Are they butcher block? I like the way they look, but couldn’t tell from the photos just what the material is. I need to re-do my own counters and I have been considering various types that would look current but not break the bank.
You ‘re doing a great job with the tutorials. They are so useful. Keep at it!
I used an antique hemp sheet for the upholstery, because I love the texture and look for it. The sheets are three pieces stitched together, though, so seams will be visible. I think they add character, so that’s just a personal preference thing.
Yes, the countertops are made of cherry butcher block.
I love these. I find the seams to be charming and add to the visual appeal that “defussifies” the chairs. The fabric on the back is fun and almost brings a sassiness to them.
I completely agree with Ashley! I love what you did with these chairs, Marian and Kriste! They turned out fabulous!
Your tutorials are excellent!
Thank you for sharing them with us!
I am buying a mat cutter this weekend and have already bought a chair at the thrift store to re-upholster
Thank you!
Your tutorial on the chairs was fantastic. I learned so much! Especially that I need a pneumatic staple gun and compressor – I really thought I would have been able to use my hand held stapler.
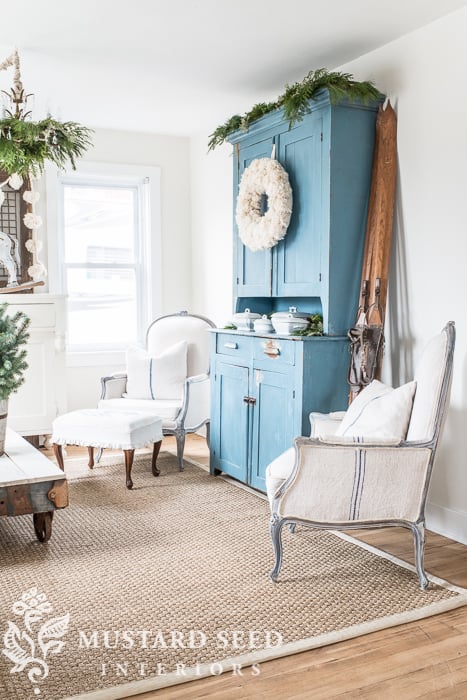
I have a question – your armoire in the picture above is a lovely shade of blue – is it one of your colors? If so, which one?
Please keep the tutorials coming!
Thanks! Yes, the hutch is a custom mix of Trophy and French Enamel in MMSMP. I don’t remember the ratio, since I just mixed it until it looked right to me!
Can’t wait till the tutorial on a wingback chair as I have one sitting in my shed that I am going to have to completely gut and redo. the fabric is shot and ripped and I am sure mice have taken up residence.
All your projects are fantastic! Love the fabric mix on the chairs. Would love 4 of these to change out my never used dining room. I think the room is there only to decorate! How about a series where we send in a photo of a chair and you give us ideas of how to cover it? I have the common pressed back oak chairs. Tired of them so I made a cover for the pressback part but have no idea what to do with the seat to complete it. Hmmmm now you got me thinking. Love your inspiration!
Those chairs are gorgeous! I was going to ask if they are available for purchase, but I see they are already claimed by some very lucky person. I would love a tutorial on the dining chair slips. I need to make my own for my grandma’s dining chairs.
Thanks Marian and Kriste for all your hard work and tutorials. So many people won’t share their how-tos, you just don’t know how much it is appreciated. I don’t miss a day!
I love the use of the antique hemp sheet with the seams for upholstery. I think they make the chairs look much more interesting!
I was hoping to know where you purchased the fabric on the back or who manufactured it. I have been searching for something similar for my project chair but haven’t been able to find anything with these colors. Thanks!