
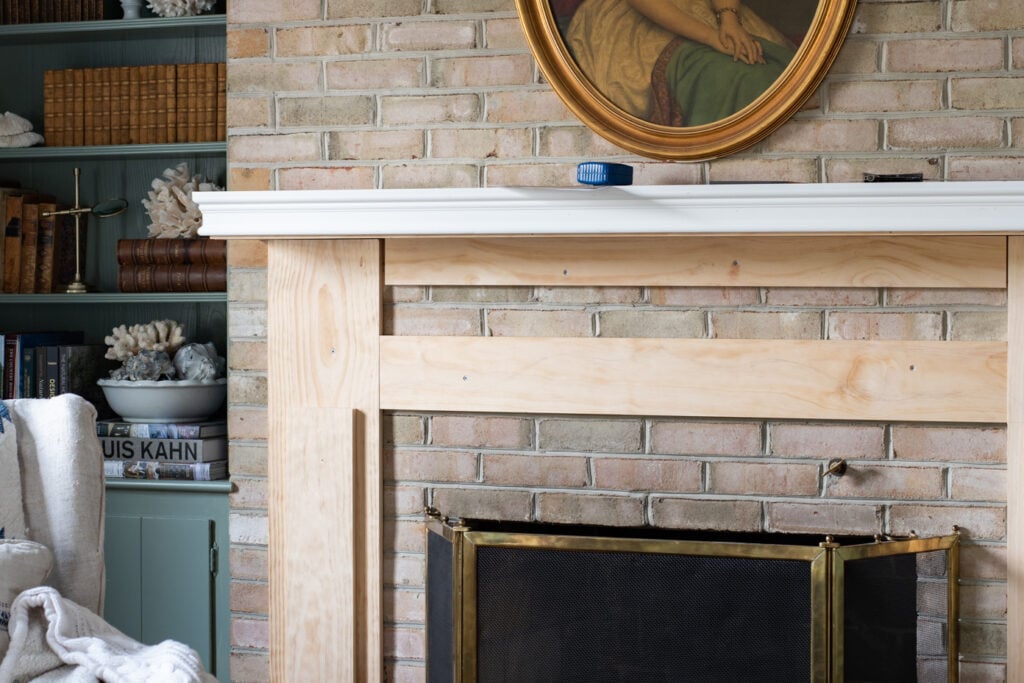
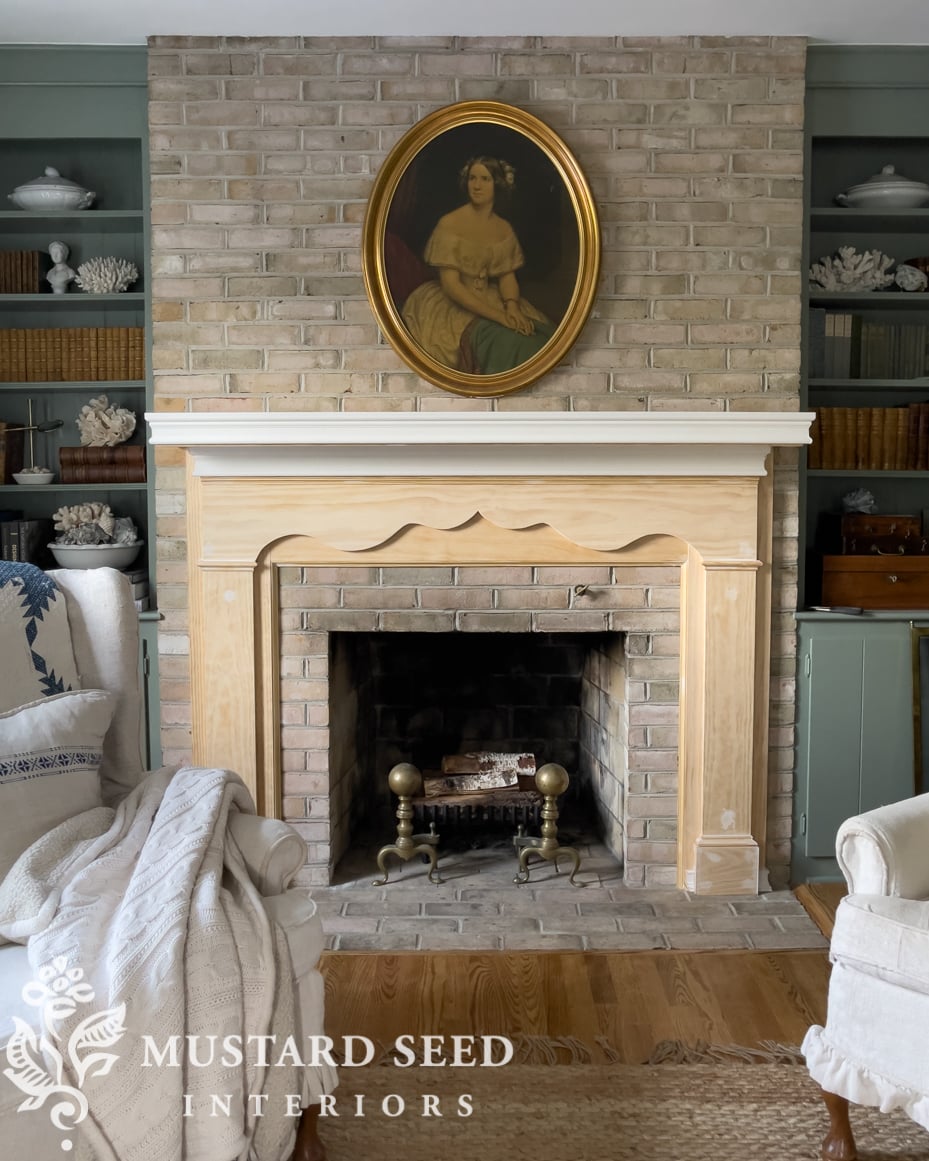
Several of you guessed we would build fireplace mantel option number one and you were right. All of the antique-style mantel options I shared in THIS POST were strong contenders, but I kept coming back to the first one. It was the first picture I saved as inspiration and the one that I imagined in our living room. I think the others would’ve worked, but there was something about this one that I just couldn’t shake. So, I went with my gut and this is the one we built.

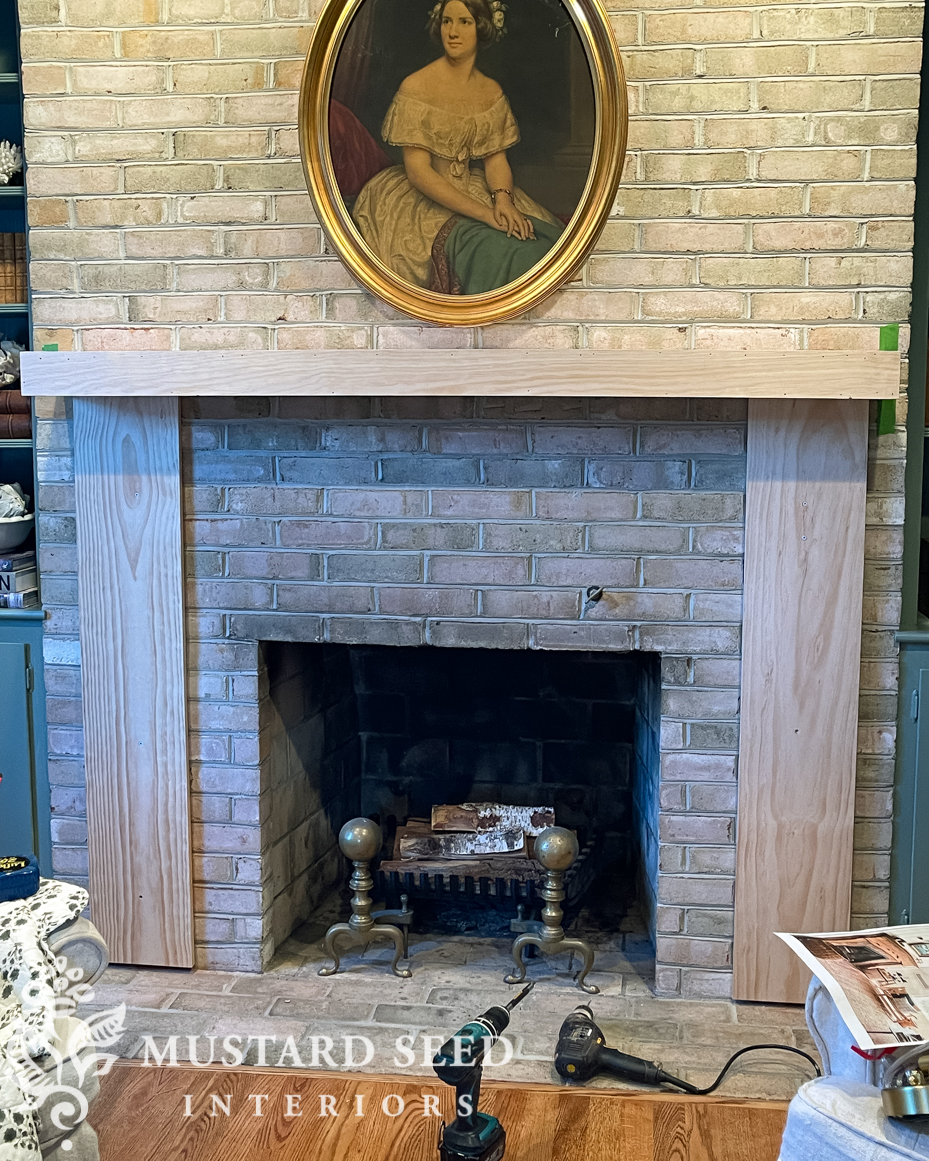
Because our fireplace had three two-by-four supports for a mantel shelf built into the brick, it made the most sense to work around those. We could’ve simply cut them off and then build whatever mantel style we wanted, but having support foe a shelf built into the wall was a better option than trying to build up moldings to support it.
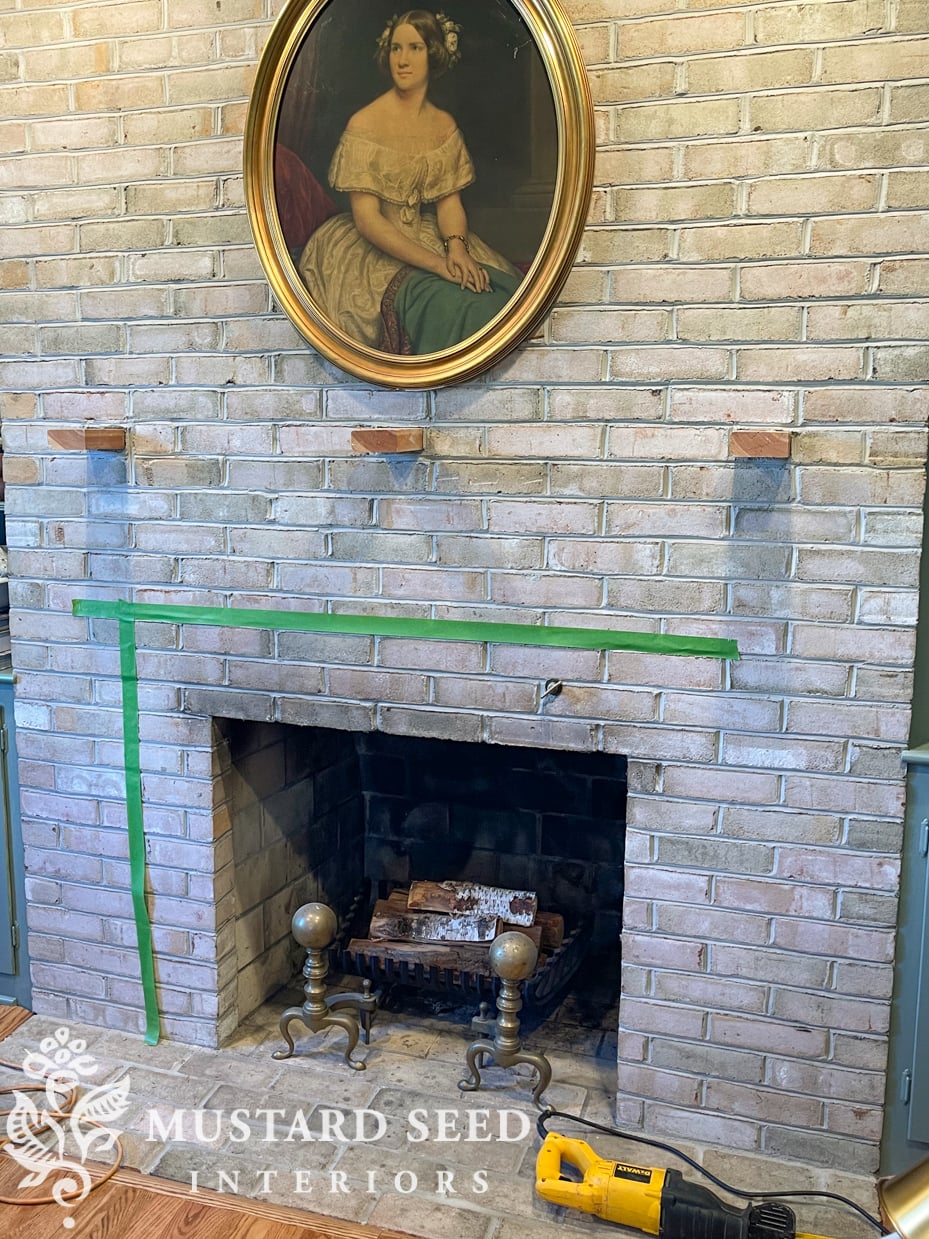
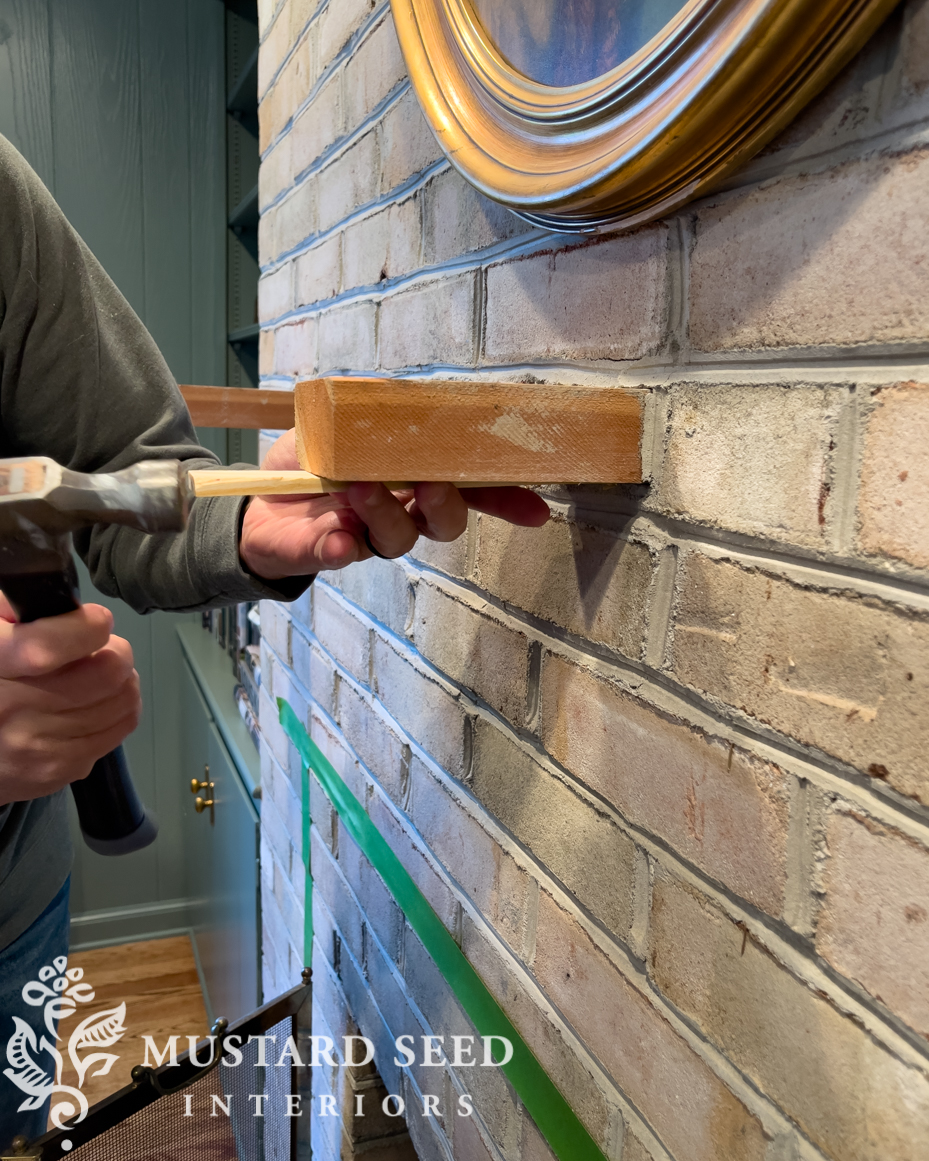
The boards must’ve settled after they were installed because the mantel wasn’t quite level. Jeff shimmed the two-by-fours and he was able to get them level again.
We then built a box to install over the two-by-fours to make the mantel shelf. It was very similar to what was originally installed as the floating mantel shelf, but we would build a more traditional, antique-style mantel with a full surround.
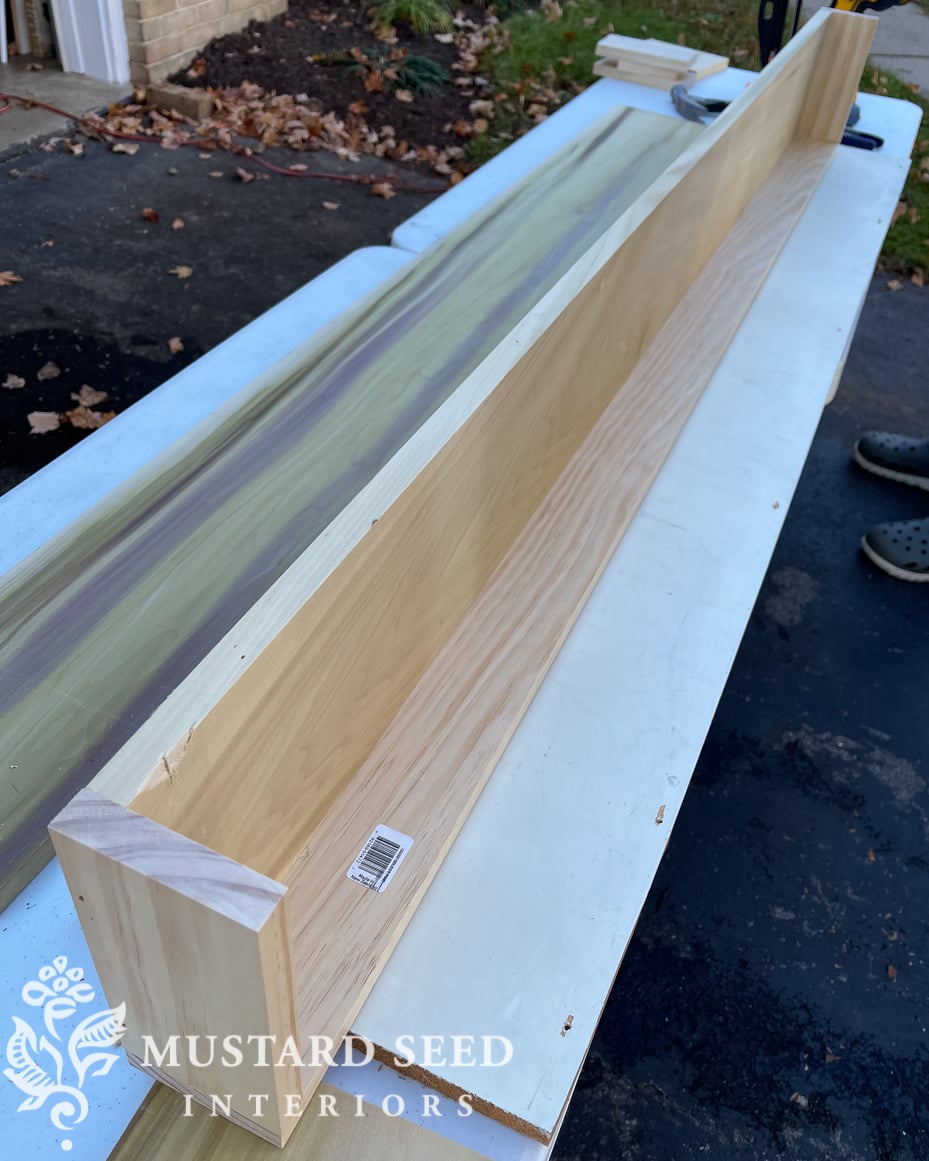
We built the box out of two 1 x 8s and two 1 x 4s cut to size, attaching the boards with nails. We then slid it over the two-by-fours and screwed them in place from the top. If the original mantel shelf had been level, we could’ve added trim and built a mantel under it, but it was worth taking down the old one so we could fix that issue. Jeff is a human level and it always bothered him.

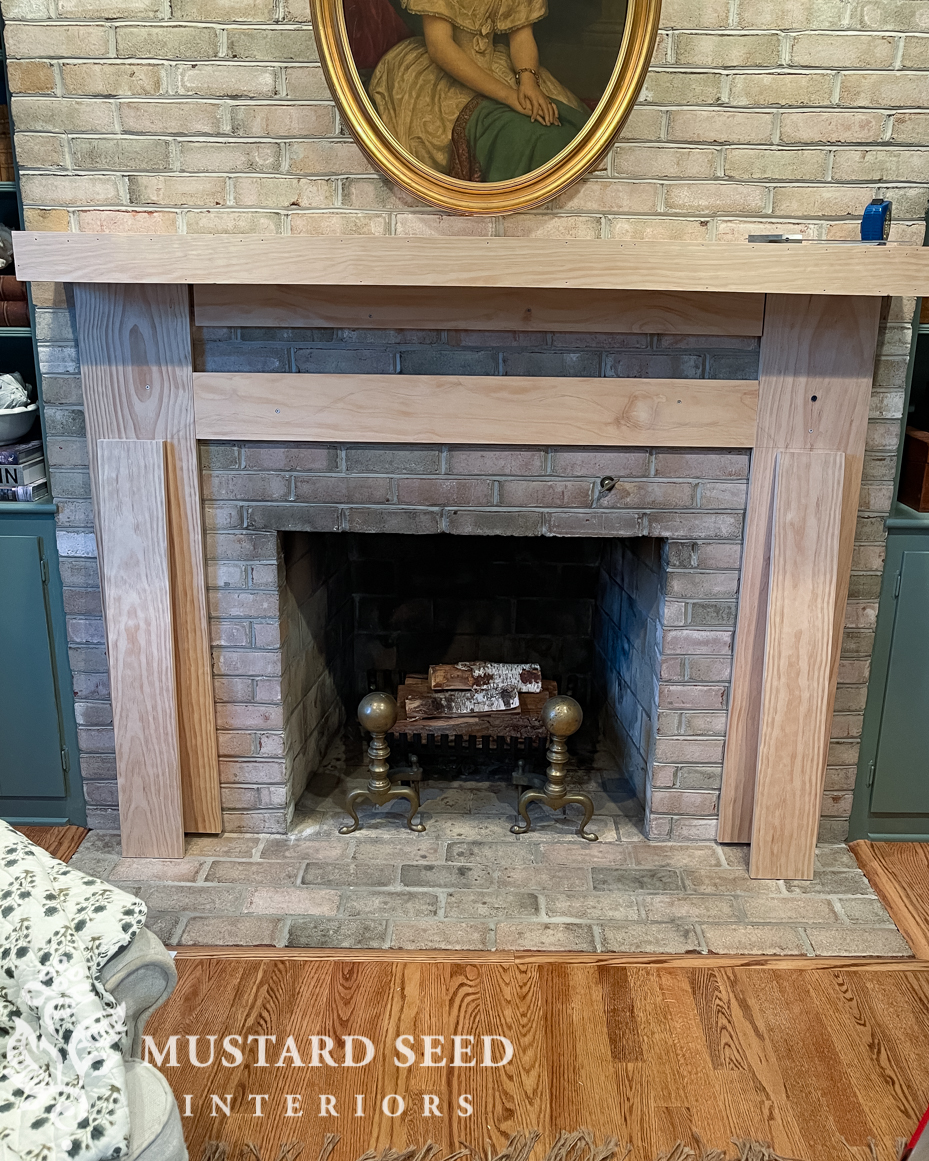
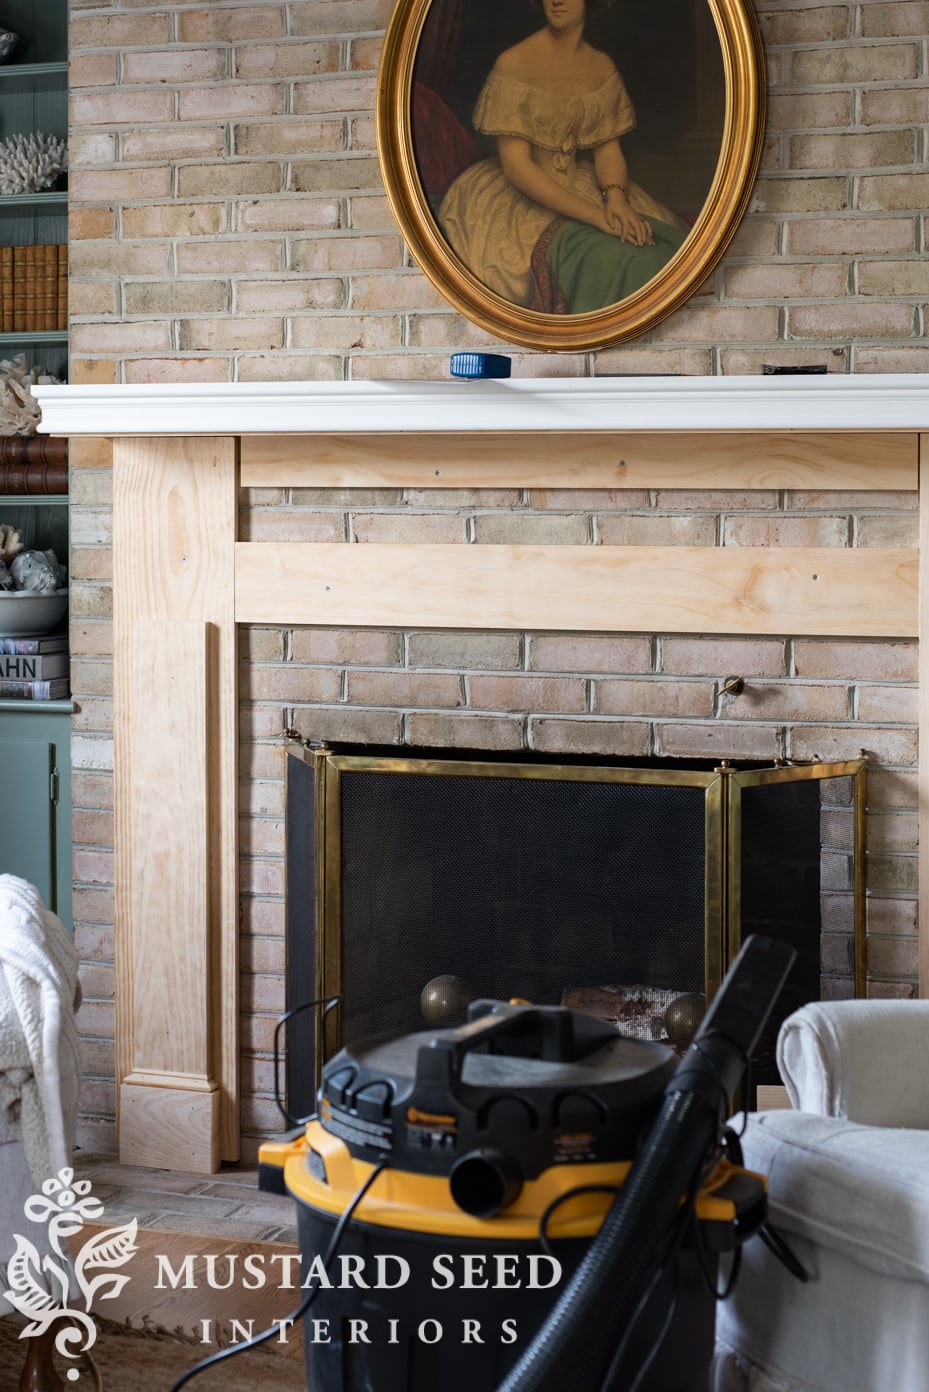
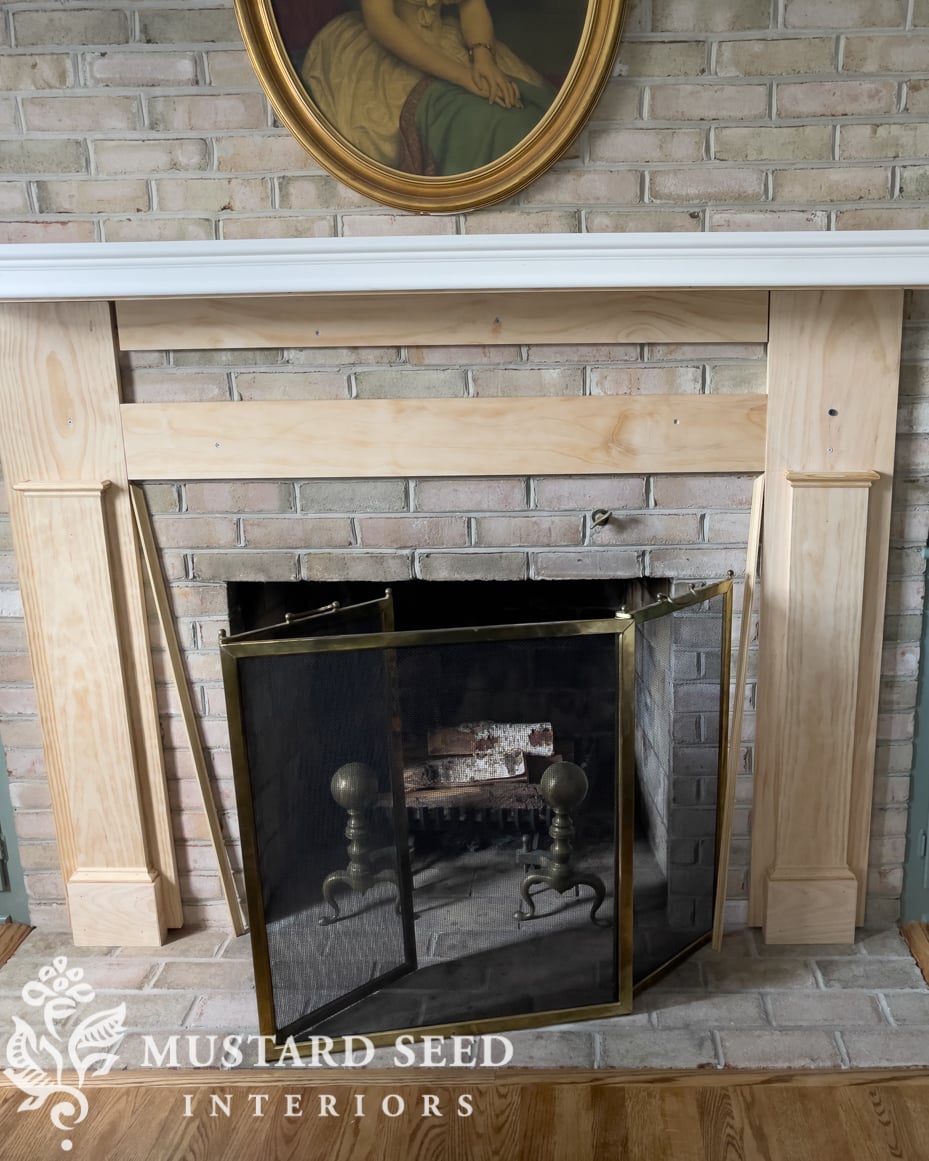
With the mantel shelf secured, we made sure the mantel legs (side pieces) were properly placed and plumbed and then attached them to the brick with tapcon screws. Those are screws made for cement and brick. After Jeff installed the boards, he asked me how they looked. “They look good! Well, it looks stupid right now, but it will look good when we’re finished.” I mean, at this point, it did look like a homemade mantel and not in a great way, but there were a lot more pieces to come to make it look like an antique-style mantel. We just needed to get the foundation in place to build on.
Since the header of the mantel was going to be covered by another layer of wood, we were able to install two smaller pieces of wood. We just needed something to nail into. We also cut those boards to size, made sure they were level, and attached them to the brick with tapcon screws. I wanted Jeff’s help with building the foundation, but I have done a lot of trim work over the years, so I worked on trimming things out the next day.
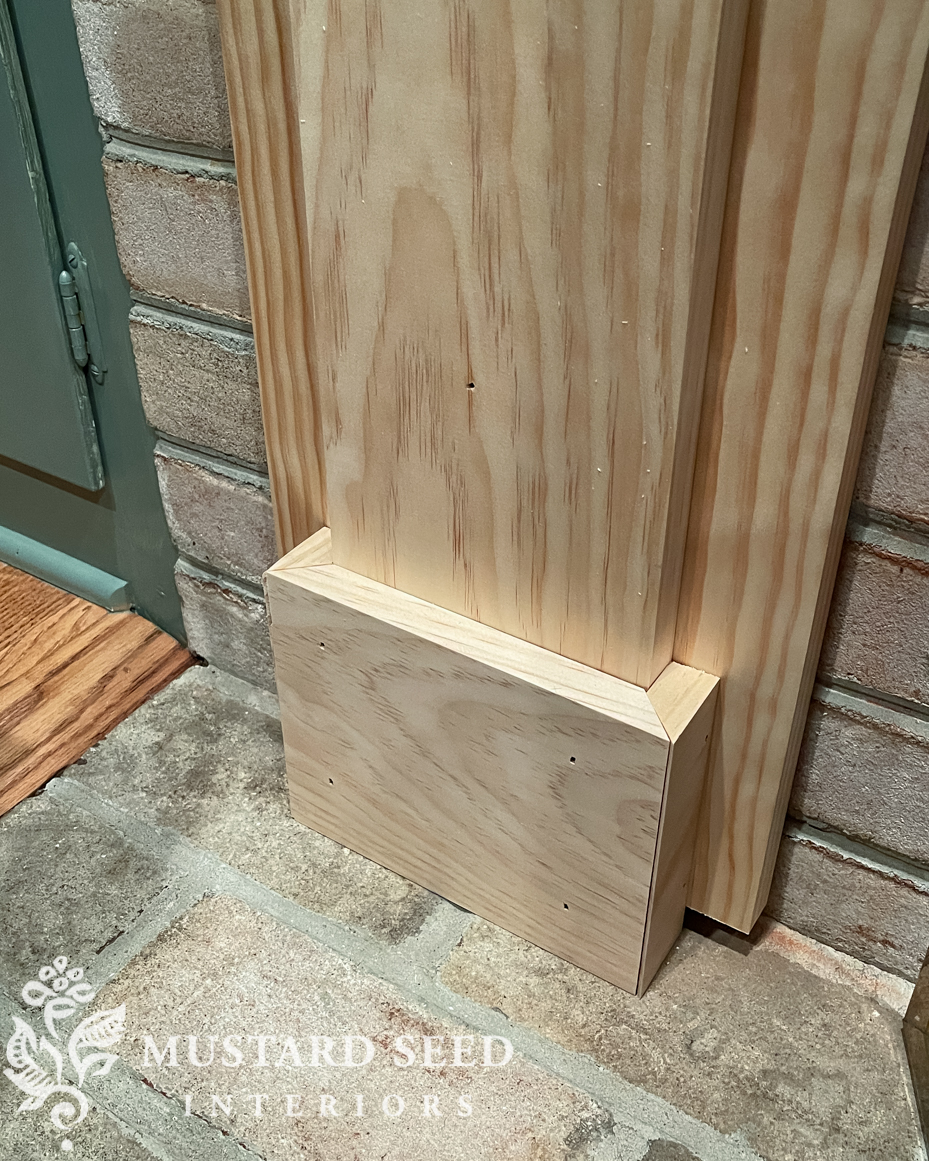
The base of the mantel legs was a 1 x 10″ board and we stacked a 1 x 6″ board on top to give them more dimension. I built a plinth on the base of the mantel legs with a 1 x 6″ board.
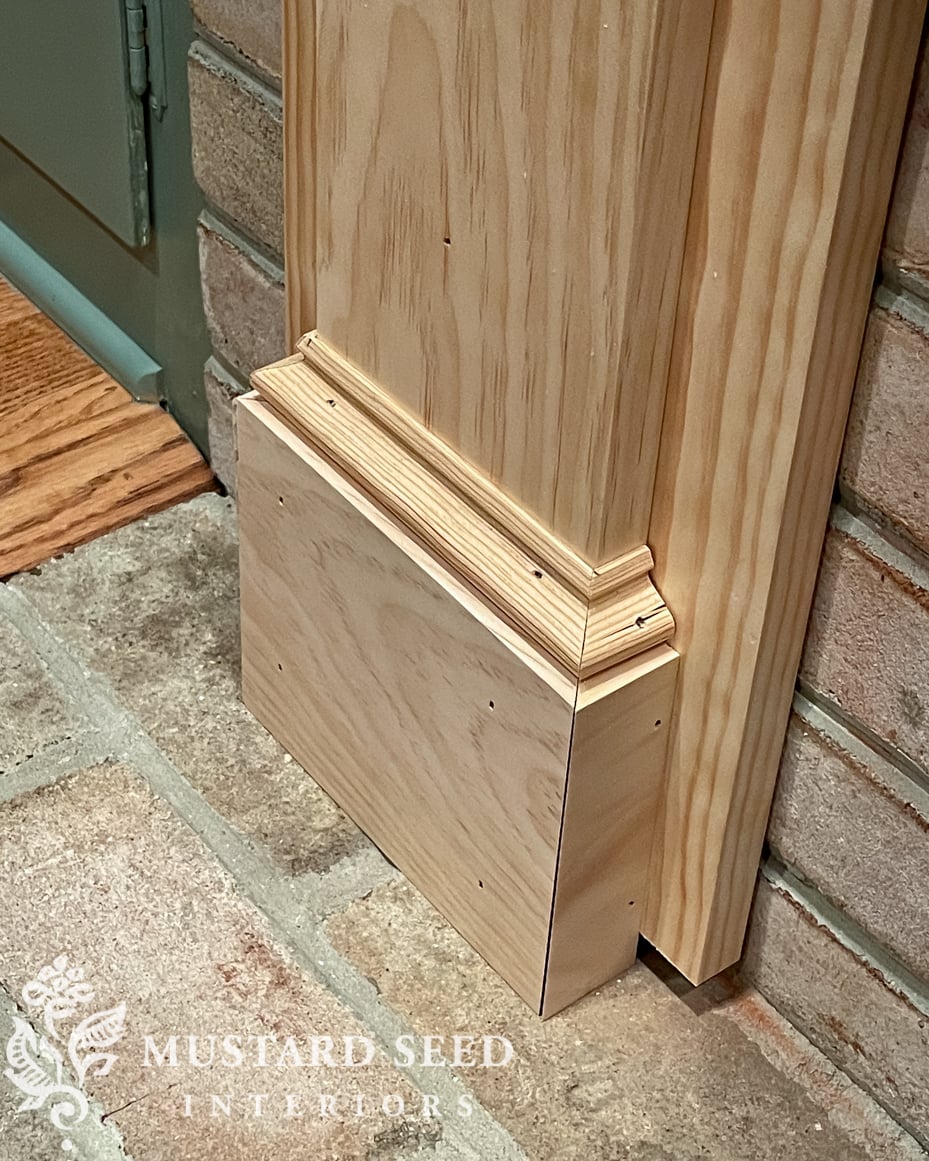
…and then trimmed out the top with a piece of molding.
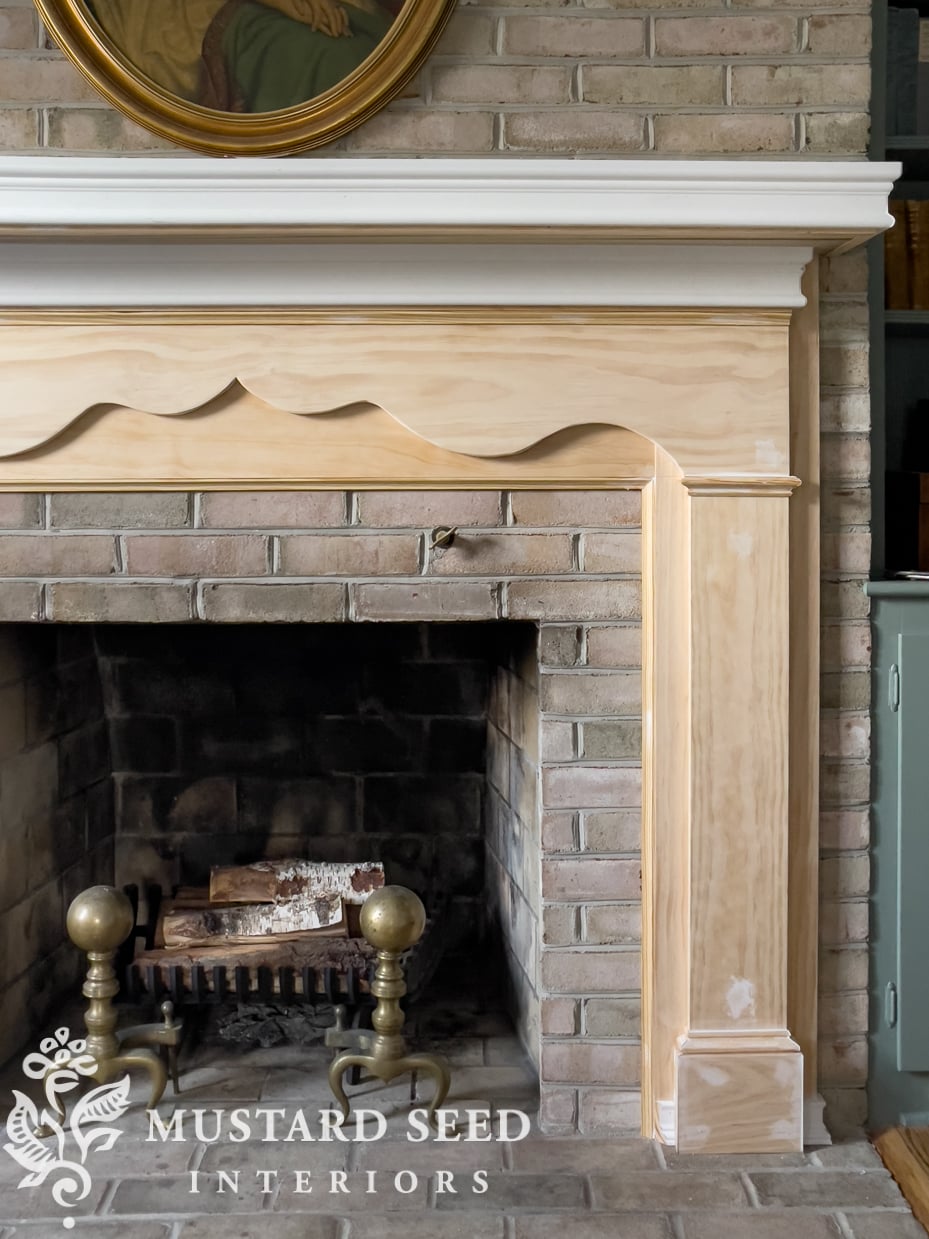
I also added a piece of molding along the mantel shelf to give it a bit more detail. If it’s going to be chunky, I wanted it to have a bit more detail. You can see how even the addition of those design elements made a big difference! It was starting to look more like the antique-style mantel we were going for.
I added the same trim to the top of the mantel legs as well to match the inspiration mantel.
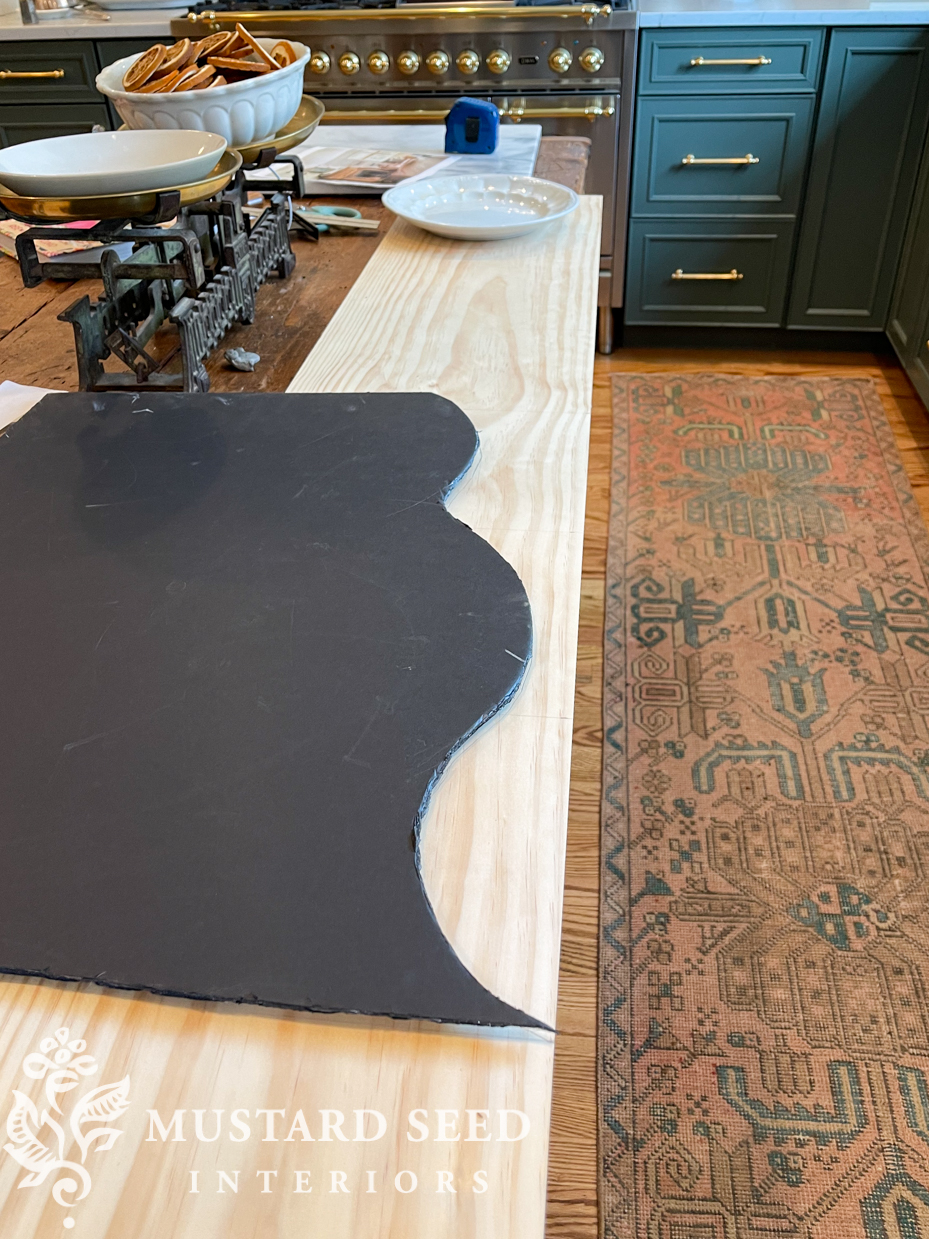
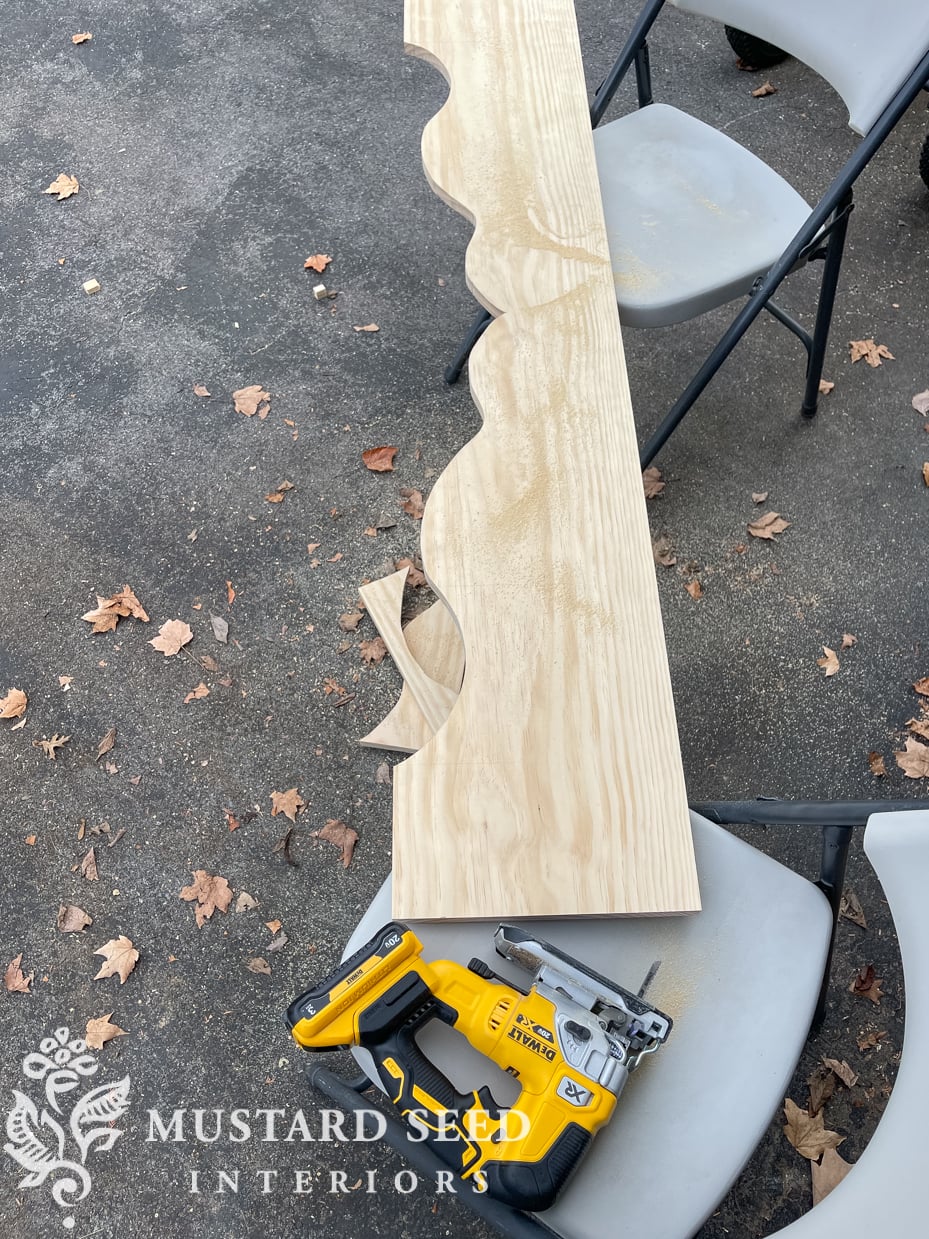
The header board with the curved detail was going to be the biggest challenge. First of all, it was a $50 piece of premium pine, we wanted to make sure our cuts were spot on. Also, if you look above the right mantel leg in the picture above, you can see that one of the tapcon screws is popped out a bit. The screw wouldn’t go in anymore and, since the board was secured in the brick, we didn’t want to remove it. We decided it would be better to just make a little recess for it to fit in. Jeff helped me cut the board to size and then I worked on making a template for the curved detail. I played around with some different shapes and ratios and I eventually made a design I liked using an antique ironstone plate and the lid of my Staub dutch oven, which is an oval shape. I made half of the design on a piece of foam core board and traced it onto the wood. I then flipped over the template and traced the mirror image of the design on the other side of the board. I took a few measurements at key points to make sure both sides matched up.
I cut out the design using a jigsaw. THIS is the one we own. The cut was a little rough, so I sanded it with an orbital sander to smooth out the cut line. Overall, I was very happy with how it turned out.
We installed the curved header board and some additional trim along the inside of the firebox surround, under the mantel shelf, and around the base of the mantel legs.
I caulked the seams and filled in all of the nail and screw holes with wood filler. It still looks a little disjointed at this point, but primer and paint will bring it all together.
I can’t wait to show you how our handmade antique-style mantel turned out not to mention the Card Room Green walls, beams, trim, and built-ins. It was all a lot of work, but I love the way it looks and now I get to decorate it all for Christmas…


49 Responses
Bravo!
Does Jeff rent himself out ? :o)
Wow! I can’t wait to see the final results! It’s gorgeous.
👏👏👏👏
It looks wonderful!
It is STUNNING!!! Absolutely beautiful. I can’t wait to see it all decorated for Christmas.
It is beautiful! So unique, so you. So glad you went ahead with what you loved. I would love this in my home. In a heartbeat. I cannot wait to see it finished and the creation in your living room.
This is a home run ! I am saving this! I live in an American Four Square built as an Orchard tenant house in the early 1900’s so it’s lacking in ornamental details. The mantle is pretty ugly and my dream french curved marbled mantle is not really a good choice. This is a wonderful design! Can’t wait to see it finished.
Wow! This is just such a perfect look for this room and a huge improvement to a major focal point. Yay!!!
It looks just like I thought it would be. Y’all are so good. You can build anything. Better and are so generous with your gifts. I love it.
Wow, looks great! Good work, Marian, and kudos to Jeff. My husband is also a “human level”, too funny.
I love that you figure these things out the “old-fashioned” way, using household items like a Dutch oven lid instead of computer design programs. Nothing against those modern conveniences, but there’s something about using the “little grey cells”. Plus, I can’t afford those programs and I don’t like the free ones that I’ve tried.
Eagerly awaiting the reveal!
Always so impressed by your ingenuity and design style. I am looking forward to the reveal. Actually, I can’t wait!
I’m amazed at how talented you are with the carpentry work. I can’t wait to see the finished room. Will you be painting the brick, too?
It is just beautiful!
It looks exactly like I thought you would make it. Beautiful. Y’all are so smart, and do such good work. Thank you for always sharing your knowledge and inspiring us.
Your knowledge and talent are unending. I wasn’t sure you could turn this 70’s house into Marion’s Home.
I was so wrong, You’ve done it again!!! ❤️❤️❤️
I love it!
FANTASTIC!!! I predict that carpenters everywhere will soon be asked to copy this.
Just amazing!
It’s just gorgeous! You and your husband are a force.
Fabulous!!
This had to be such a rewarding project for the two of you to create together. It turned out beautifully and suits your fireplace and the room so well. ❤️ You made this DIY project look easy! And now I feel inspired to do something with my blank fireplace wall. 🤔
Wow – you nailed it. You are so lucky to have the talent to take on DYI projects, long with your spouse. The mantle is just perfect! The details are what makes this mantle special and what a talent you and your husband are. I love the fact that the two of you take on such great DYI for everyone of your homes. It is such a great way to personalize your home and can be assured on quality workmanship.
See this brings me back to my childhood and my dad. Growing up, my dad that that kind of person – he could make or built anything. He actually building the house that I grew up in, and our cottage on a lake in Northern Wisconsin. He never had any sons, so my sister & I helped him. Unfortunately he never really taught us how to do many things.
I have a real appreciation of your work, watching you take on these projects. I am well aware of the time and talent it takes to complete these projects. You are amazing!
I love that you are able to take on these kind of projects and when finished, they are so professional. You are a woman of many talents.
Keep up the good work!!
This looks just beautiful!! You are so blessed to have the skills to take on these DIYprojects and get them completed in short order.
Can’t wait to see the completed room. The curves you created reminds me of a fancy men’s mustache!!
The fireplace looks so pretty–even w/out being painted. I’m very impressed by your mitering skills and am looking forward to seeing the finished product.
Looks so sharp…thanks for the step-by-step instructions!
This makes me so happy for you! It looks gorgeous!
MMS! So glad you trusted your “gut”!! The mantel is a “forever” treasure. Enjoy painting and decorating!
Warmly, Diney on Mercer Island
Amazing job!
I have a very similar fireplace surround in my house but instead of a scallop center it has three window pane like structures. I love it and yours is just as gorgeous. Cant wait to see it completed
I can’t WAIT to see the finished room!!!
Gorgeous! Looking forward to seeing the completed room. Well done!
Oh my glory!!!!! I am SO SO SO SO glad you chose that one. It really stuck out so very superior to the rest. Marian, you guys did an amazing job. It is GORGEOUS and I can’t wait till it’s all painted and see it with its surroundings. Oh I absolutely adore it. WELL DONE! It’s going to be a beautiful thing decorated with stockings and winter delights.
Just wow. SO happy for you.
I’ve been patiently awaiting an update on the mantel! I too am looking forward to the final ‘reveal’, and it’s clear you’re looking forward to sharing it with us! I think that it’s turning out beautifully…thanks to both of your skills, vision and ‘leveling skills’ ! So happy that this final piece is coming together in time for Christmas!
Love!!
WOW! You and Jeff are an amazing team! I love saving these types of posts for “someday”. We may never do this exact mantle, but it gives my hubby to see, when I start dreaming. 🙂
It’s perfect!!!
It’s FANTASTIC! Been anxiously awaiting the reveal!
Somehow I thought you bought the perfect antique mantle so was surprised to see you create one from scratch. It’s definitely a WOW! I did something similar in my more modest Living Room and I loved doing it and how it looks. And I love yours, too.
Good job!
what a joy to work so well together as a couple!
and how exciting to have a vision and make it happen together 🩷 It looks fantastic unpainted and will be sooo perfect painted
You are incredibly talented!
Such a job well done!
Just beautiful!!!
I am so impressed- I read your post twice, pored over the pictures, and thought these projects you take on should be featured in your next book! Love your mantel!
The mantle is beautiful.
You must feel so accomplished.. the mantel is beautiful already! I, too, thought you had bought the mantel for this fireplace.. what did I miss?
OOh the sneak peak of the curved wood just sent me swooning. I love how it turned out. Bravo. Looks like it was always there.
I had to laugh about the style of the mantel being your first choice…when we were looking for hardwood flooring, we went all over town looking at options, and saw a lot of different products, then we realized we loved the first ones we saw… we are also doing a gas insert and will need to build a new mantel…love what you’ve done!
I love it! I can’t wait to see the finished product. How wonderful that you’ll have it done in time to decorate for Christmas. It’s gorgeous!
Didn’t realize you picked that one and thought to myself. The first one is the ONLY one I would pick. Can’t believe you picked my choice but it’s just the most perfect one. So cottage yet different! Perfect choice and of course your decorating for Christmas is your reward for such hard work. Wouldn’t have said anything if you chose differently but cudos for picking that one! Enjoy the holidays!