

I confessed on my Instagram Stories earlier this week that I still had my white lights and greenery hanging up outside. As in Christmas lights and greenery. I think mid-March is past the line of Christmas decor looking wintry and acceptable! But, it’s been cold and snowy and, when it’s been warmer, I haven’t wanted to spend my time taking down Christmas decor. Anyway, it finally happened today! The funny thing is that I had it built up in my head as this big, annoying thing I had to do and it took less than 10 minutes.
So, with the Christmas season now officially over (or way beyond over), I decided to dust off an old Easter project I did years ago. I was introduced to Pysanky, or traditional Ukrainian eggs, by my dear friend Shari. She was the perfect friend for the stage of my life when I needed a mentor. Her family had bought a farm and, since I was living in my in-laws basement, I was eager to help them with fixing it up. Jeff and I spent most of our weekends at their farm and it was such a sweet time. Anyway, she was a homeschooling mom of four kids, so she was always looking for something creative to try. She found Pysanky egg dying, which was a perfect way to use up their abundant supply of farm-fresh eggs from their chickens and ducks. She knew it would be right up my alley, so she invited me over to join in on the craft.
Pysanky eggs are decorated with an intricate wax detail and then dipped in dye. Traditionally, the egg would be waxed and dipped in stages, so the result would be a detailed, multi-colored design. I made simple two-color eggs as well as more colorful ones. I enjoyed the process so much that I bought my own dyes and supplies and I have made them a few times on my own since.
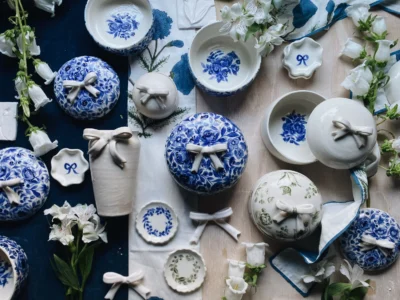
Each time I cleaned out my craft supplies, the egg-dying supplies made it through the cut. I’m glad I held onto them, because I thought it would be fun to make some blue & white eggs and share how to make them with my blog readers.

SUPPLIES NEEDED:
- Candle & matches (or lighter)
- Eggs (White, farm-fresh are best, because some “grocery store” eggs can have a residue/coating on them that prevents the colors of the dye from getting as rich. I used grocery store eggs for this, though, and they worked fine. It is fun to play with green and brown eggs, too, but that can throw the color scheme off, if you want white in the design.) Buy lots of extras, because eggs will break!
- Egg blowing kit (You can find one HERE and This can be done just by blowing on the egg, but I’ve done it before and a egg blowing kit is a much better option!)
- White vinegar
- Medium-sized nail or needle
- Pysanky egg dying kit (THIS is the one I have.) It includes dyes, design ideas, three delrin kistky (the small holders/pens for the wax), and beeswax
- Glass jars for dyes
- Spoons (for handling eggs)
- Egg crate for drying

STEP 1:
Gently puncture the top and bottom ends of the egg with a nail or needle.

Stick the long yolk-puncturing tool through the top hole and stir around raw egg. (You could use a paperclip as well.) It’s important to break up the yolk, so it can be blown out of the bottom hole. If you don’t break the yolk, the egg will break when you try to blow it out. Ask me how I know this.

Blow out the egg and rinse with water. Pat dry with a clean towel.

Make sure to collect all of the blown eggs in a safe place, because they are fragile!

As an aside, traditional Pysanky eggs are actually not blown out. They are dyed raw and left to dry out, which will happen after about a year. You can hear the dried yolk rattling around inside the egg. When I first dyed these eggs with my friend, that’s what we did. Our eggs did start to smell, though, and my cats had a field-day with them. Try cleaning rotten, dyed, stinky egg out of your carpet after your cat “killed it”. So, I now blow them out.
STEP 2:
Make the dye in glass jars with lids (you can store the dye for a while to use again). Follow the instructions on the packets, but mine needed to be made with boiling water and it needed to cool before adding 1 T of white vinegar to get it ready to use. I prepared my dyes first and gave them a chance to cool while I worked on the eggs.
STEP 3:
The designs are drawn on the eggs in wax, using these small wax holders/pens. The different colors are to indicate different sizes. The wax will come out in a thicker line in the larger one, finer line in the smallest. In my set, red is the biggest and white is the smallest.

Fill the open end with beeswax.

Melt the wax over a candle flame.

Draw your design with the wax onto the egg. You can pencil your design first, if you want, or just go for it. I kept my designs pretty simple and repetitive, so I didn’t draw the designs first.
Anywhere you put wax will be white and the rest will be dyed the color you use. If you’re using multiple colors, you want to dye from lightest color to darkest. For example, if you want your design to be white, yellow, dark green, and black, apply the wax where you want the egg to be white first. Dip it in the yellow dye and apply wax where you want the egg to be yellow. Dip the egg in the dark green dye and so on. Sometimes an egg will dye in just a minute or two and, for other colors, you’ll want to let it soak for 10-15 minutes. The colors can get fully opaque, if left in the dye long enough.

It does take a little practice to draw holding the tool at an odd angle and to control the flow of wax. In some ways, it’s like trying to write with a quill and ink! I just go with it, though. Sometimes I get a big blob of wax where I don’t want it, but I just carry on. They don’t have to be perfect and they can be as detailed or as simple as you want.
As another aside, I tried using the melted paraffin wax that was collecting in the candle, but it doesn’t seem to stick as well as the beeswax.

STEP 4:
Dye the eggs. Since the eggs are hollow, they will float. You can use a spoon or smaller jar to hold them down in the dye. As I mentioned above, most of the dyes, especially the darker ones, can get fully opaque if the egg is left in long enough. I didn’t care if the blue was opaque on my eggs, so I dipped them in and turned them over a few times, before taking them out. I used a mixture of Royal Blue and Black dyes to make an indigo color.

Set the eggs in a carton to dry. You can also use a board with nails pounded into it as a “drying rack”, but that’s only if you’re making a lot and want to get fancy. My friend’s son made one when we were dying eggs and it was handy, but the carton works fine, too.
I didn’t “plug” the holes in my egg with wax, to prevent the dye from getting inside. I just let them drip out the excess dye as they were drying. Plugging the holes is an option, though, and it keeps things a little neater.

Once the eggs are dry, put them in a 170 degree oven to cook off the wax. I put mine in a glass baking dish on tin foil, to catch the wax.

Buff the egg with a paper towel to remove excess wax and it’s done! You can spray it with a glossy polyurethane, if you want or they can be left unfinished.
Put them in a bowl or string them on a piece of ribbon or twine to hang on an Easter tree or make a garland.

You can see that my designs aren’t perfect, but that’s okay. They really don’t have to be to look lovely. And, when you’re drawing with wax, you just do the best you can!

If you asked me if this was a kid-friendly project, I would’ve said, “no”, except for the fact that we did these eggs with my friend’s four kids and a couple of them were quite young at the time (maybe first or second grade.) You do have to use caution with the candles and the fact that you’re drawing with hot wax. The eggs, of course, are easy to break. And there are the dyes, which will dye your fingers for a few hours and they certainly will dye clothing, carpets, etc. if they are spilled. So, just be aware of all of that if you’re thinking about doing this with the kiddos.
I think this is a better girlfriend’s “crafternoon” kind of project. It really is fun doing it with others, though, so you can see how their eggs turn out and you can chat while you’re working, since some of the designs can get tedious.
The result is really beautiful, though, and these eggs can be stored and used for many Easters and Springs to come.

![]()
Disclosure: This post contains affiliate links.


51 Responses
Absolutely lovely! No one does “blue” like you.
I agree, Betsy. Prettiest blues, ever!
These are beautiful Marian. I remember blowing out eggs in like 3rd or 4th grade, at a friends house. We decorated them with paint and beads. It was a lot of fun. Thanks for bringing back that memory.
My kids have been doing Pysanky eggs for years now. I’ve actually never done it myself (Spring cleaning); just watched the kids do it. My older kids’ eggs were often quite beautiful; my younger ones, sometimes more like abstract art. They always had a lot of fun doing it together. I considered the mess all part of the fun and learning. None of the kids has ever burnt themselves (the wax is not super hot and there’s only a small bit in the stylus) or set anything on fire. It’s a fairly low-risk activity with minimal adult or teenage supervision. Save the blown egg mix for Easter quiches. You can freeze the egg mix for future use too.
I feel the same way, but wanted to note that it might not be for all kids. I don’t think my boys would have the patience, but I know some kids would really tune into this sort of thing.
I just ordered everything on a whim….all or nothing that’s my style….because your eggs look SOOOOO beautiful! Thank you again for the inspiration….your images are so inviting!
Oh, you will love making them and you’ll be great at it. It’s a fun, therapeutic artistic activity. 🙂
OMGosh!!! Amazing!!! Some of these colors match your linen dress from the island of Santorini!!!
Yes, they do! I wore that on my Florida trip. I love that dress!
These are beautiful works of art! I’m just curious if you’ve ever read the children’s book Chicken Sunday by Patricia Polacco. It’s a wonderful story and Pysanky eggs play a big part!
Love your eggs! I have made a few and have dozens that I purchased in Slovakia, the Czech Republic and Hungary. It’s a beautiful craft! I’d attach a picture if I could.
Your posts never disappoint! I’ve only been following you a short while but I love how you seem to dive into many different styles of projects, you bring to life all the millions of different ideas I have rolling around in my head. Thank-you for being who you are and a real inspiration!!
I love white lights all winter long, so I say you have perfect timing, as you may get more snow ,lol
These are gorgeous, but I doubt I could do them as beautifully! You are an artist in all you attempt!! But then again, even that inspires me to at least try! I think there’s an artist hiding in all of us waiting to be uncovered!
These are really so gorgeous! I so love the color, and the patterns alook awesome altogether!! Thank you for yet more inspiration!!
These eggs are beautiful and I want to make some. Wondering if bisque eggs could b used, eliminating the need to blow eggs and the risk of breakage.
I’m about to spend Spring Break with 4 of my grands and think this will be a perfect craft to try.
Thanks for sharing!
Have a Blessed Easter. He is Risen!!
Brings back memories of my late husband who was first generation Ukrainian. My morher-in-law would give me a beautiful pysanky egg every Easter. I still cherish them and display them all year.
When I saw this post, I immediately thought of Ukranian eggs given to me as a gift years back. What a lovely memory of your husband. 🙂
Marian..like everything you do..these are gems♥
These are beautiful!
Commercial Easter Egg dyeing kits often come with a clear crayon that you can use to do the same type of resistance dyeing. Obviously, it doesn’t let you get as detailed, but it’s a nice way for kids to do it and not have to worry about the candle and hot tools.
I just did a quick Google and it looks like you can even get beeswax crayons, which would melt-off better.
Perfect!! This is the exact blue that I need for my living room. I never thought to mix the blue with black… you are the queen of color! Love these so much!!! Thank Marian!
These are so beautiful! I’m in the middle of getting ready to move so I can’t make them this year, but I’m pinning this so I can do it another year. Thanks so much for sharing. I absolutely love your blue and white designs. LOVE.
I was thinking the same as you, Justin, in regards to a wax crayon. And, as to not blowing out the eggs, I have some from the late 60’s that my father and I hand painted with tempra (sp) paints. You can still hear the marble like yolk when you shake them. The ones he painted are works of art.
How do you hold the egg while covering it in hot wax designs without smearing it all?
the wax cools very fast so it doesn’t smear. I’ve done these since i was a child and have introduced my grandchildren to this art, it’s part of my Ukrainian heritage.
Gorgeous!! LoVed learning this process.
So Beautiful!!!!
Fascinating! Your work as always is exquisite. I don’t have the patience, but I was wondering this: are the eggs’ yolks/whites actually usable once blown out? Assuming you are using clean tools, of course.
Bravo! The operative word is “fragile.” I enjoy the German custom of hanging decorated (empty) egg shells from soon-to-flower tree boughs & brought back a supply of hand-painted egg shells from then Czechoslovakia. Alas, kitty paws & multiple moves finished them off. I changed over to hand-painting the dime-store plastic eggs (the kind intended to be filled with candy). I buy them “on sale” after Easter and use craft paints to decorate them with flowers, lots of “gold” drapery and lace, etc. Not as lovely as true Pysanky or the Czech hand-painted eggs, but a LOT sturdier. Your Pysanki are especially beautiful with your colors.
Oh, Marian! What wonderful memories! Those times together were so precious to me! Your tutorial reminds me how much work the Pysanky eggs were! But , oh, we had such a good time making them! Love the blue and white eggs. They are just so you! I love keeping up with all that you are doing. You are one busy Momma! I miss you so much. Give your family my love! Levi and Jenna live not too far from you now. Maybe we can get together next time we’re up there. Love you!
One question: what would happen if you blew the eggs out AFTER you dyed them? Would it work? I was just thinking they might be sturdier to work with if still heavy and full?
These are beautiful! (I call that indigo “Marian-blue” whenever I see it now!). I am going to try this.
Lovely eggs and so unique! Where can I find these tools and the device used to blow out the eggs? While it’s too late for Easter, I still like to use eggs for my Spring decor.
I remember as a kid watching my mother blow the egg out of the shells, her face would turn as red as a beet trying to get the egg out. She would do enough to make an “egg” tree, at least a dozen. I honestly thought she was going to blow her brains out. Funny memory for me, for mom…….not so much! Your eggs are beautiful
Your eggs are beautiful, but I have to comment on the white lights, greenery and snow. When we lived where the world was covered in snow from December through April, I had a “snowman tree” I left on the covered porch and lit every night. It brightened my spirits many a night to see the warm lights in the darkness and was great fun by day. I hope your boys are enjoying the snow, my children miss playing in it!
thnaks Marian Parsons, for such type of post
l enjoy it Marian Parsons thanks
These are quite beautiful eggs! My fondest memory from my childhood was dying eggs at Easter from my great-aunts pet goose. These eggs were huge and so much fun to dye.
Marian, thank you for this post. I can always count on you for a fresh take on tradition! I have loved pysanky eggs since I first saw them as a teen. I think I am going to have to get the kit and try my hand at this, now. I think I will try it with my nieces and grands. Sounds like fun!
Those are gorgeous! Hobby lobby once sold ceramic eggs… I used food safe paint to decorate/ color them for her Easter bread she makes… I wonder if they still sell those and if they would work for this type of decoration too…
Whoooa! This is so fabulous! What you show is wonderful *.* I must also do this: D
These are amazing (I call that indigo “Marian-blue” whenever I see it now!).. I am going to try this.
Looks good. I tried this too, couldn’t do as good as you though.
Looking Good, Will try it out and thank you very much.
Thanks dear, mouth watering while reading this stuff, I will try it today in my house for sure.
Oh wow, this is fantastic. I have recently started homeschooling my son, so this is definitely something we are going to do soon. They look brill.
so this is definitely something we are going to do soon. They look brill.
Amazing Article sir, Thank you for giving the valuable Information really awesome.
Thank you, sir
Cheers!
WHATSAPP GROUP JOIN LINK LIST
Good post. Thanks for sharing
indigo pysanky egg tutorial I Love This Post, And This Blog Very Nice Blog
This Post Is Very Informative I Love This Blog
I love these! Will have to give it a try.