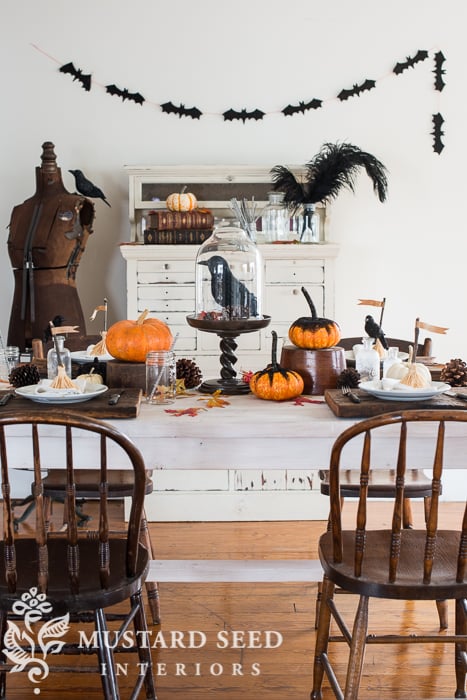
Preorder Move Slow & Make Things, and enjoy a collection of thoughtful bonus content created just for you!

Tutorials

Photography

improve your photography…

I’ve been planning on writing this post for a while and I kept forgetting about it in favor of sharing a furniture makeover or some progress we’re making in the studio, but I was reminded of it as I was shooting pictures of a home for Cottages & Bungalows last Thursday.  I’ve had “real camera crews” come shoot rooms in my house before, so I felt a little unimpressive showing up at Heather’s door step without a ton of fancy gear, scrims, umbrellas and suitcases full of flashes and lenses.  I had one camera bag, one circular reflector/scrim that was $11 off Amazon and a couple of lights we use for videos.  We didn’t look fancy, but we got the job done! So, while I was shooting, Heather noticed that I was zooming in on each picture on my laptop and she asked why I was doing that.  I went on to

Read More
Before and Afters

victorian settee makeover reveal

I shared a preview of this makeover yesterday, but here is the full sha-bang (that’s a highly technical decorating term)… This isn’t a typical piece for me to buy, but as you may have figured out already, I like to change things up, so I don’t get stuck in a rut.  Buying a piece of furniture that is atypical for me helps me with that.  Sometimes I love the piece and then I want to explore that style more.  Other times, I enjoy working on the piece, but I don’t fall in love with the style.  I really like how this turned out, but I’m not sure you’ll see a lot of stuffy victorian settees here. This is how the piece started out…   It was one of the messiest pieces I’ve ever worked on…shedding grass and old burlap every time someone brushed passed it or breathed near it.  The fabric

Read More
Artistic Endeavors

milk crate & a peek at the settee

When Kriste and I went shopping last Friday, I was looking mostly for pieces to sell at the Chapel Market, but I was also looking for one specific piece for a specific photo shoot – a milk crate.  I didn’t have a particular style in mind, but I figured I would know it when I saw it.  And I did.  Kriste and I spotted this beauty and there was a silent acknowledgement at the awesomeness of the milk crate.  Maybe there was a slight gasp, but words didn’t need to be exchanged.  I turned it around to look at the price.  It was $59.  I cringed.  That’s a lot more than the $20 range I had in mind. I looked up at Kriste, “It’s $59.  Do you think that’s worth it?” “Oh yeah.” “Yeah.  I thought so.” I’ve learned in my years of hunting for antiques that sometimes it’s better

Read More
Hand Painted Furniture

the jelly cupboard | distressing & antiquing

As a recap, this is how the jelly cupboard started… It looks like wood grain, but it was actually painted brown. I painted it in MMS Milk Paint Artissimo without the bonding agent added.  The previous coat of brown paint wasn’t glossy, so I expected the milk paint to adhere pretty well.  It chipped in just a few places, which was perfect. The jelly cupboard had amazing texture on the finish and I wanted to bring that out by using two different blues and distressing.  To make the distressing process easier, I rubbed the surface with our natural beeswax puck.  You can use any kind of beeswax or candle wax you have on hand for this technique. I also rubbed the edges of the piece, where the paint would naturally wear away.  When using the wax puck between layers of paint, it acts as a resist.  It makes it easier to

Read More
Photography

process of styling | part two

If you missed the first post on my styling process, you can find it HERE.   In this post, I’ll talk through how we styled this hand painted piece as a buffet as well as sharing my camera settings. This is where I started with the styling… I’m shooting in my studio and I am working with a white wall as a backdrop.  I like shooting against white, but it feels a little stark without anything on the wall.  I used wooden breadboards to add height and warmth.  The wood chairs tie into the wood of the boards.  The white ironstone suggests this is a buffet and the green moss adds some color.  I was pretty happy with the way it looked, but called Kriste over for a second opinion. She felt like the casserole was getting lost on the white wall, so she moved the breadboards over.  We also

Read More
Decorating

process of styling

I’ve been asked to share my thought process for styling a photo shoot, specifically with a piece of furniture, and this post is in response to those requests.  I think styling is something that is hard to teach, because it is an art in itself and is based so much on personal taste.  As I walk you through my thought process on styling this piece, you might like one of my “rejects” better than the one I liked and that’s okay.  I’m hoping that through sharing my thought process, it can help you think through your own process, so when you’re styling shots you can be more intentional with your choices. The first thing I learned is that I am much happier with my shots when I take my time.  This means putting the camera on the tripod and connecting it to my computer.  This is known as shooting “tethered”.

Read More
Hand Painted Furniture

empire buffet project | white waxing

I spent some more time today on the empire buffet.  If you missed what this piece looked like before and how it got to this stage, check out PART ONE. So, we last left the piece with the top stripped off the finish and the body painted in one coat of Shutter Gray MMS Milk Paint with the bonding agent added in.  Since milk paint is thinner than most modern paints, the coverage can be streaky in the first coat if the paint color your using is drastically different than the surface you’re painting.  In this case, I was painting a really dark wood with a medium gray paint, so it wasn’t going to cover in one coat. This is the stage where some people lose heart… As with most multi-step furniture painting projects, it looks worse before it looks better.  I’ve said it many times; do not give up

Read More
Artistic Endeavors

adding casters to the counter

A couple of weeks ago, I found this amazing antique counter on Craig’s List.  My mom and I cleaned it and then I sealed the paint to prevent further chipping. I want everything in the studio to be very easy to move, so we have a lot of flexibility with the set up and I can scoot things around by myself without shredding the floors.  So, my dad came to the studio yesterday to put casters on the counter.  We thought we might need to build a frame underneath to support the casters, but when we flipped it over, we saw that the wood was thick and in good condition to accept the screws required to hold the casters in place. Adding casters was as simple as lining the caster up and screwing it in. I bought some vintage casters, but we ended up using new ones, so they would lock

Read More

I’m Marian, a painter, writer, and lover of all things creative. From art and antiques to home projects and everyday life, I share my journey in hopes of inspiring you to embrace your own creativity and make beauty in the spaces you live.

next art sale

May 20th, 2026 at 1pm EST

Now Available for Preorder

Move Slow & Make Things

A book about creativity, intention, and making things with care. Sign up to receive updates, preorder details, and exclusive bonus content.

From the Studio

Artful pieces for your home and everyday life.

From original paintings and art prints to Pup Club releases and curated goods, each piece is created or chosen to bring warmth, creativity, and character into your home.

From the Studio and Home

Shop the Feed

A handpicked collection of items styled and shared throughout posts, projects, and social feeds. Every product is thoughtfully chosen to reflect a timeless, collected aesthetic.

Recent Video

Spring Posts

Explore the Shop

Explore the Blog

Categories
error: Content is protected.

Pin It on Pinterest