Preorder Move Slow & Make Things, and enjoy a collection of thoughtful bonus content created just for you!

crafts

crafts

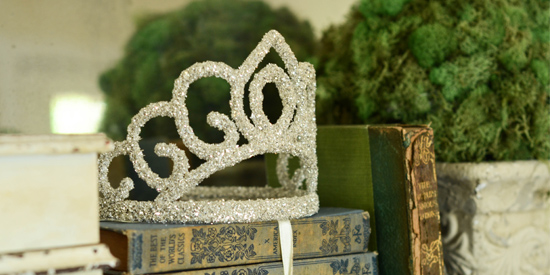
how to make glittery pine cones

 This project is simple, but I was so happy with how beautiful and elegant these glittered pine cones turned out that I thought I would share a tutorial on how I made them.     I bought these over-sized pine cones from Hobby Lobby, but you can use freebies collected from your yard or an obliging neighbor. Insert a small screw eye into the woody end of the pine cone.  I just twisted it in with my fingers, but you can use a drill or a small nail to create a pilot hole, if necessary.   I then applied some Elmer’s School Glue with a 1″ wash brush to the tips of the pine cone.  (I have no idea what those things are called and I actually Googled “anatomy of a pine cone” and still couldn’t find the proper name.)   For some crazy reason, I thought, “This must be what it’s

Read More
crafts

Glitter Crown Tutorial

German Glass Glitter makes almost anything better.  Well, except maybe not cheesecake.  Yes.  I can say with certainty that German Glass Glitter would not improve cheesecake one bit, but it makes a lot of cheap, plastic things look better.  Take this crown…   It started out as a $2.00 tiara from the birthday party section at Target.     I want to use the crown as a decorative piece, something a little whimsical and sweet for the holidays, so I plucked off the combs, so it would sit flat.     They pop off pretty easily.   I then removed the purple jewels, again, just popping them off with my fingers.   Your fingers can get pretty raw after repeating the jewel-popping and comb-plucking on four crowns, so I suppose gloves or pliers might be of use when doing a ton of these.     Ah.  It already looks better…    

Read More
crafts

crafternoon with emily

A few of the kids in our youth group have been firsthand witnesses to the entire journey of my blog.  Yes, they used to make fun of me and I’ll admit that the notion of writing a blog sounded a little dorky to me, too, until I got sucked in.  They tolerated me celebrating over 17 followers, they were excited for me when I had my first magazine feature, they watched my house as it’s evolved, they brought me furniture and antiques their families were getting rid of and they have helped me move furniture, strip chairs and glitter letters.  Last week, one of our former youth guys, Sean, who’s now almost done with college, brought his girlfriend to my house for a little crafting with “Miss Mustard Seed.”  Having played hours of X-Box and eaten many meals at our house, he has the hook up.  Emily is an Anthropologie

Read More
crafts

Pinwheel Tutorial

I posted these last week and was asked by several for a tutorial. I aim to please, so here it is! This tutorial is really from Mini Mustard Seed aka “Mini” aka Charlene. She’s my babysitter/nanny and helps me out with my business during busy seasons. She’s super crafty, so she makes most of my glitter letters and helped out a ton with the Christmas ornaments last year.  She brought a paper folding book home from the library one day and we both immediately spotted the pinwheel.  Sheet music…glitter…let’s mustardize these pinwheels. We’ve since made some out of vintage division flashcards, scrapbook paper and a vintage “Dick & Jane” book. (The Dick & Jane book ones are so cute, because of the soft colors.)   Here’s how to make your own… Supply list: 5/16″ dowel rod paper scissors paper cutter (optional) Elmer’s glue 1/2″ artist brush hot glue gun and

Read More

Wordsworth Pillow Tutorial

A few days ago, I got a new toy from Artograph and I couldn’t wait to put it to work.  I’ve been eyeing a light box for a long time, but it was always bumped down the priority list after lenses and sewing machines and other tools of my trade.  My new Artograph LightPad A930 arrived on my doorstep last week and I knew my days of taping things to a window to trace were over.  Can you hear the angelic choir?  I have loads of ideas for how to use this, but I started out with something simple.  A hand painted poetry pillow. I started off by selecting a pillow, fabric, poem and a font.  I chose the very last paragraph of a Wordsworth poem called “Intimations of Immortality from Recollections of Early Childhood.”  I printed it in a free downloadable font called “Jane Austin.”  Once the poem was

Read More

DIY Club Tutorial & a Tea Tin Makeover

I am honored to be a guest blogger today over at the DIY Club!  I was challenged with using some of their sponsored products to come up with a DIY project and this is the result.  Would you like to know how to turn a dated burlap shade and a “scratch and dent” Goodwill lamp into something unique and chic?  Check out my full tutorial over at the DIY Club.  On another note, I mentioned that Leslie brought me a bunch of goodies to makeover when she visited me at the grand opening of Wild Rose and Co. Marketplace.  One thing I spotted in the box was a vintage tea tin.  I didn’t take a before picture of it, but you know what I’m talking about.  I decided to give it a new life by painting over the label with chalkboard paint.  I love how versatile and updated it is, now.  This would

Read More

Book Bundles & Birds

I decided to share another very cheap and easy home decor project today.  I love the look of old books and I’ve been fortunate enough to find some cool ones on my thrifting excursions, but what if you can’t find any old books?  No problem.  Run (or drive) to your local thrift store and pick up a stack of hard back books.  I bought mine at Goodwill for $.97/each.  Try to find books that have yellowed pages and a bit of age to them.  Most of the books I found were from the 1980’s. Using an exacto knife, cut the bound pages from the spine and remove the cover.  Bundle the books together using twine and use for display.  (Just a tip – Don’t do this to your husband’s civil war book collection on a day you’re mad at him.) These neutral book bundles are a great way to decorate a book

Read More

Recreating Costume Jewelry

This project is super simple.  Like, “embarrassing that I’m even showing you how to make them” simple, but I’m going to insult your craftiness and post a tutorial, anyway.  I love vintage costume jewelry, but I’m not about to don my rhinestone clip-ons and mink shrug for a day of furniture refinishing.  (That image made me laugh.)  But, I find it a sad thing to leave them sitting in a jewelry box.  Why not use the clips for something else?  Clip-on magnets is what came to mind.  Gather broaches, clip-ons, belt buckles, pins and any other pretty sparkly thing you can glue a magnet to.  I purchased mine from a great yard sale for a quarter each.  Buy a roll of magnet from a craft store and cut the magnet to size.  I purchased mine at AC Moore for under $1.00.  Use some super glue or Gorilla Glue to adhere the

Read More

I’m Marian, a painter, writer, and lover of all things creative. From art and antiques to home projects and everyday life, I share my journey in hopes of inspiring you to embrace your own creativity and make beauty in the spaces you live.

next art sale

May 20th, 2026 at 1pm EST

Now Available for Preorder

Move Slow & Make Things

A book about creativity, intention, and making things with care. Sign up to receive updates, preorder details, and exclusive bonus content.

From the Studio

Artful pieces for your home and everyday life.

From original paintings and art prints to Pup Club releases and curated goods, each piece is created or chosen to bring warmth, creativity, and character into your home.

From the Studio and Home

Shop the Feed

A handpicked collection of items styled and shared throughout posts, projects, and social feeds. Every product is thoughtfully chosen to reflect a timeless, collected aesthetic.

Recent Video

Spring Posts

Explore the Shop

Explore the Blog

Categories
error: Content is protected.

Pin It on Pinterest