If you follow me on my Instagram Stories, you know that I’ve been working hard on my laundry room/mudroom over the past several days. It’s still not finished, but it’s well on the way and I thought I would share the details of what I’m doing and show you the progress. As point of reference, here is how the room looked before…

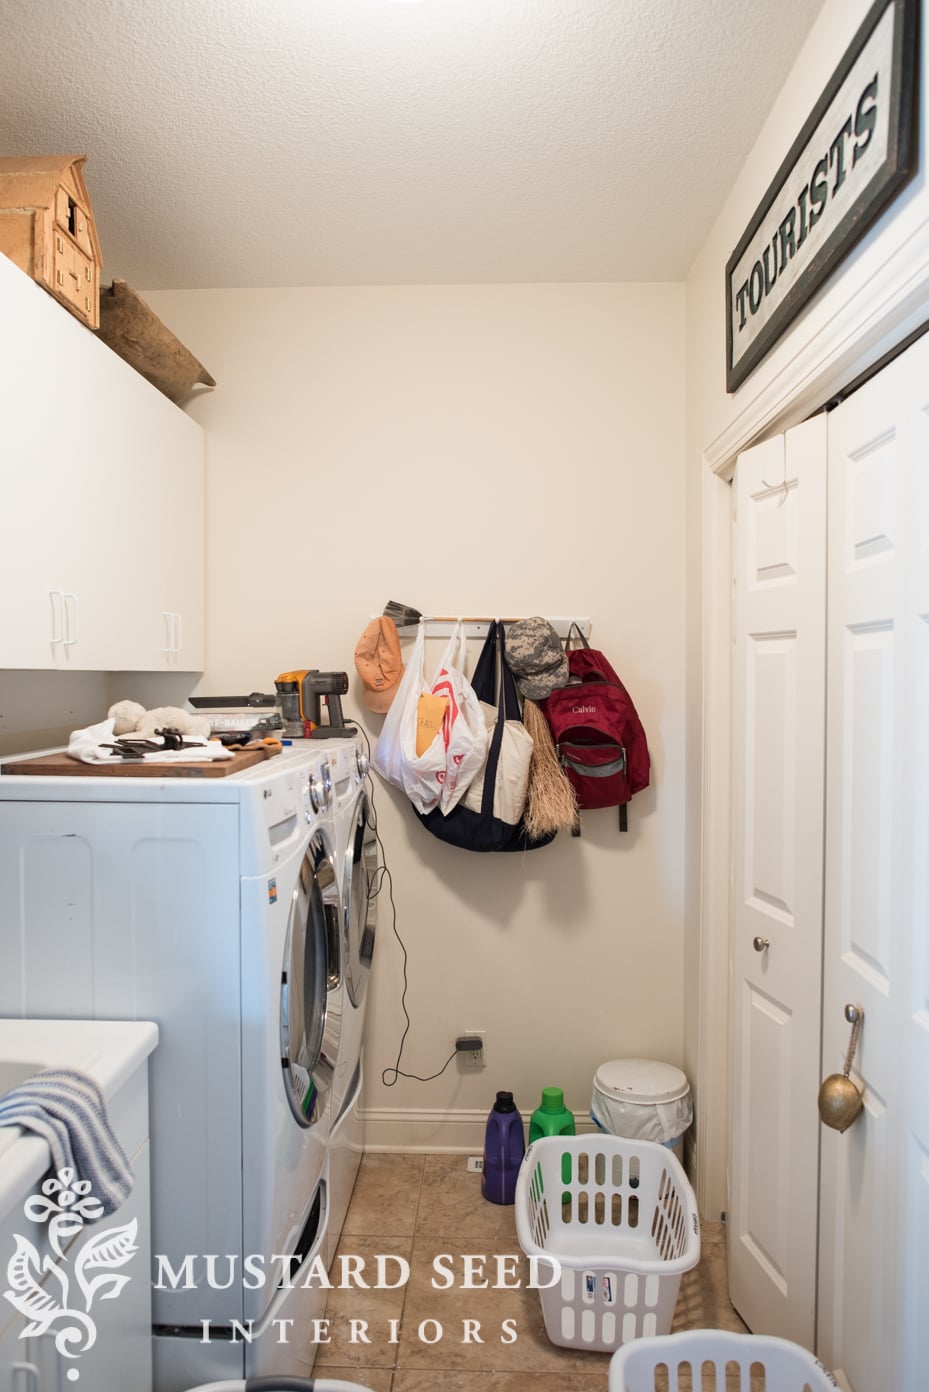


…and I use the word “room” very loosely. This is a small space that’s basically a hallway, closet, utility sink, and a place for the washer and dryer. My mom pointed out that it’s bigger than her laundry room, which is just a hallway with a washer and dryer in it, but it’s smaller than a lot of the mudroom/laundry rooms that you’re seeing in suburban family homes these days.
Despite it being a little tight when folding clothes, I love this space. I am throughly enjoying having a utility sink off the kitchen, just around the corner from my studio. With all of the painting I do, of one sort or another, it’s nice to have a dedicated sink to wash my brushes. I also like not having to schlep to the basement to do laundry.
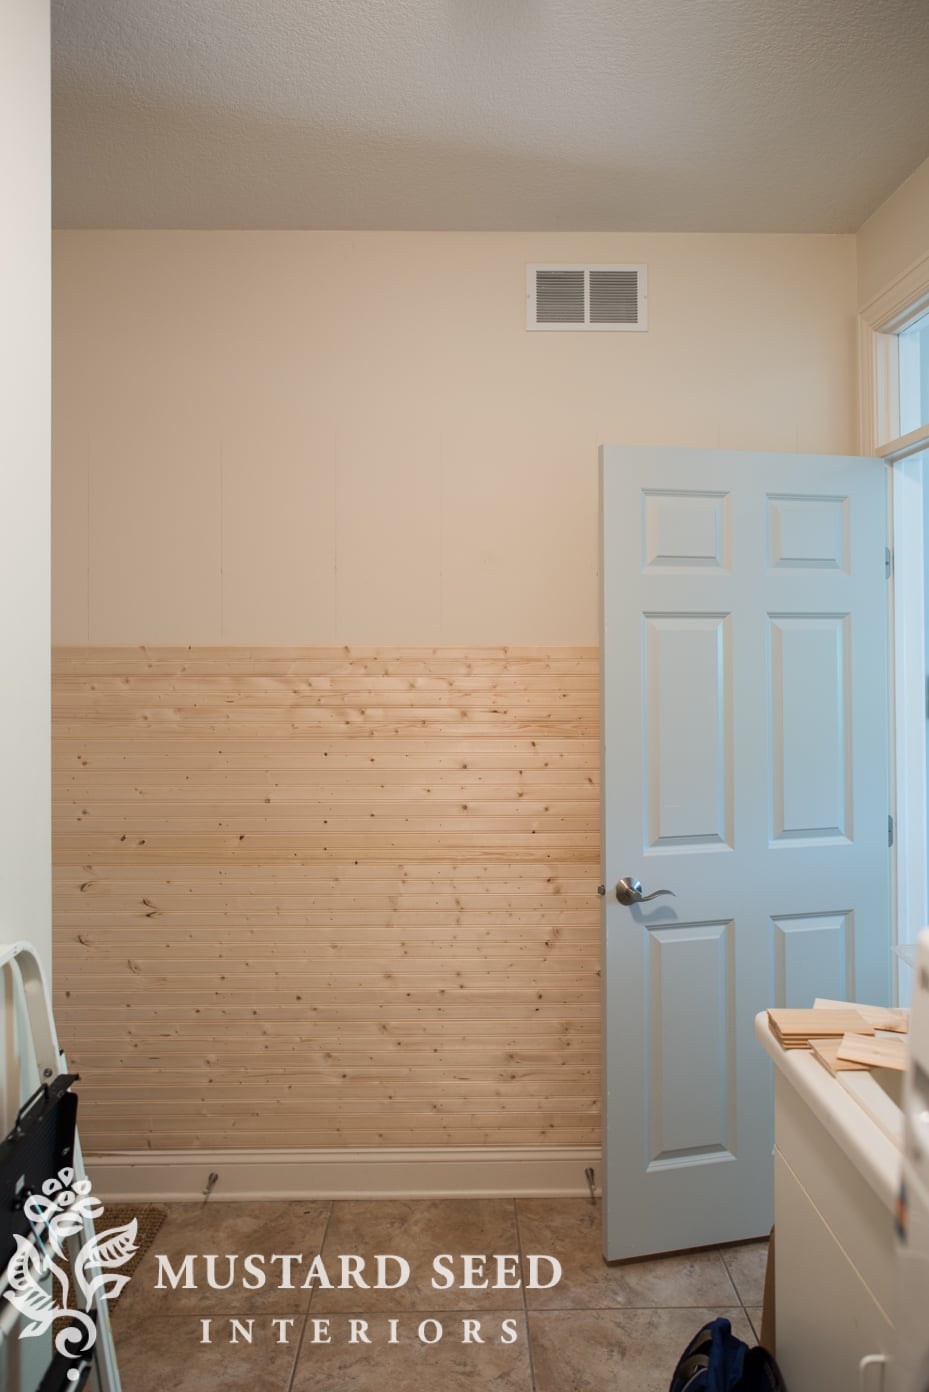
Originally, I wasn’t planning on doing much beyond painting to this space, but my wheels started turning as I was working on the butler’s pantry. The bead board was easy to work with and install. And, I thought, and beadboard would look fitting and pretty amazing in a laundry room. I talked myself into it and bought the materials.
As I thought about how I wanted to install it, I remembered an inn I saw online a few years ago – the Inn at Little Pond Farm. I was smitten with the woodwork used throughout the home. I decided to install my beadboard in a similar fashion, running horizontally except for the top portion of the wall.

Not only do I like the unique look and the horizontal lines will visually lengthen the room, but it is a design that’s easier to install, because it reduces the rip cuts along the ceiling. “Ripping” a board is when you cut it along the length of the board, which is best done on a table saw. We sold our table saw when we moved, so I wanted to avoid long rip cuts, if I could. With this design, I could make most cuts on our miter/chop saw and the rest with a Dremel Saw Max and Multi-Max, which are small, not-as-intimidating, power tools.
I shared on Instagram that I’ve been working on this project by myself and some may have wondered why Jeff isn’t helping me. Well, he’s been on an adventure – backpacking in Iceland with a good friend for the last 10 days! It would’ve been great to have his help and expertise for this project and it certainly would’ve gone faster with two people working on it, but the fact that I was flying solo gave me a lot more flexibility to work while the kids were playing with friends, push dinner back a little later, stay up working on it after the boys were in bed, etc.
When I first started working on the wall, I was certain I would be able to get to a point and then I would get stuck, like at a light switch or a rip cut above a door frame, but I kept getting past hurdles and I was able to get it all done on my own!


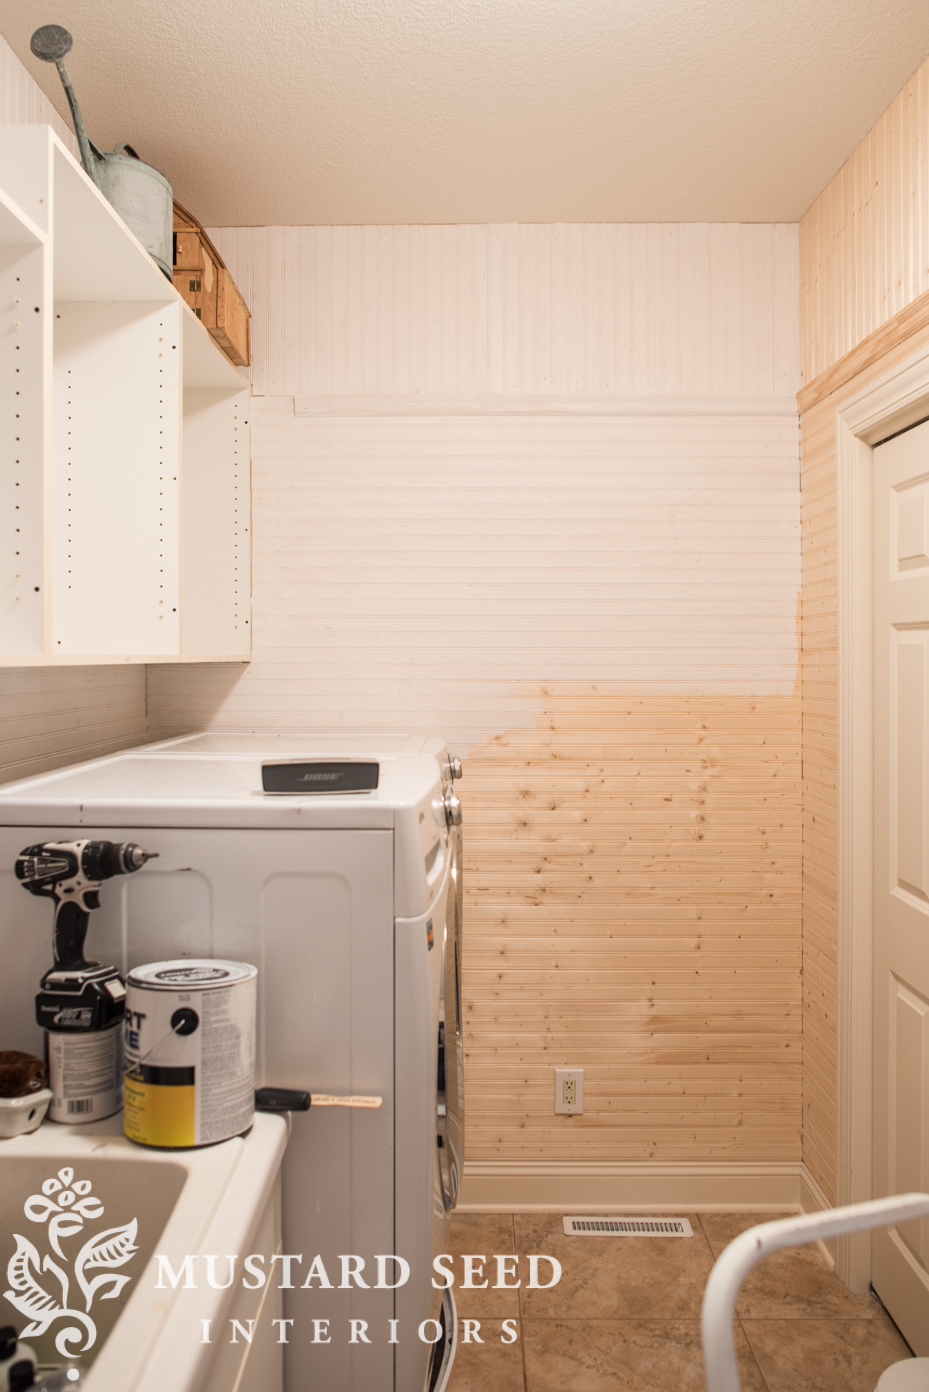
Partway through the process, I decided to remove the laminate cabinet doors and back the cabinets with bead board, too. I was thinking through all sorts of options to make those laminate doors look less-laminate. I looked into cladding them in bead board or adding trim (both would prevent the doors from opening) or even replacing the doors with unfinished wood doors (too expensive), but removing them was free and maybe even more impactful.
It opens up the room visually and totally changes the look of those cabinets. The downside is I lose the closed storage to hide ugly things, but there wasn’t a lot stored in the cabinets and much of it could be relocated. For example, the carpet cleaning shampoo and attachments could be moved downstairs to the utility room with the carpet cleaner.
I’ll use the open storage for cleaning and gardening supplies along with some other pretty things that are currently behind closed cabinet & closet doors. If I was tight on storage, I would’ve just kept the doors and painted them, but I could afford to ditch the doors. Actually, I didn’t ditch them. They are in the basement utility room as well and I can always put them back on if ever I miss them.
So, once the woodwork was done (except about 4′ of trim that I needed to pick up to completely finish), I primed everything. The trim, the doors, the cabinets, the walls…everything. It was a lot of priming!
I love how the beadboard looks around the transom window.
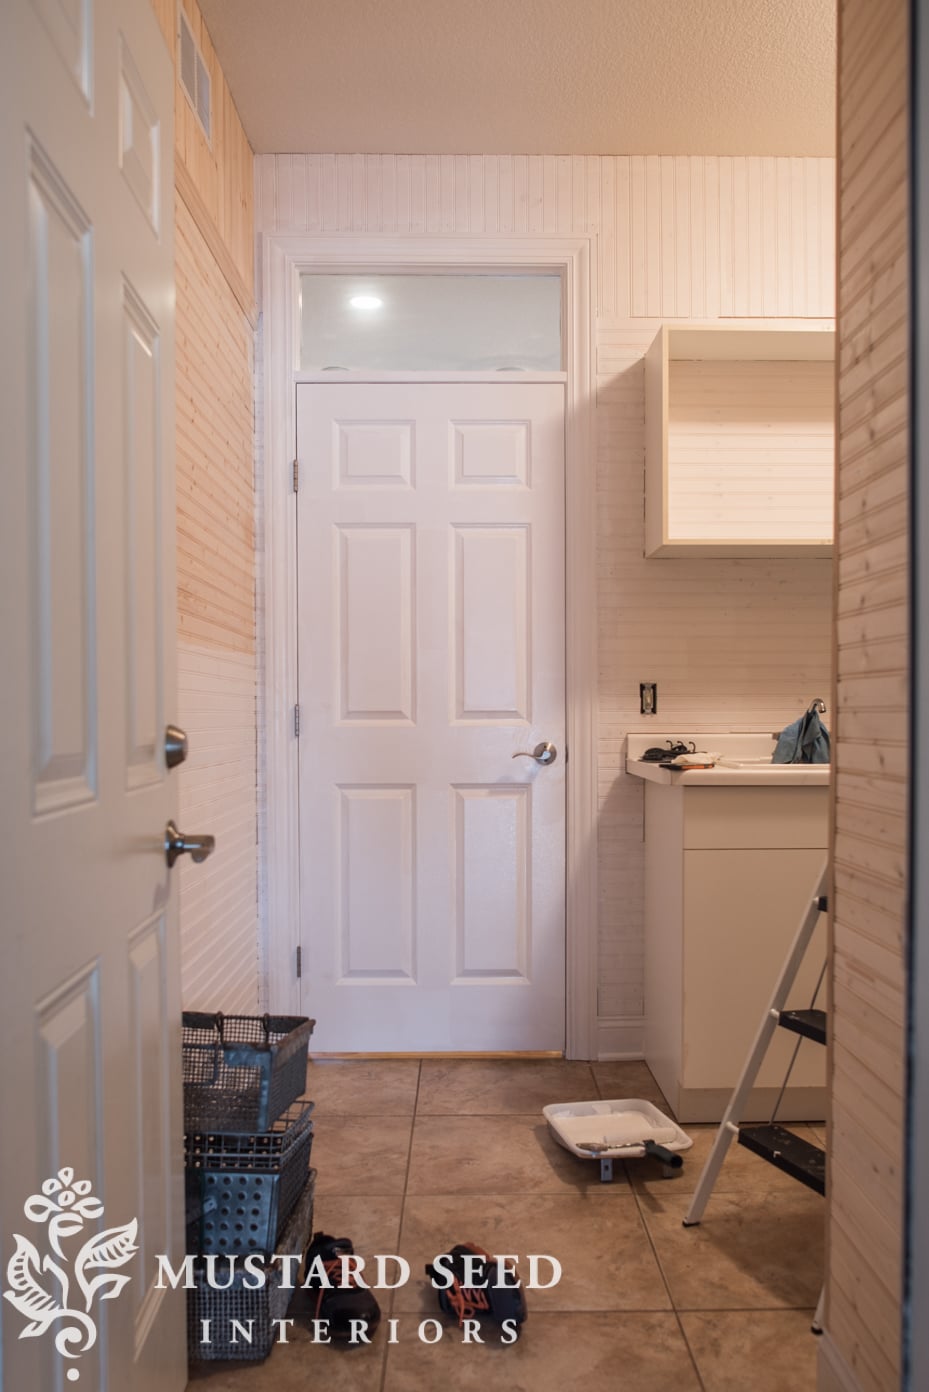
And, oh, what a difference it made to paint it all out in white.


It took me 2 1/2 days (off and on) to do the trim and about 3 hours to prime and then I was pooped the next day (Saturday). I did get going, though, and finished the caulking, installed and primed the last bit of trim, primed the corbels (for under the cabinets), and then started painting the doors (Coventry Gray) and cabinets (my custom Boxwood green). The walls and trim will all be painted in the same white as my kitchen cabinets and the trim in the rest of the house.
I will share more details in a follow-up post, including the tools I used, tips on installing this kind of beadboard, paint colors and finishes, organizing the space, etc…
You can find the rest of the series here…


Wow!!! What an amazing transformation, its perfect and flows great from your kitchen. Won’t Jeff be surprised when he returns and I’m sure proud of you. It’s funny how much more I get done when my husband is gone, but always glad when he returns. Can’t wait to see the finished product!
Marian..wow..is right..this looks so good..I really like it..and it gives me an idea when I do my laundry room..I wanted to ask you where you purchased your bead board, and did you have to put “seams” on your wall’s, for the “width”..in other words…was the boards the same “length” as your walls were wide..didn’t know how you “hid” the seams…if any at all..Your home is looking so pretty…thank you for sharing…
Good question, as I was wondering the same thing. How did you manage no seams?
I absolutely love it and can”t wait to see the completed after 🙂
Love it! I think the Boxwood will look awesome, can’t wait to see it. And looking forward to seeing what lovely lighting you put in there. We call the current one boob lights 🙂
Marian, I love your choice of colors and you’ve done a fab job, like always!! For many years my great grandparents, then grandparents, and finally my parents owned a cabin on our church campgrounds. The campgrounds were sold about 10 years ago, but your color scheme brought back some fond memories. All the cabins on the campground were painted white with this shade of green for the trim. It looks very much the same green as your boxwood. I just love this combo cause it holds tons of memories shared by 5 generations that attended camp every summer. Blessings!!!
Amazing transformations! Thank you for the idea!
I’m always amazed by how much you’re able to accomplish in such a short burst of time.
Can’t wait to see the restaurant of the story.
I can’t wait to see what “restaurant” Jeff takes her to when he gets home and see everything she’s accomplished, either! hehe
So how is this beadboard installed, do you just screw it into the studs here and there? Those tight and skinny spots around the door frames look like no fun to do!! But of course, it all looks great! Even with the laminate. 🙂
I used finishing nails into studs.
Marian, you have done an amazing job!!!
Oh, I love this! My laundry is a combo of machine and rear entrance. I have been debating on what to do with walls for months. Wainscoting below, wallpaper above? You’ve just given me another option! Thanks!
Oh, I love this! My laundry is a combo of machines and rear entrance. I have been debating on what to do with walls for months. Wainscoting below, wallpaper above? You’ve just given me another option! Thanks!
Looks great…my laundry room is in need of a “makeover” but I am currently concentrating on my master bath…TRYING to stay focused. I am watching intently because we have VERY similar floor tile in our kitchens and laundry rooms and I just know you will do something with yours someday soon…hoping! Something that won’t required that I move into a hotel while they bust up ALL the tile!
You have always been a source of inspiration for me. What amazes me is your confidence to just go on and do it. Thank you for sharing and inspiring others. I am going through some major changes and I want to hold onto your fealessness.
If you decide that the shelving needs a “door” you could always make curtains for the boxes and use tension rods. This would give you an opportunity to showcase some of the fabric you designed.
As always…..fantastic job.
I can’t get over the change in the cabinets! With the beadboard in the back of the cabinets, it now looks like shelves hung on a solid beadboard wall. Fabulous job! Also wondering if you had seams where end of beadboard meets the next sheet. I can’t see ANY seams in your pics. You are either very lucky with the layout or you disguised them like the artist that you are – LOL!
I actually didn’t use sheets of bead boards, but planks!
OH! Thanks for replying. I should have thought of that as my husband has used those before.
Really interesting one Marian thanks so much for the inspiration. 🙂
Looks fabulous! I’d love to see a Barn Door on the entry to laundry room. Maybe it would be too much, but what a great spot for it.
Mary Beth
Everything you do is done so well…your taste is timeless and classy. I remember you shared the brand of the bead board on your stories, but I don’t remember what it is and where you bought it….please share again! I can’t wait to see the finished room!
Fabulous. I am still dreaming about painting a cupboard in my kitchen boxwood green and now this!!
My laundry room is small too. What I found is that not having the risers for my washer and dryer give me folding space and hanging when needed. I loved mine but love it more without…..
Can’t wait for the final post on this!
Someone else suggested that, but the drawer under my washing machine is actually a little washer that I use for delicates and items that need to be hand washed. I love that little washer!
Looks great!!!! You mentioned on Instagram that you were not doing behind the washer and dryer. mmmm…. I recommend you save a supply of the wood as washer and dryers don’t last as long as they used to. It would be a shame, after all your hard work, you need new appliances that end up being shorter. Sometimes wood gets discontinued and then you will be short on the matching wood. AND don’t ask me how I know this!!!!!!!
Very smart and yes, I have some extra bead board if I need it. I was able to put it mostly behind the washer and dryer, but it’s not all nailed in.
How did you manage the bead board behind the washer and dryer????? Can you take a picture of that for us (pretty please)?
Thanks!
I just slid it behind and nailed it as far in as I could. It’s not completely done or painted, but you can only see that if you really look for it at the right angle.
And, by the way, it looks FABULOUS! I can’t wait to see the finished product!
Lovely. You never disappoint and always inspire.
I can’t wait to see it all completed.
“Marian’s general store coming soon!” Some ideas….distressthe beadboard in some places then do something to make the wood turn gray there…..shelves instead of cabinets….crown moulding…..paint the tiles……..find vintage doors and sink!
Jeff is going to be so proud! It looks great and is amazing technically with all those mitered corners! Great job!
You are one heck of a woman….i have parkinsons and stage iv melanoma but reading about your “activities” gets me up and out of my chair and improving my house! The only difference between now and then is i am slow ….. I admire you much.
Leann B. Of Dallas Tx
I’m sorry to hear about your health, but I’m so glad you’re inspired to be creative in your home! It doesn’t matter how fast or how slow you are. Good for your for doing it!
Oh my gosh, that looks so good! It reminds me of the walls in an old farmhouse. Totally in love with it !
Gorgeous, and not even done yet….I’m starting to see that floor painted, black and white, can’t wait to see it done!
Dang! You go girl. Looks great! Like I said before-I wish I had your energy!!
(and your great sense of decorating!)
Woo-hoo! What a great job you have done and done on your own. I guess with something like that, I would have talked myself out of it thinking I couldn’t do it by without help.
Can’t wait to see how the room looks when you are all finished.
WOW! Way to go Marian! You did that! Can not wait to see it all done. What a difference already…
Like most of what you do, it looks great – can you please tell us the width of the bead board?
It looks narrower than that in the inspiration (bedroom) photo.
Was that deliberate because your room is smaller?
Or is it an optical illusion…
Hi Marian: I have read you for years and never commented. I enjoy your blog and it has inspired me to start a blog of my own “for the love old.net”. In 1997 I did some research into painting laminated cabinet doors, I found it could be done and I have never had a problem with them chipping or peeling. Very similar to yours I added molding around the perimiter to change the look of these very boring and contemporary looking cabinets gluing the wood to the surface, securing with brads and I then primed them with oil base primer and painted with oil base paint.
They have metamorphosed 3 different times with 3 different colors of paint and i still have no chipping or pealing. As you well know it’s all about the prep. They look like custom cabinets and no one knows but me that they are cheap builder grade cabinets. Good luck. Shelley
I so admire your decorating style and courage and just do it attitude! I have been following you for years and years and we live in Rochester also. Practically neighbors!
Please consider holding a tour when you are finished making over your beautiful house. Or open a store, teach classes, etc. Almost every house in Rochester has your “before” orange oak trim and cabinetry. Your transformation gives me hope for my own home!
I can’t wait to see your final mud room after!
Well, yes, if you live in Rochester, we are neighbors! I’ve learned that it’s a small town in many ways, so we’ve probably crossed paths at one point and didn’t even know it. 🙂
amazing , love it!
come on, open the closets for us , just want to see , but your before picture gave me peace
LOVE this look……thinking of borrowing this idea for my master bedroom redo 🙂
Dear Marion, you are a He-Women! I don’t think that there is anything that you can’t do and do well. I like the fact that you will try and when blocked by a problem you face it head on and complete the project. Beautiful work on the wash room! Thank you for sharing your great projects, I am a big fan.
xx Jo
Love this! Did you butt the bead board planks right up to the baseboards or did you remove them and reapply so there’d be a lip? Love your blog!
Do you hire out?!?!?!? Husband and I are too old to begin projects like this………they’ll never get done even if we start them! LOVE the horizontal beadboard!!!!!!!! We used to live at the beach and had beadboard much throughout our house (had a great handyman then!)……….the look is so clean!!!