I received several requests for the tutorial on building a simple DIY farmhouse table (with just a drill) that was published in the October 2011 issue of Cottages & Bungalows. I just got the “thumbs up” to publish the full tutorial on my blog, so here you go!
DIY farm house table | materials & tools
Pine lumber –
3 – 1” x 12” x 6’ (top)
2 – 1” x 3” x 64” (apron/frame)
2 – 1” x 3” x 28” (apron/frame)
2 – 1” x 3” x 26 ¼” (bracing)
2 – 1” x 2” x 28” (bracing)
2 – 1” x 3” x 28″ (bracing)
Four pre-turned legs, 29” high
Electric drill
One box self – drilling 1 ¾” wood screws (matching bit included in box)
Clamps (optional)
Router (optional)
Wood filler
Putty knife
Fine grit sanding sponge
DIY farmhouse table | instructions
1. On a level work surface, set out the four pine lumber pieces cut for apron in the shape of a rectangle. The 64” pieces should run parallel to each other and perpendicular to the 28” lengths. Working on one corner at a time, set the two meeting pieces of lumber on end and butt together, forming a right angle. Clamp to work surface to hold in place. If clamps aren’t available, have one person hold the pieces tightly together while another screws them in place. The 28” length should be on the outside of the joint and three self-drilling screws will be inserted through it into the end of the 64” piece. A scrap piece of lumber can be used to prevent clamps from marring the wood. Repeat on three other corners, making sure the joints meet in the same manner as the first joint.
")
2. Place a pre-turned table leg on each inside corner of the rectangular frame. One at a time, clamp leg tightly into place and insert four self-drilling wood screws from each side corner. Position screws so one doesn’t run into another. Repeat with other three legs.
")
")
")
3. Determine which side of the 12” wide planks will make the top of the table and lay all three face down on work surface. Place two to three medium-sized nails between each board to ensure even spacing. Lumber can be butted tightly together, but this slight gap will enhance the cottage look of the table. Place assembled table frame and legs upside down on table top, centering it. There should be a 3” overhang on all sides. Position two 1” x 2” x 28″ pieces inside rectangular frame. Lay them flat to underside of table, each spaced about 1 ½ feet off center. Screw into underside of table top. Place each 1” x 3” x 28″ piece perpendicular to brace just screwed into table top. Screw into place at each end through table apron and into flat brace. Insert two last brace pieces (1″ x 2″ x 26 1/4″) , laying them flat between the legs at each end. Drive screws through apron into each brace and screw to table top.
")
")
")
4. Use a putty knife and wood filler to fill screw holes. Allow filler to dry and then sand smooth with a sanding sponge. Use the sanding sponge to smooth any rough edges of the wood. Optional: A decorative edge can be created on the table top by a router, if desired.
")
")
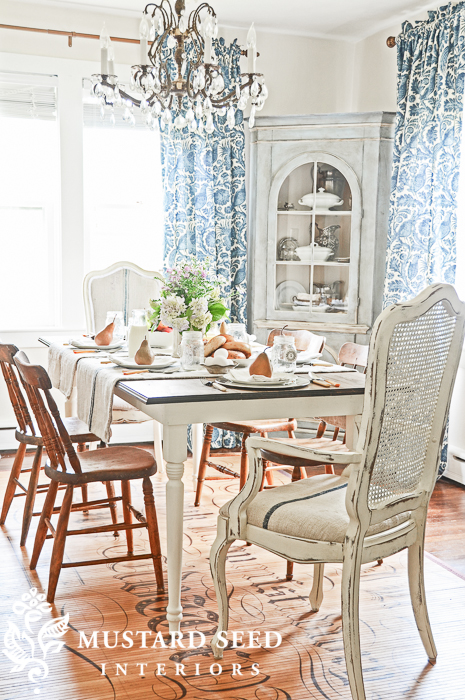
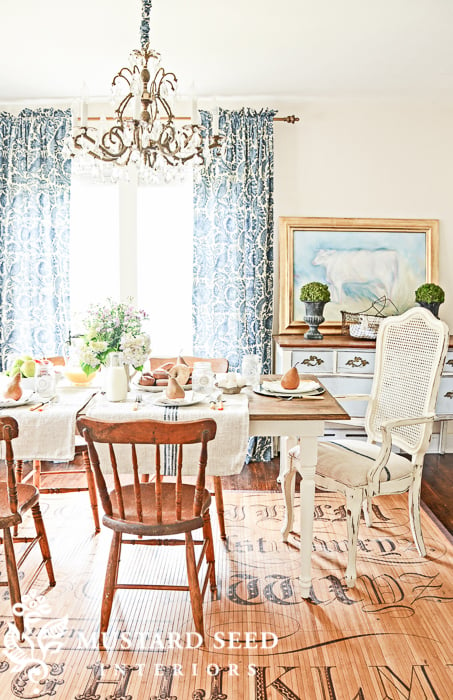
5. Finish table with stain, paint, wax or polyurethane. This table was finished with a medium stained top protected with furniture wax and a painted base.
")
")

If you are interested in getting the full issue, which is lovely, you can purchase it online through Beckett Media. You can also subscribe, if you haven’t already!

If you’d like to connect with other C&B readers and discuss some of the articles and features in each issue, you can “like” Cottages & Bungalows’ Facebook Page and join in.
You can find more simple woodworking projects on my blog HERE.


What was the actual color of your stain, and what type and color of paint did you use for the legs.
It is beautiful, and I see this as a project coming up in the future at our house.
The stain is a mix of gunstock and dark walnut. I wiped on the gunstock and then the dark walnut over that. The base is painted in ASCP Old White, but Creamy by Sherwin Williams would be a good substitute.
Thanks for the tutorial, Mariam! Can I follow up Jackie’s question with another one? How many coats of stain did you use each of gunstock and dark walnut? And did you layer the stains on one right after another (first gunstock, then walnut, then gunstock, then walnut, etc.) or did you let each coat dry before adding the next? Sorry–I’m totally fresh at this DIY thing. Looking forward to making this table with my hubby soon!!
Sure thing! I applied one coat of gunstock and then immediately applied the walnut, without letting it dry in between coats. The gunstock has reddish undertones and then the dark walnut added some depth. Both colors are made by minwax and the small containers will work for one table top.
Just another idea for making your own table. I bought a big table at a garage sale for $10. The top was white ceramic tile with a 3″ wood edging around it. It had 4 white, very heavy, thick turned legs. I didn’t like the look all together, but the legs unscrewed from the top and made great legs (repainted cream) for a new wooden, stained top. Even the “apron” was usable, and a friend wanted the ceramic top for an island in her potting shed.
Recycling perfection!!! Yummm! I love it when that happens. I even think $10 was cheaper than buying the legs and they were more substantial than the ones I found at the big box lumber centers. Speaking of boxes, it’s great to think outside of them!! Love your website, very inspirational!
Now if I can only convince my husband 🙂 Maybe if I print this out and leave it on the 35 year old, chipped whobbly dining room set long enough!
Happy to see you post this! My farmhouse table was one of the pieces that you recently picked for a favorite on your blog and we are getting ready to build another. This one will need to have some sort of leaves and we may have to wing it. Not the easiest thing to figure out!
xo
Fabulous tutorial! I’m definately inspired to make one for my home. Thank you for sharing.
AHHHHH I want a farm table soooo bad!! That is the coolest tutorial! Thank you
so much for showing us how to do it ~ It is gorgeous!!
xoxo
Lori
Thanks for sharing the how-to on the table. I love your diningroom!
Love the table! I just might have to try this. 🙂
Marian, you did a wonderful job as usual. I had my dad build a farmtable for me about 10 years ago, only I had him make it counter height. In those 10 yrs, it has been used as a table, a island and a studio table at the present time. I may post it, because you have now given me the courage to paint it white 🙂
Thanks for sharing
It sounds awesome and it’s so great your dad built it for you. What a special piece.
That is SO funny, I was just pinning farm tables this morning! Thank you so much for this tutorial, I would love to build a table with some reclaimed old barnwood for the top. (Someday!) So exciting about your lovely dining room in C&B! Congrats!
Very nice! Looks fairly simple. We have a salvaged wood table in our kitchen right now. I bought it before I knew it was trendy!
OK….so I loved your table aready, but now that I see you made it……WOWSER!!!! I am really impressed! You did an awesome job! I am planning on making one too. SO I really appreciate you sharing your tutorial. Helps me with some ideas. (wink)
I love farmhouse tables. You make me think I could actually build one myself. Thanks for the tutorial.
Marian! Thanks so much for sharing! I’ve been wanting one for quite some time, but hadn’t stumbled upon a “fix-er-upper”… I’ll just make my own!!
awesome tutorial! i’m forwarding to my friend who wants to build a table. thanks for sharing!
Sarah
Thanks so much, I have several finished table tops and now know how to attach the legs and make the apron! I’d also love to win the free subscription…love that magazine!
Oh, I would love to try this myself! Great table.
Thanks for the tutorial. I want to construct a console table and I’m going to modify the size, but basically follow your steps. Fab work again!
You make that look so easy. It is gorgeous. I don’t have any need for a dining table right now, but I love the last comment to modify it for a console table. Now that I have room for.
This looks very doable – thank you for the clear tutorial! I love the C&B magazine!
The table looks wonderful and so easy to make. Wish I knew about it before buying mine from PB!
Love that table! I’m looking for a table to use on my sunporch to do my projects on. I really think that would work! Now, all I have to do is convince my hubby to make one for me….thanks for the tutorial!
Lovely work! Great, clear instructions.
I recently subscribed to Cottages & Bungalows (thanks to your blog!) and love it.
Wow!! I can do this! Thanks for the tutorial. I love Cottages & Bungalows!!
Hi, Marian! Makes me kind of wish I needed a table, just so I could make this great project! Have a great week!
Thanks for posting this tutorial! I looked everywhere for this issue of C&B and couldn’t find it. Your table is beautiful!
I can’t believe the tutorial came today. I was just telling a friend about the table yesterday!
wow…what a great and easy tutorial…hoping to get around to it at some point!!!
We have a beautiful table that belonged to my DH’s mother and I hate it! It is too delicate for our life style, we do homework, art project, I use it as a desk, and my dream is to have a simple rustic table that can be seriously aged with our usage.
I wish I could convince my DH, this table seems to easy to make, I bet my son would love to help build it. Thanks for the tutorial.
Yes, it was really simple and doesn’t need any specialty workshop tools. It’s very sturdy, too.
Great tutorial and I love the table – have seen it many times in your posts. It is on my to do list!
Thanks!!
Adore this table! May try it one day soon. Please enter me in the giveaway!
Thanks!
~Donna~
Great tutorial! You make it look very doable!
Sure would love to win a subscription! You can never subscribe to too many magazines.
Never thought that a diningroom table could be constructed with just some wood, screws and a drill. It looks amazing.
I enjoyed your tutorial for the Christmas stockings in the December issue of Cottages & Bungalows. Because it’s quick and easy, I can make many of these in an evening for friends and family.
Thanks for sharing your talents with us.
Vanessa
Yep, I try to keep all of the projects very simple, so anyone can do it.
You amaze me!
Have always loved the table. Thanks for the tutorial. Would LOVE the magazine – a magazine freak is what I am.
This makes me sooo happy!!!! I picked up some lovely table legs from the road side a few weeks ago- Now I’m ready to have a go…….. great tutorial. I’m a visual learner so that’s just what I needed!
Oh yeah, this would be great with some old legs and a reclaimed wood top!
Just love the table. Thanks for the tutorial, now I can show my husband and he can make one for me.
Thanks
E
I love farm house tables. My daughter has a beautiful one painted a blue green color that sits in her GARAGE! No room for it right now.
Oh! that looks so nice. I love the painted wood with stained top.
I have my table that Honey made…and I’m thinking I’d like that look on this table. But he has the aversion to painting wood. Hmmmph! Men.
I don’t get that magazine. Glad you were able to get the post up here.
Pat
Wow, your table looks great. Thanks for the giveaway!! Would love to read the magazine. kradams54@hotmail.com
Cool tutorial! I don’t have room for a big farm table where I live now, but I have the furniture clamps! Thanks for sharing and good luck to me for the drawing! 🙂
Thank you for providing the details! I hope someday we’ll make the table! And keeping my fingers crossed for the magazine.
OMG I want,….no…I need one. Thanks for sharing the deets! Off to convince my better half to start making one! 🙂
Hmm… Our craigslist table is a disaster.. Maybe hubbie will make one if i drop a few hints. He did make our bed afterall.
I don’t know whether to laugh (as in he made the bed by tucking in the sheets and fluffing the divet) or be impressed (he made the bed itself with power or hand tools). So different, and yet described by the same phrase 😉
Your farm table is just gorgeous!
What an amazing table! Thank you for sharing the insturctions on how you made it, the staining technique was the best!
Love all your tutes! Thanks for sharing!
You are quite the carpenter!! Very nice!
I admire your enthusiasm for work!
I don’t think I will ever cease to be amazed at what you do! This table is gorgeous!
You make it look so easy! I love how it turned out and I love Cottages and Bungalows magazine.
Thanks,
Maureen
Ooooh. I’m really excited about this tutorial! I’ve wanted a farm table for a long time.
Thank you.
Love the table!! Wondering about the rug under table….where to get one like it?
LOL…I’m asked about that rug more than anything else. It’s a bamboo mat that can be purchased online from The French Freak.
Oh bummer…they’re not carrying the larger size anymore.
I LOVE the tutorial and would love to browse the Cottages and Bungalows magazine! 🙂
Absolutely wonderful! I did a spotlight of this post on my blog so my readers can see it too. I linked to your post here, thanks again for making such a wonderful tutorial! I can’t wait to try it.
http://ninered.blogspot.com/2011/11/spotlight-farmhouse-table-tutorial.html
Thanks for the feature!
Oh this is gorgeous! Thanks so much for this tutorial – I have always loved this kind of table. Now if I could just get the thumbs up from my hubby to build one 🙂 And I don’t suppose you have a tutorial on building that island that is pictured on the cover of this issue LOL Thanks for sharing this amazing DIY project!
Thank you for this tutorial! In our house, darling DannyO wields all of the power tools. I would love to try it, but he is willing and has a wood shop and everything. I think I am going to print this out and ask him to make it for me for Mother’s Day 2012. If I asked for it for Christmas, Santa would run out of time!
It is beautiful!
Melodye
That table is to die for! I’ve been dreaming of building one myself from scratch and really appreciate the information 🙂
Christa
I am definitely doing this! We tore down an old barn/chicken coop this summer and I wanted to build a farmhouse table with that wood. Unfortunately my grandfather (who was going to help me build it) didn’t think there wasn’t enough good wood (or big enough pieces) to build anything from it. Hopefully I can find a nice piece for the top!
Thanks for the tutorial! I wish I had known how easy it was to just build one of these tables before I went and bought one off Craigslist last year. When I got it home I realized the whole table top was buckling….now that I’m thinking about it, we could just use the frame and make a new top for it…thanks for the inspiration 🙂
Yep, that’s a great idea and something I’ve done before. With painting the base, it doesn’t matter if it matches the top.
Beautiful table!
Is it really that easy? It is beautiful. Thanks for posting.
Leslie
Thank you so much for sharing this! I have a couple of friends who have been looking for a table, but can’t find what they want. Now they’ll be able to make it themselves!
gertie
I love Farmhouse Tables. I wonder how hard it would be to make a round table…
Thanks for sharing!
Building a round table isn’t too hard. The principle is the same. Just build a square base instead of a rectangle one. Put your boards together and use a circular template and cut it out with a jig saw. It would be nice to also add a decorative edge to it with a router.
Wonderful table tutorial, simple and yet detailed enough to get it right and it finally solved my confusion on now to build a long ottoman – thank you. I might try the table too. What color paint did you use, i love the creamy almost white of it.
It’s ASCP Old White, but Sherwin Williams’ Creamy is a comparable color.
Trop génial! J’adore ton travail! Tu es formidable et c’est tout ce que j’aimerais savoir faire!
Bravo!
Have a great evening!
Hey Marian!
Now if only I can convince Mike to help me build this 🙂 Haha, he’ll say, “add it to the list!” 🙂
Take care!
~Kerry
God has so gifted you Marian..I am always so inspired by your work and posts…I would love to win this contest/giveaway….have a beautiful evening..Blessings 🙂
Thank you for the tutorial..I love the table..My husband saw your blog here and said do ya want one?…I couldn’t say yes fast enough..Thanks again..
Woo hoo!!!
Hi there, Lovely table. Sometimes the big issue in DIY is just convincing yourself you can do it and having a go. You make such a contribution to the first part on your blog! If the giveaway is open to international readers then I’d love to be in. Otherwise you’ll just have to draw again and I’ll quite understand. 🙂
(By the way Marion…you may not have realised how internationally famous you are, but us non-US people are avid readers too. Would it be possible for you to somehow give a clear idea who your giveaways are open to. So many are US only in the blog world but it’s nice to know for sure. Thanks)
Ruth in New Zealand.
Amazing! You make it look so easy! Thanks for the tutorial!
I just love that table. thank you for the tutorial and also for a chance for a giveaway. how nice 😉
Marian, the table looks great! I think I just might add this one to the “Honey Do” list 😉
Great tutorial and thank you for the giveaway.
I have wanted a farm table/harvest table for a long time. I’ll have to show this to my hubby. Maybe it will convince him that it CAN be done. haha. Thanks for sharing.
Love your table…will have to give it a try…
Also love Cottages and Bungalows and would love to be entered to win their giveaway! Thx
Yes!! This tutorial is just what I was looking for! My husband took our old table and make a version of this for me a few years ago and I have just convinced him that we need a bench instead of chairs on the side but we haven’t been able to find anything that didn’t seem like we would spend a month putting it together. Now I can take this and adjust the measurements for bench height. We may just have to do build it this weekend! Thanks!!
I love it and can’t wait to try it! Thanks for the tutorial! I would LOVE to win the subscription too!
I love you table. Just love it. Thank you so much for sharing.
Sheesh. Yet another excuse to persuade the hub to sell my pretty but dysfunctional antique table and chairs. They were just not meant to seat contemporary humans who are over 5’2! Thanks for the instructions Marian!
I don’t know you you do it, girl, but you do it very very well. I would love to sit at that table with you and your family and break bread.
Perfect! I have two windows that I would like to use as a table top and been looking for directions on how to make a table with ready-made legs. Thanks for posting this! 🙂
Thank you so much for the tutorial. This looks so easy. My husband is going to have a really hard time saying he can’t do this one! Looks like I’m getting a new table!!!
Your tutorial and pictures were very concise. I would love to try making a table. Love your combination of stain and paint, as always, Thanks for sharing!
Oh my husband is going to think I’m CRAZY when I tell him I want to build this table!!!
Hi My husband and I saw your article in the magazine and actually just built our table 2 weeks ago! I LOVE it! Thank you for inspiring us!!
Awesome! Send along a picture if you can!
i actually just posted it on your FB fan page. I’m not a great photographer but I think you can get a generally sense of the table there anyway. Thanks for responding!
I didn’t see if on my FB page, but I’m not super savvy in FB. Can you e-mail a picture or send me a link?
You make it look so easy! Very impressive. I would love a subscription. Thanks
Oh I would love to make that for my daughter-in-law. I think I have to have a subscription. Thanks.
This is beautiful!! Thanks so much for sharing! Now I just need to find someone to help me build one 🙂 LOVE it.
I love farmhouse tables! I’m hoping I can adjust your plans to make a great looking coffee table, thanks for all of the great details!
This is awesome…thanks for posting!
Thanks for sharing and what hardware do go to in your home town to get all your supplies ? I just loved the table great job
I meant to type what hardware store do you go to get your supplies ?
We bought these from Home Depot. My husband likes the quality of their lumber better than Lowes.
That table is awesome! And, I still drool everytime I see a picture of your curtains, I love, love, love them!
Great lesson. Wish I would of had this last week 🙁 I did my first stain job, came out fine but I love the mix of the gunstock and walnut. I used walnut only. Well now a reason to do another 🙂 Have a fab weekend!
Love the farm table. Thanks for the tutorial!
Great tutorial Miss Mustard Seed! Thank you for the free giveaway offer. 🙂
Sharon in chicago: ahh let me clarify.. My husband made the bed as in built a bed.. With beadboard and cedar stained mahogany. Hmm.. I think hes only made the bed as in tucking in sheets etc maybe 3 times in
7 years 🙂
Great tutorial!!! Thanks for sharing! I am pretty handy and this looks very “doable”
WOW!!! What a great project! Wish I had known about it before I bought my kitchen table!!
Ahhh! Thanks for posting this! I just had a WONDERFUL idea pop into my head! Pretty much make it into any length…{if you have the room} and the holidays around the corner!! You are such an inspiration!!
Love your work!
~*Jessica
I subscribed to Cottages and Bungalows because you mentioned the farm table tutorial. Unfortunately, when I read the article on the farm table and the chalkboard they didn’t make sense. This tutorial fixes the questions that I had about the farm table. Thank you!!
This is amazing, love it!
Great tutorial! I enjoy your blog and all the great information. I tried ASCP for the first time this year after reading one of your posts and I love it. I also tried the paint/stain combo on a piece of furniture and it turned out beautiful. Thank you for all the inspiration!
Thanks for posting – I was looking all over for the magazine and couldn’t find it. This is very helpful. I have an amazing dining room table, and this farmhouse table would be perfect for my craft room. Thanks for being such a generous person to share all the information that you post. Your blog was my door way into the wonderful world of bloggers. I pushed the little link on the Houzz feature and voila – a whole new world hiding in plain sight.
You are such an inspiration! I want to do this for our home, and can’t wait to go lumber shopping with my hubby!! Thank you for sharing all you have learned, and your talents; and helping to make our homes better places!!
Hi Miriam
Amazing…I love the table and the colours you’ve chosen are wonderful. I wish I could do something like that too. YOur pictures are very good too. Now I really like that colour….maybe I’ll start with using your colour choices on my coffee table. Thank you!
have a great day
and…please enter my day in your draw. I also have a US address cottage..if I win.
Judi
Lovely!
Love this table, thank you so much for the tutorial:) Would love to make one someday!!
Thank you for your blog, it is so inspiring!!
Lisa
Love the tutorial!! 🙂
Thank you!! This tutorial has inspired the next piece for my lil’ consignment space 🙂
lovely, simple table!
Great tutorial – making a table is something that I’ve been toying with for awhile. I was wondering if there is any problem (like swelling etc) with putting the boards together on the top rather than spaced apart. Do you find you have problems with crumbs or spills getting down the cracks or did they fill up with stain?
What a FABULOUS table and it looks pretty darn easy! Thanks for posting such detailed steps.
Wow, what a great detailed tutorial! Thanks for sharing!
I LOVE this table! Curious how much it cost you for supplies, excluding the stain finish and paint? I would love to make one myself! Thanks!!
Thanks for the tutorial! Definitely going to add this to the to do list. I love your dining room and wanted to ask where you found those gorgeous blue and white damask curtains? Thanks again!
So now I know that my list to Santa this year is going to include a few tools, because I’d love to make this table.
Hi! I love your table and my husband is getting ready to build it for me..with my help of course! 🙂 It looks like you used a router on yours? We have never used one before. Can you explain how you did it and at what point you used the router? Thanks!
Yes, he did use a router, but that is optional. The farm table in my kitchen has straight sides with the corners just sanded smooth. If you want a decorative edge, the router is used one the table is assembled. He just held the router and ran it along the edge. I think he used a ogee (sp?) edge for it.
just wanted to let you know that my boyfriend and i just built a desk using your tutorial. we modified it- used two legs and mounted the legless side to the wall in my office. we also lopped off the three inch overhang on the back side. this is the first piece of furniture we have ever built and we knocked it out in about 2 hours. thanks so much for such an awesome (and easy) tutorial!
Brace measurements Question. The supply list has four brace pieces at 261/4″ and two braces at 28″. Is it the other way around ? The photos show two short braces that meet up with the legs and four longer braces ( two perpendicular pairs) in the middle.
~ C
You know what…I think you’re right!
Can you tell me where you got the rug and curtains. I love them!
Thank you,
Michele
I am having some difficulty sourcing the screws – Lowe’s and Home Depot tell me that 1 3/4″ is a VERY unusual size for them. Can you tell where you got them from?
Thanks for this tutorial. I went out and bought C and B when the issue first came out, and am finally getting around to doing the project. I too am modifying the size to make a desk, and couldn’t find the 1 3/4 screws at Home Depot. I used 1 5/8 instead. They seem to work ok… although I am having a hard time screwing everything in with my drill – but I think that is just my inexperience. Thanks for the additional pictures, they really cleared up some questions I had, particularly about the bracing.
I love the rug. Any chance you made it and id so how?
Thank you for every other informative blog. Where else may I get that type of info written in such a perfect means? I have a mission that I am simply now working on, and I’ve been at the look out for such info.
I love the rug too, where did you get it?
Thanks
So, my wife gave me this blog post and wanted me to make her this table… I am half way done, but have a few issues. I have the outside frame complete and my legs in place and I am ready to start the bracing underneath. Here are my issues: 1) my 1 bys ended up being 3/4bys so I am half an inch short on all my bracing boards… I guess I should not have pre-cut my wood. 2) When you put the 28″ 1×3 on the outside for the frame and then put the legs on the inside you are left with about 22 inches… I didn’t see anything about cutting a 22″ 1×2 in order to use that as a brace… am I missing something? (I am talking about the last sentence in step 3 “between the legs” Where do the other 1x2x28″ boards go?
Thanks,
Reese
Thanks for this tutorial Marian. I did the slipcover for my wing chair already using your tutorial…. ..now I have a new project…but I think I’ll make a couple of sidetables with this …..thanks for giving me the courage and guts to try… Love ya girl.
Marian,
Where did you find the turned legs for your table? I would love to make a table with legs like yours and our HD doesn’t have them. ;-(
Thanks,
Cindy
Cindy,
I think she got all her supplies at Lowe’s you can give them a try. Or any of your smaller home improvement stores might have them.
deana in Texas
Just found your site and love the tutorials…was wondering did you do the bamboo rug the table sets on or from where was it purchased. Love both the table and the rug…
Really great tutorial just wanted to let everyone know there is one mistake in the dimensions of the aprons. The tutorial calls for 3″ overhang on all sides but tells you the short side of the apron should measure 28″. This would give you a 4″ lip on the long side of the table. Which is fine just thought it should be corrected. Other than that my table turned out great. Thanks
Where is the rug from? Love it!!
Where is the rug from? Or how did you make it? It is perfect! Thanks.
Thanks so much for this tutorial! My nice big brother finished this for me today, hubby is not into wood working, and since I have a precious baby in my belly I needed some help! My question is: I have fiddes & sons and annie sloan stain wax but we will be using this table daily with little ones so should I stain and then use hemp oil, or will the wax be fine?
Where did you buy the turned legs from?
This is the easy instruction I’ve been looking for. I nabbed four heavy farmhouse table legs for $20 and beautiful old boards at another place.
Your tutorial gives a way to build my table without having to buy (and operate) an expensive bisquit jointer just to make one project!
Would love to post a pic when I’m finished, is there a way?
Thanks again.
I’ve been thinking of buying a farm table ever since my family is growing, but now I’m going to give this a try and save money. Thank you!
Would love to find out where the rug is from? Thank you!
I do not understand how this table is sturdy. The legs are very narrow and the frame is very thin. Is there something I am missing in the directions that makes it sturdy?